After completing my first two gravel ultra-endurance races in 2024, I decided to add another two medals to my collection in 2025 – and I managed to successfully complete both.
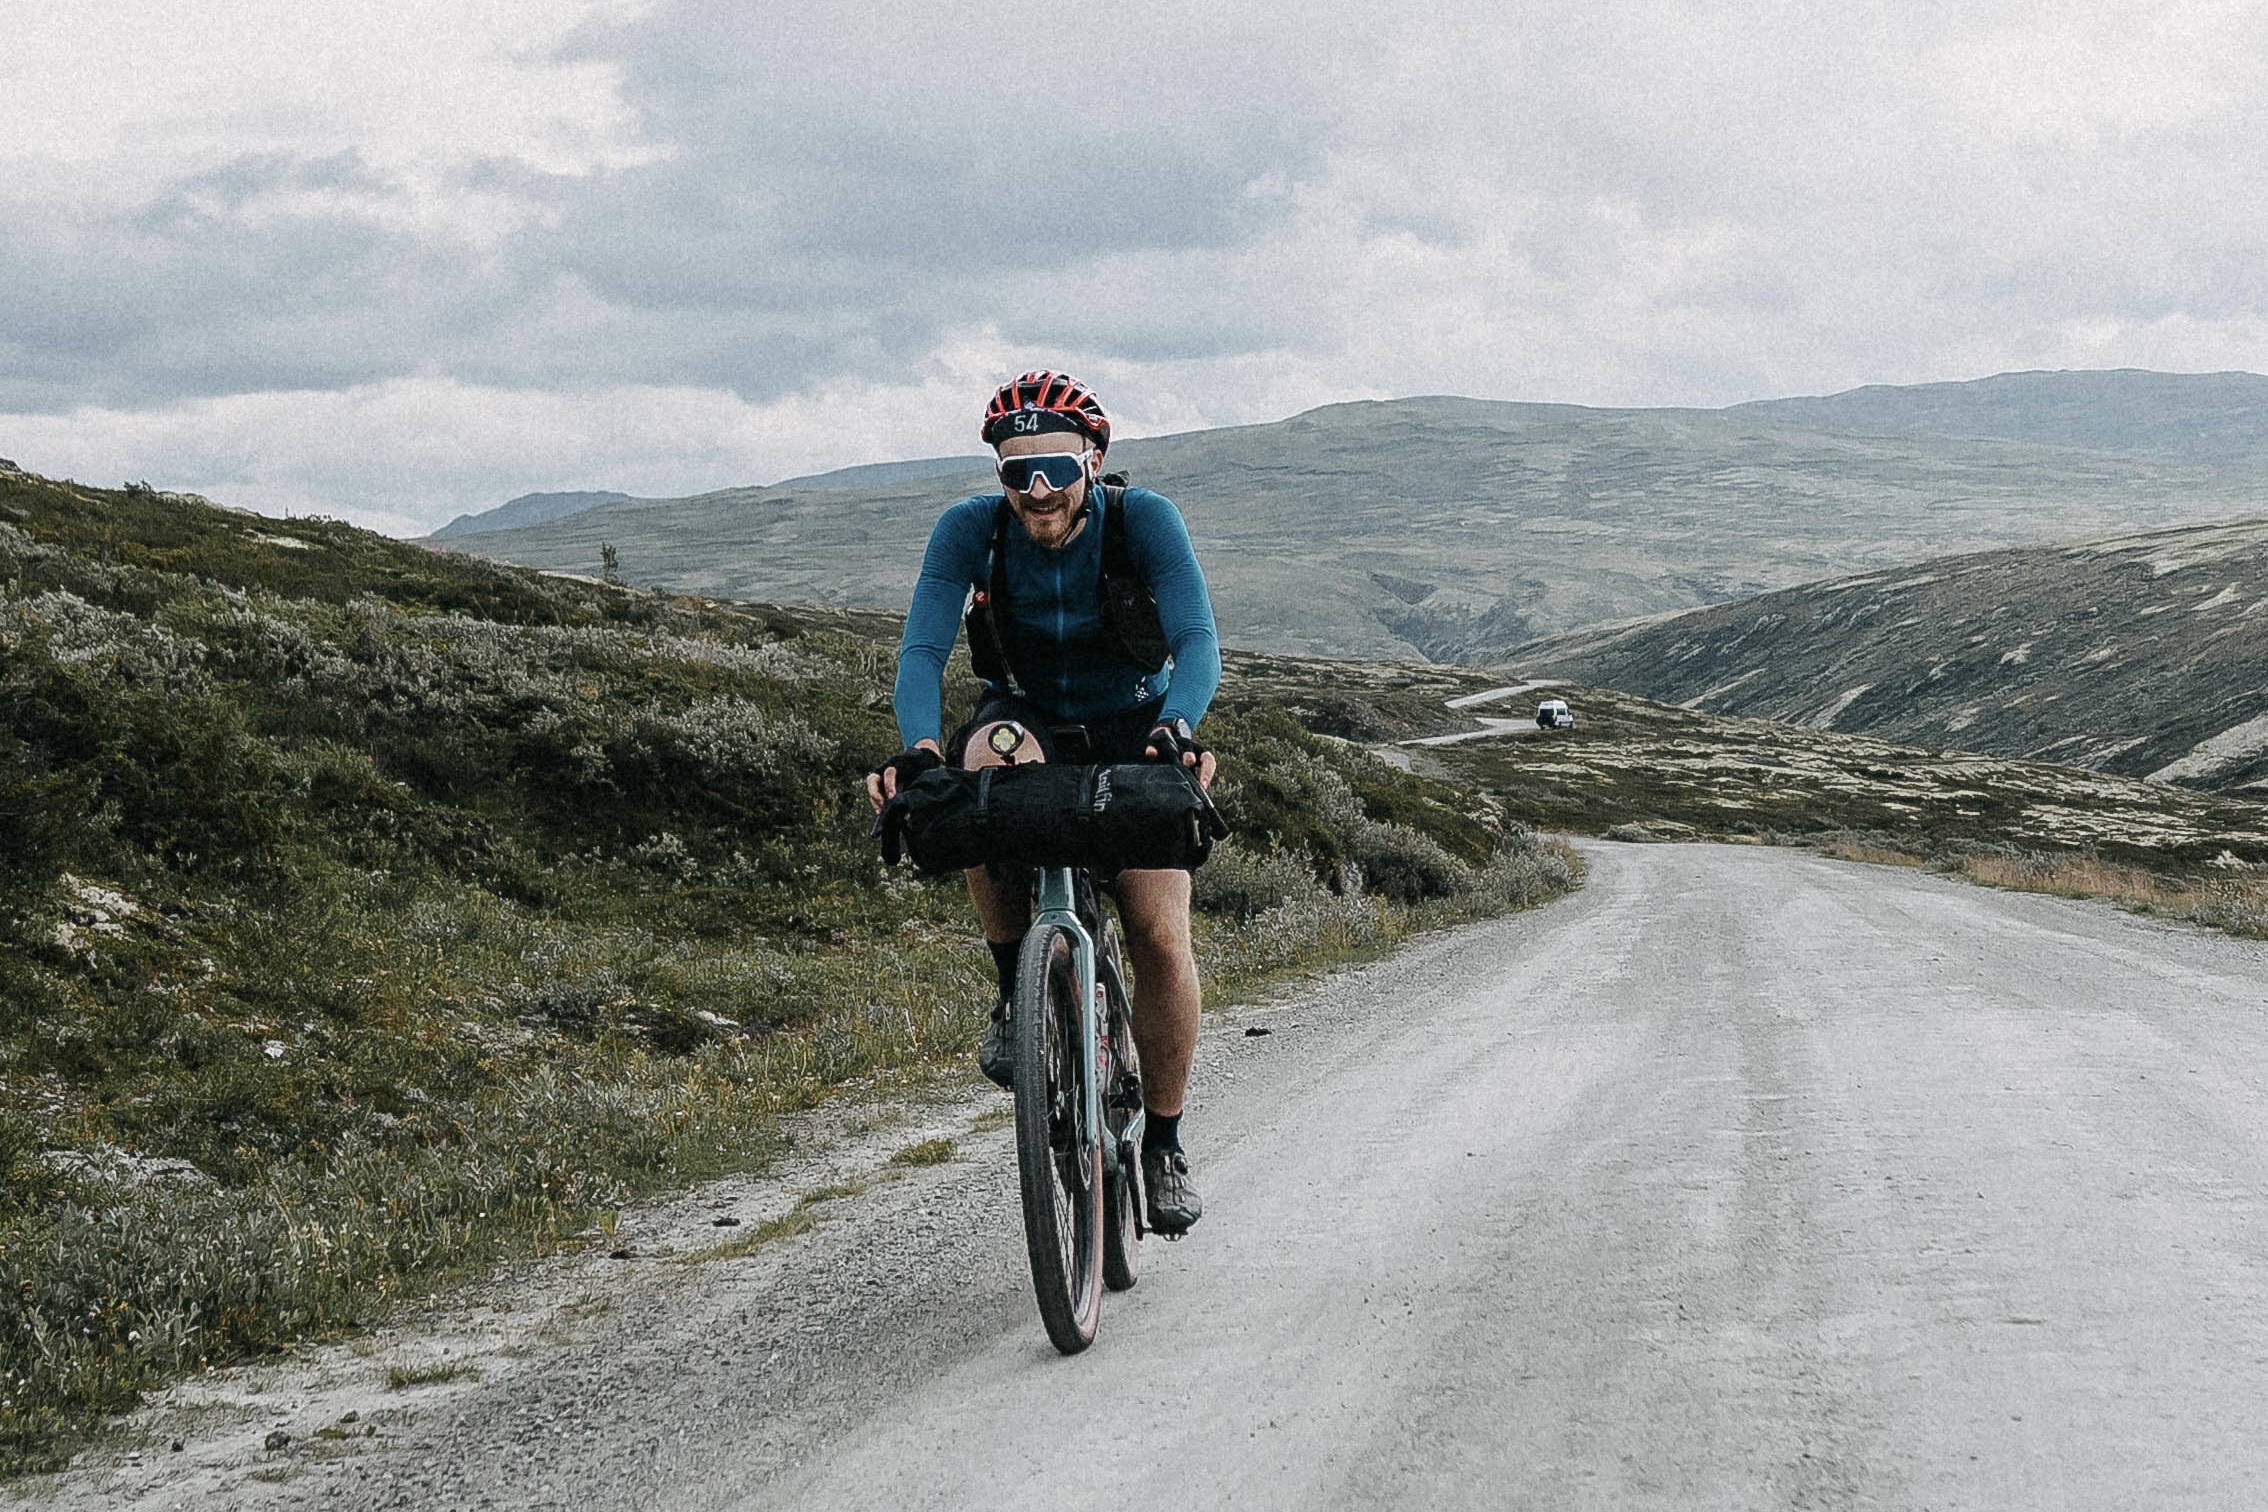
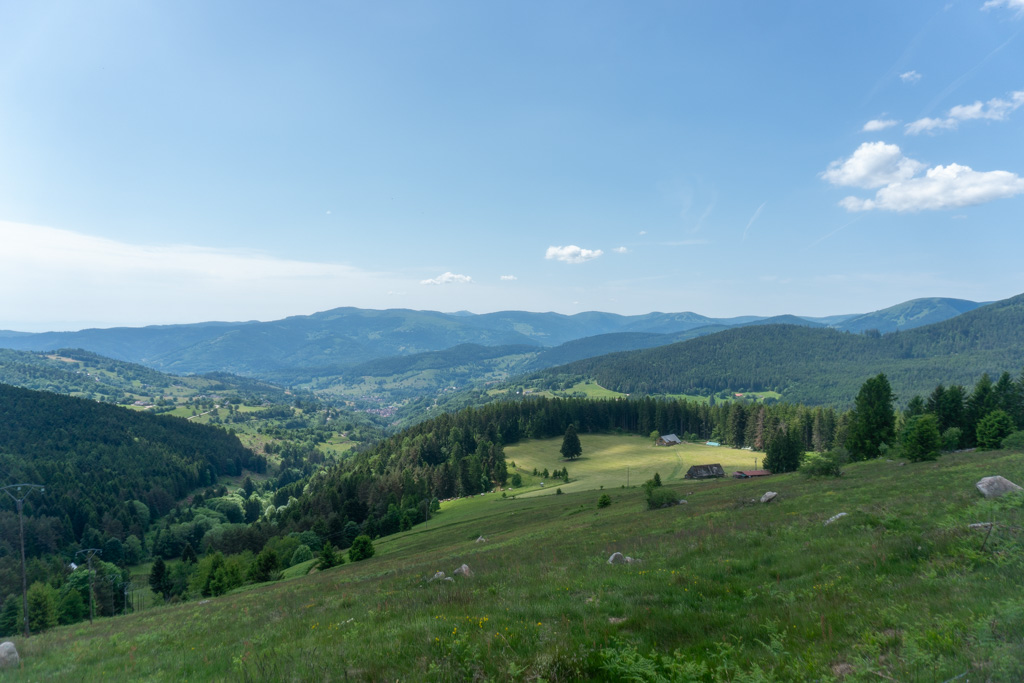
First up was Mother North, a 1,008km loop in Norway with a mighty 16,781m elevation. Although the country’s pristine Champagne gravel network wasn’t overly technical, the elevation and rather iffy weather definitely made this ride rather challenging.
My major low was having to ride 60km in the worst thunderstorm of my life through a remote area to a pre-booked hotel and coming dangerously close to catching hypothermia. But descending off the top of a glacier that opened up with views of the fjords is a memory that will be seared into my brain for a very long time.
Next was Across Andes, an 806km route in the La Araucania region of Chile with 12,111m elevation. Although those stats are less impressive, I severely underestimated this race’s difficulty.
Chilean gravel is unlike anything I have ever ridden and the palm-pummeling terrain required lots of concentration and care, with steep climbs galore and a generous dose of hike-a-bike. The first day in particular came close to breaking me.
Both races have given me memories to last a lifetime.
Another highlight outside of my races was bikepacking the Traversée du Massif Vosgien with two friends in France. I’ve also enjoyed my fair share of epic road and gravel rides at home here in the UK too.
Naturally, my six Gear of the Year picks are items I’ve relied on during racing and training, so you can be rest assured they’ve been thoroughly tested!
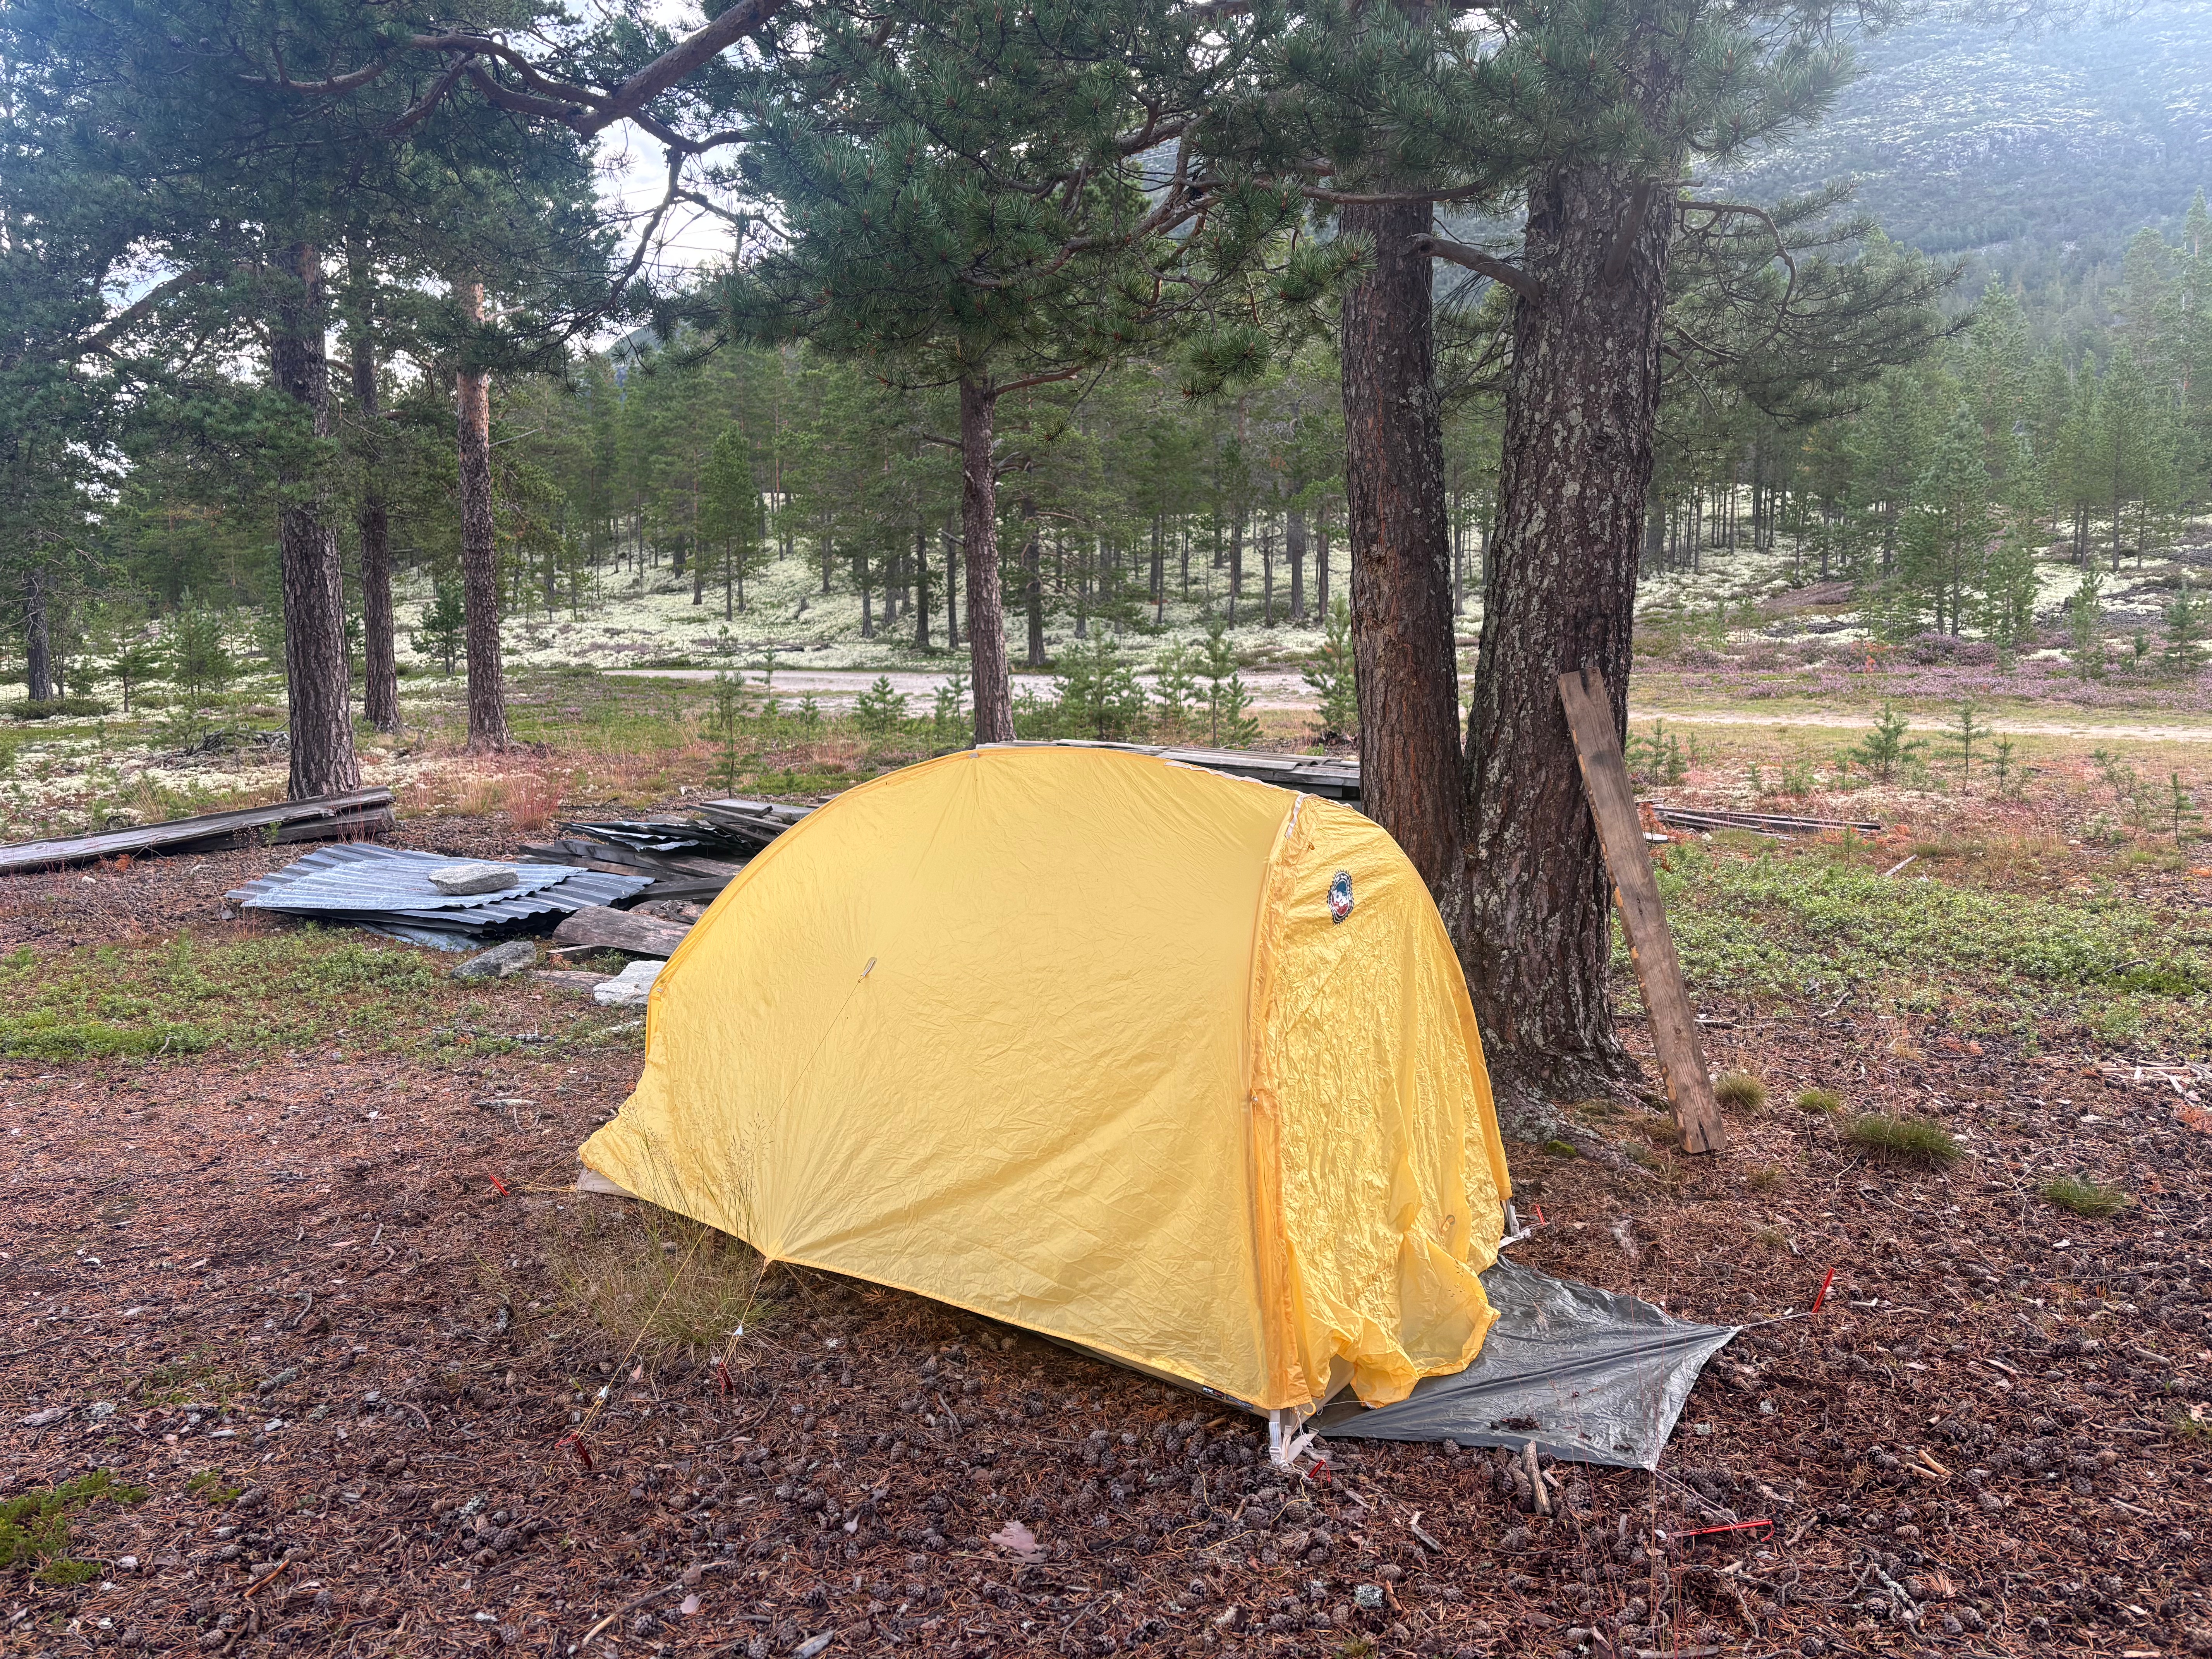
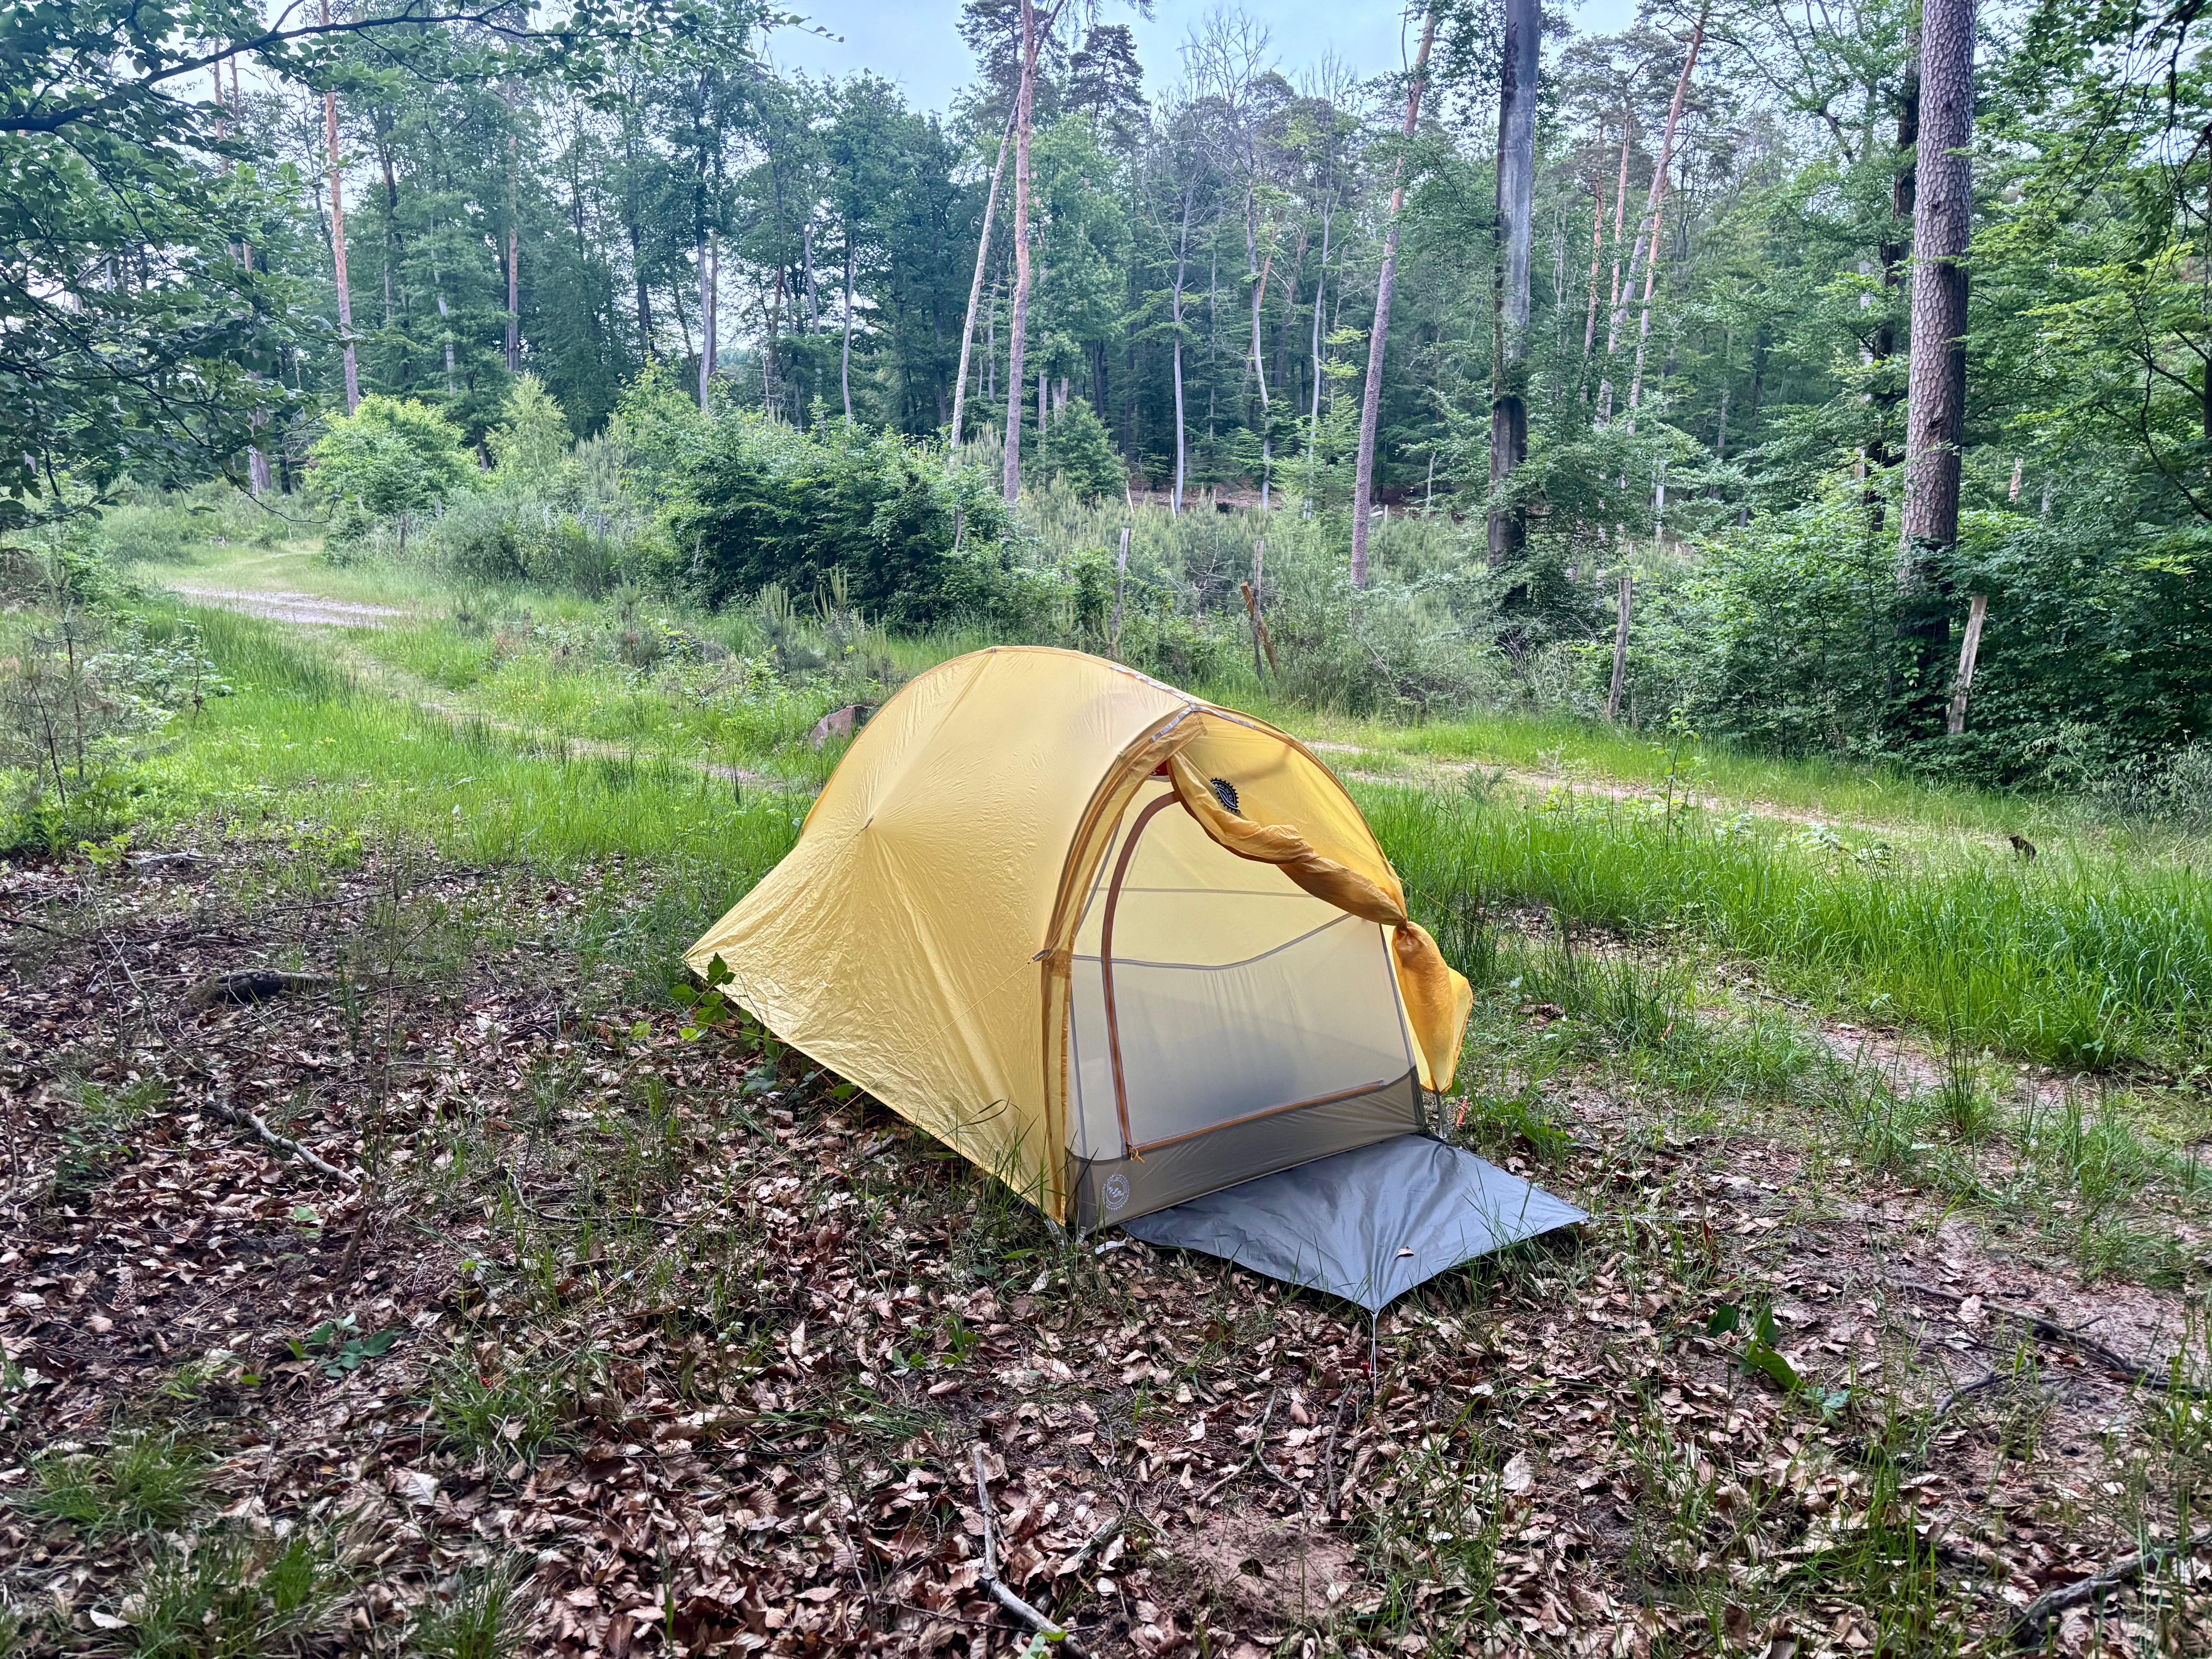
Big Agnes Fly Creek HV UL1 Bikepacking Tent
This tent accompanied me on four adventures this year. Oscar Huckle / The Cycling Meister
While you don’t need the most expensive tent to go bikepacking, a premium option certainly helps in terms of weight and overall footprint – and this Big Agnes tent has become a firm favourite.
This bikepacking-specific Fly Creek uses a shorter 12in Shortstik Poleset over the DAC Featherlite NFL pole system found on the backpacking variants, saving 11cm.
Big Agnes also incorporates some cycling-friendly features, such as a helmet holder on the outside and daisy chain webbing to hang clothes off – features I’ve made great use of.
Although only a one-person tent, I find there’s enough room to not feel claustrophobic when inside.
It all easily fits into a pack, which can function as a handlebar bag, although I prefer to keep the packed tent in my Tailfin CargoPack or inside a separate bar bag, so I can combine it with other items.
I’d recommend investing in the footprint. Oscar Huckle / The Cycling Meister
The Fly Creek has accompanied me on four trips this year – both the aforementioned races (although it wasn’t used at all in Chile), my French bikepacking jolly and a weekend trip on the Trans-Cambrian Way in Wales.
All these rides went through some very remote terrain, where there were no guarantees of a warm bed and camping meant I didn’t have to stick to pre-planned accommodation.
I carry a dedicated footprint for the tent too (£60), which I’d recommend to protect your investment even if it adds another 143g.
Sure, you can spend more for an even lighter option, but the Fly Creek HV UL1 strikes a nice balance between low weight and comfort.
£499.99
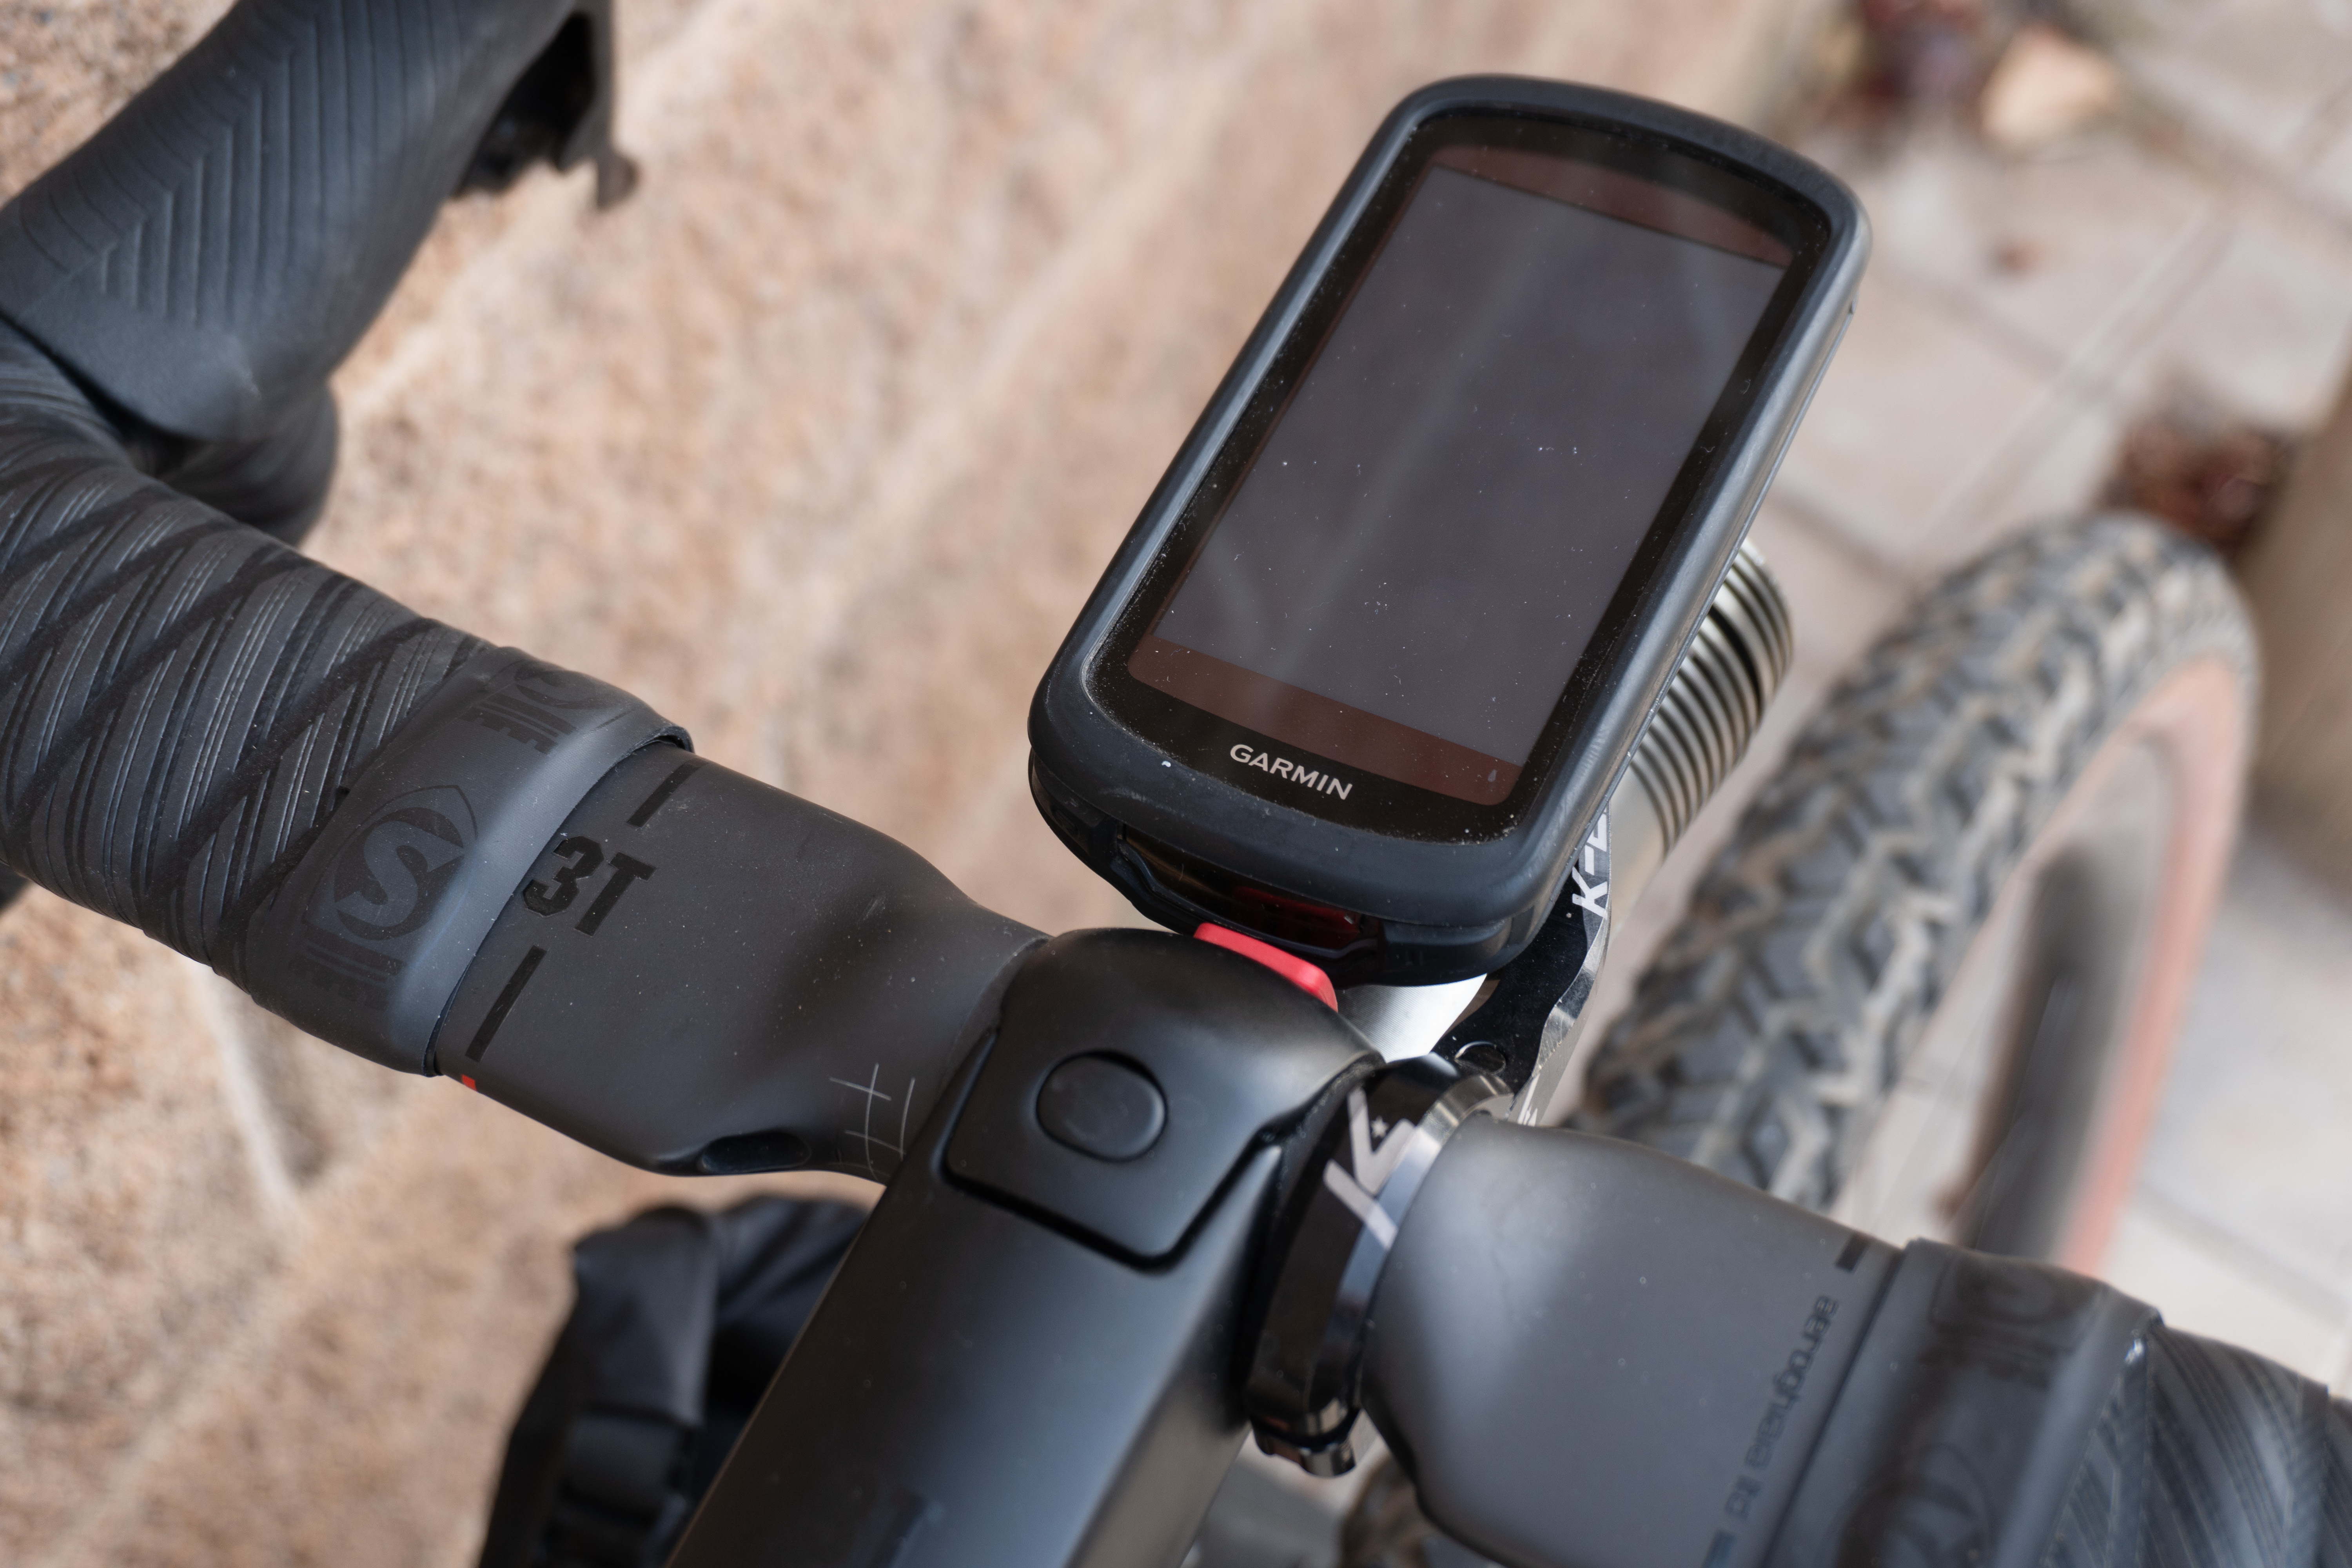
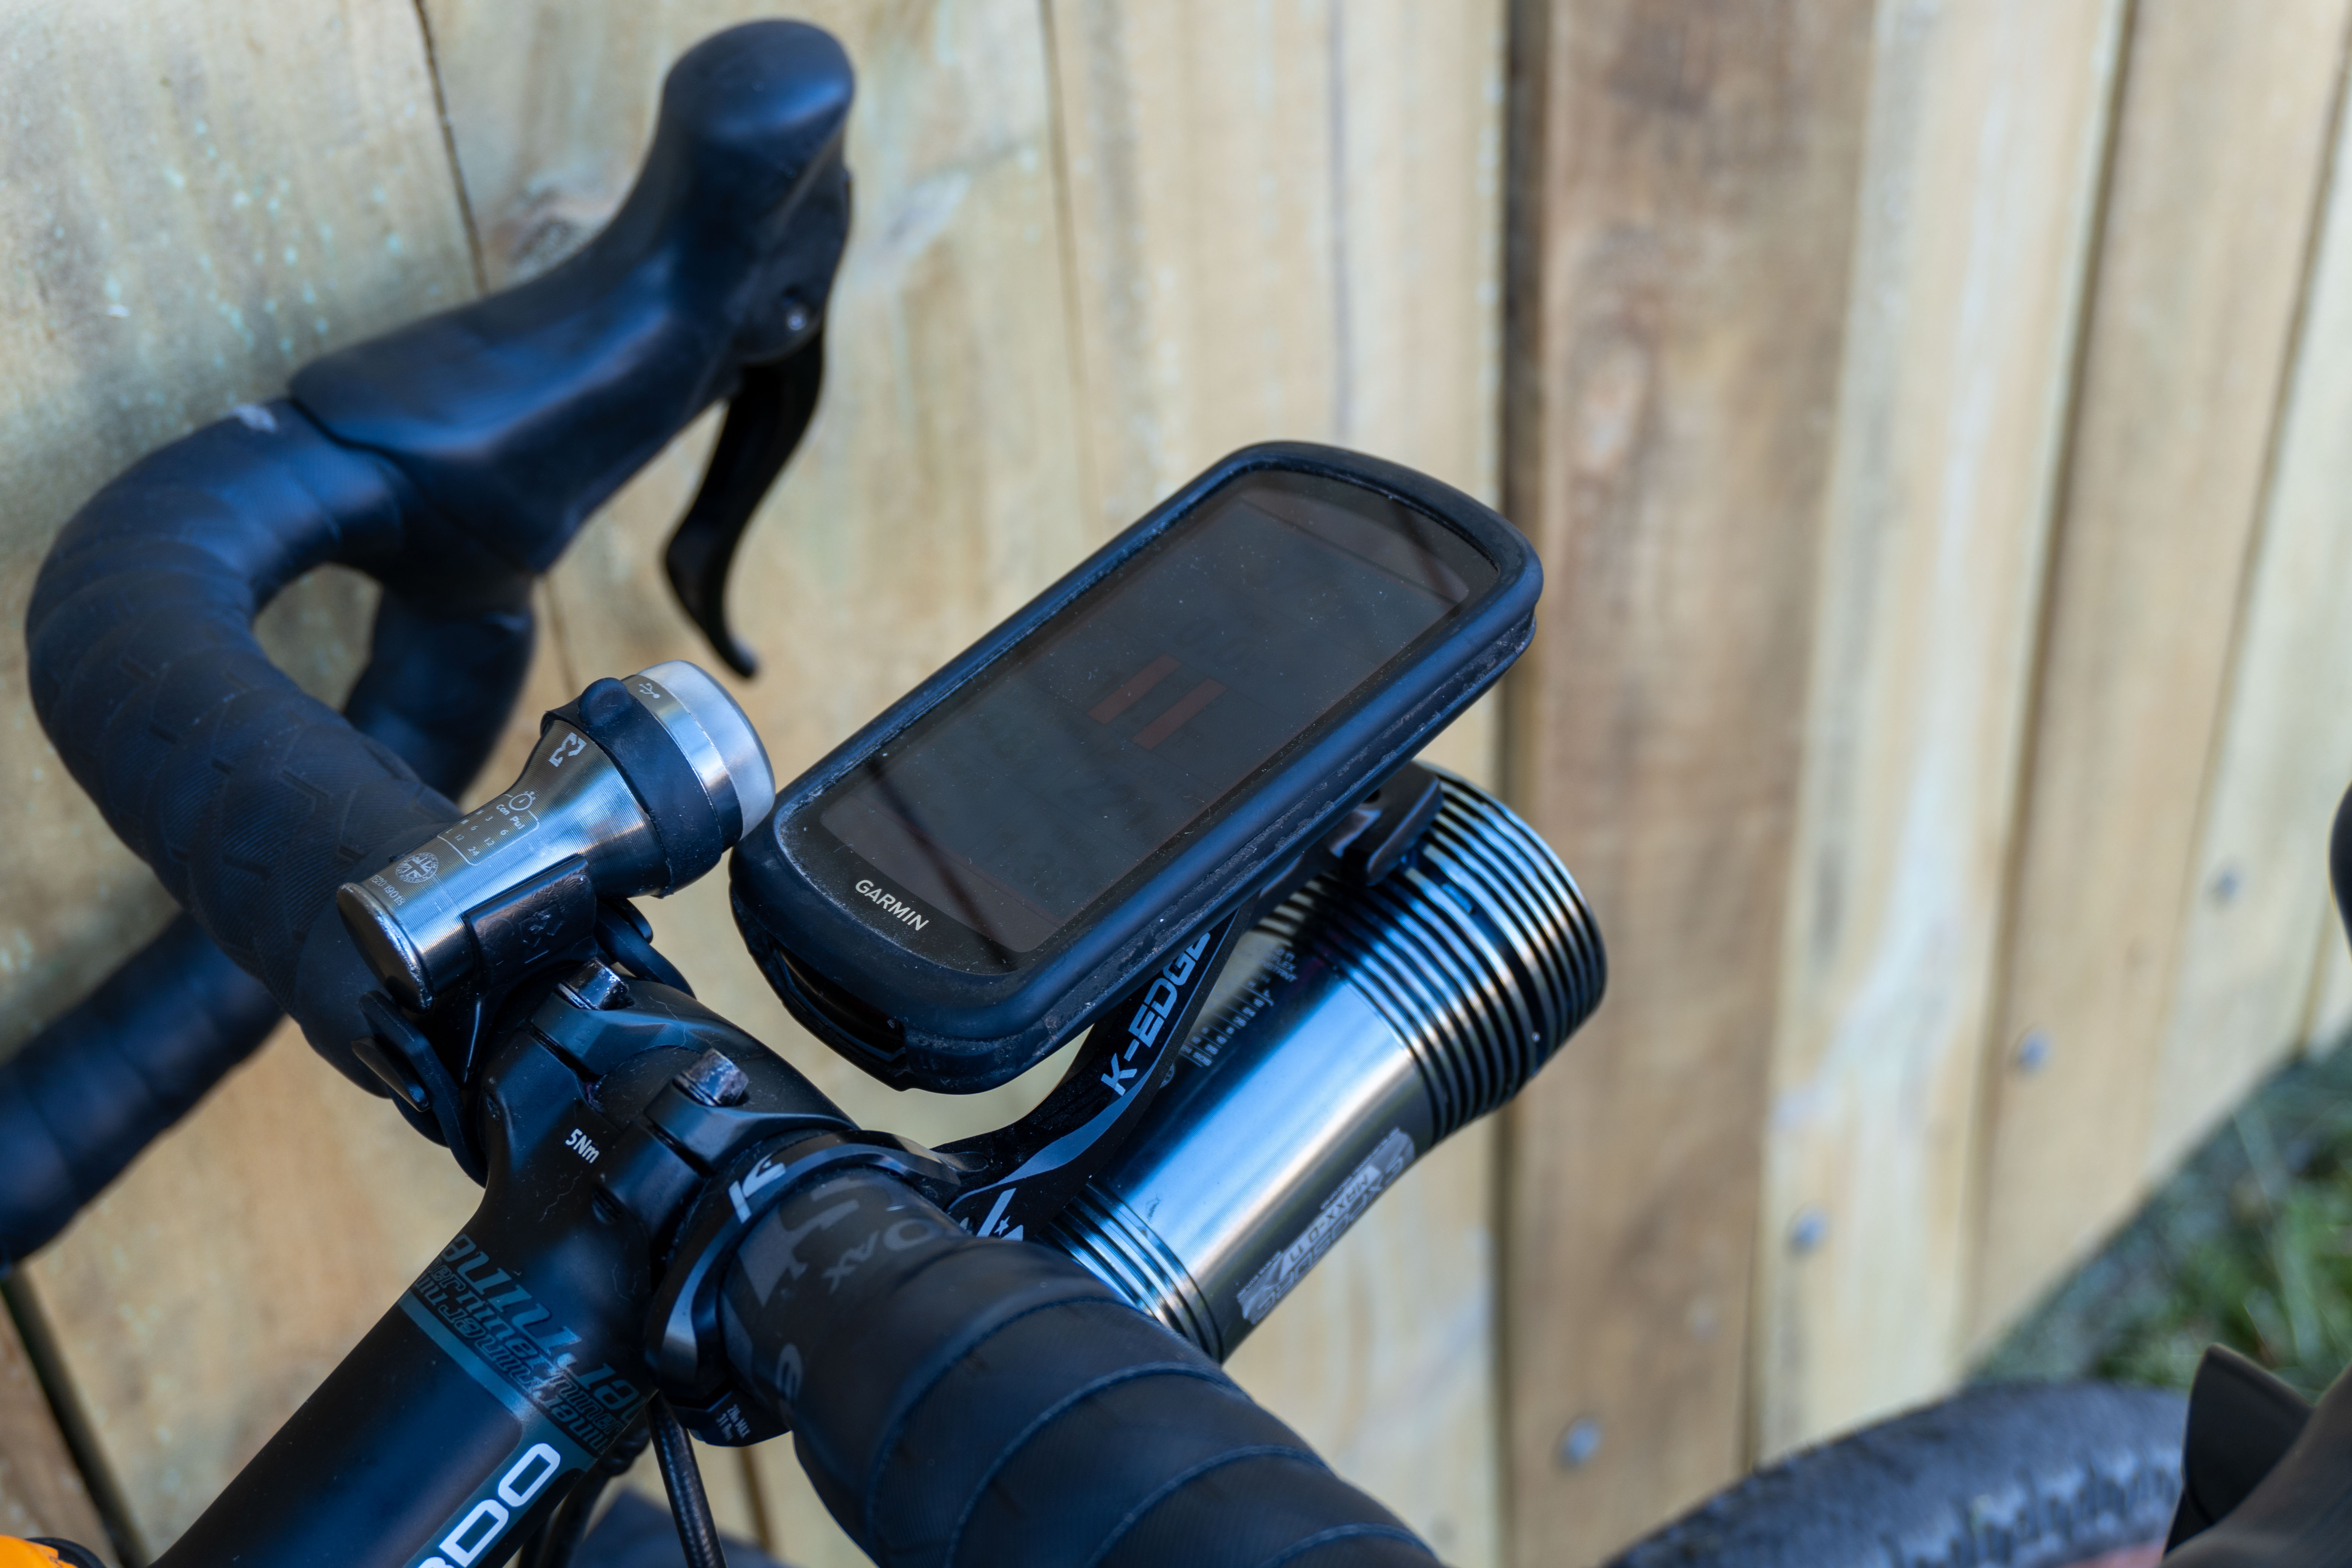
Garmin Edge 1040 Solar
This is one seriously powerful computer. Oscar Huckle / The Cycling Meister
Although it’s now been superseded by the Edge 1050, the 1040 Solar is where the party’s really at if battery life is your primary concern.
Launched in June 2022, the Edge 1040 Solar runs up to a claimed 100 hours by recharging via sunlight, while offering improved GPS accuracy and more data analytics. It was also the first Edge computer to ditch the micro-USB charge port for USB-C.
I’ve had my 1040 Solar for 18 months now and it hasn’t missed a beat. While I’ve traditionally stuck to Garmin’s second-tier 800-series computers (I owned an Edge 810 and then an 830), I love the 1040 Solar’s larger display with its clear navigation and solid-feeling build quality.
The solar charging is what I really wanted though – I found my Edge 830 would last about a day and I had to give it a 20-minute boost during the 408km Paddington Express audax I completed in 2023.
I have to juggle charging many things while bikepacking and not having to worry about keeping a bike computer constantly topped up has been a real boon.
The solar charging feature works brilliantly. Oscar Huckle / The Cycling Meister
I find I’ll get about two-and-a-half days use out of my device – and it lasted even longer when I raced Badlands in the sweltering Andalucian heat.
While I’m sure the newer Edge 1050 is a very good successor with its improved screen, its reduction to a claimed 20 hours battery life (from the 35 hours of the non-solar Edge 1040) completely befuddles me – you’ll have to pry my Edge 1040 Solar out of my cold, dead hands…
£579.99 / $749.99 / €699.99 / AU$1,299.99
Ornot Micro Grid Jersey
This jersey has been one of my go-tos this year. Andrea Peruzzo
The Micro Grid Jersey is an interesting take on a jersey that aims to keep you cool in warmer temperatures and warm in cooler climates, with Ornot suggesting a wide 13 to 22ºC temperature range, but says that can be easily extended if used as a layer.
The jersey’s secret sauce is the Polartec Power Grid fabric, which is designed to trap heat when paired with another layer but allows excellent airflow, thanks to its lightweight fabric and fine grid structure.
I go through a lot of clothing and I’ll confess it took me almost a year between receiving this jersey and taking it out on its maiden voyage.
I took it with me on a long weekend to Shropshire – a short break where cycling wasn’t the main focus, but I took my road bike with me for a couple of morning rides with cold starts.
True to Ornot’s word, I was instantly impressed by its warmth in the cool and breathability when things got warmer, as well as its excellent fit.
It’s a very versatile piece of kit. Robert O’Keefe / The Cycling Meister
It’s since become a firm favourite and joined me on both of my ultras, where it saw regular use.
I’ve found I’m happy to wear this jersey with a long-sleeve baselayer down to about 9ºC, but I’ll opt for a summer jersey for when it’s over 18ºC – I tend to run warmer than others, which is why it doesn’t quite meet that 22ºC claim for me.
With Ornot based in San Francisco, the only bummer are the hefty import bills I’d likely be stung with if I ponied up for a second jersey…
$162
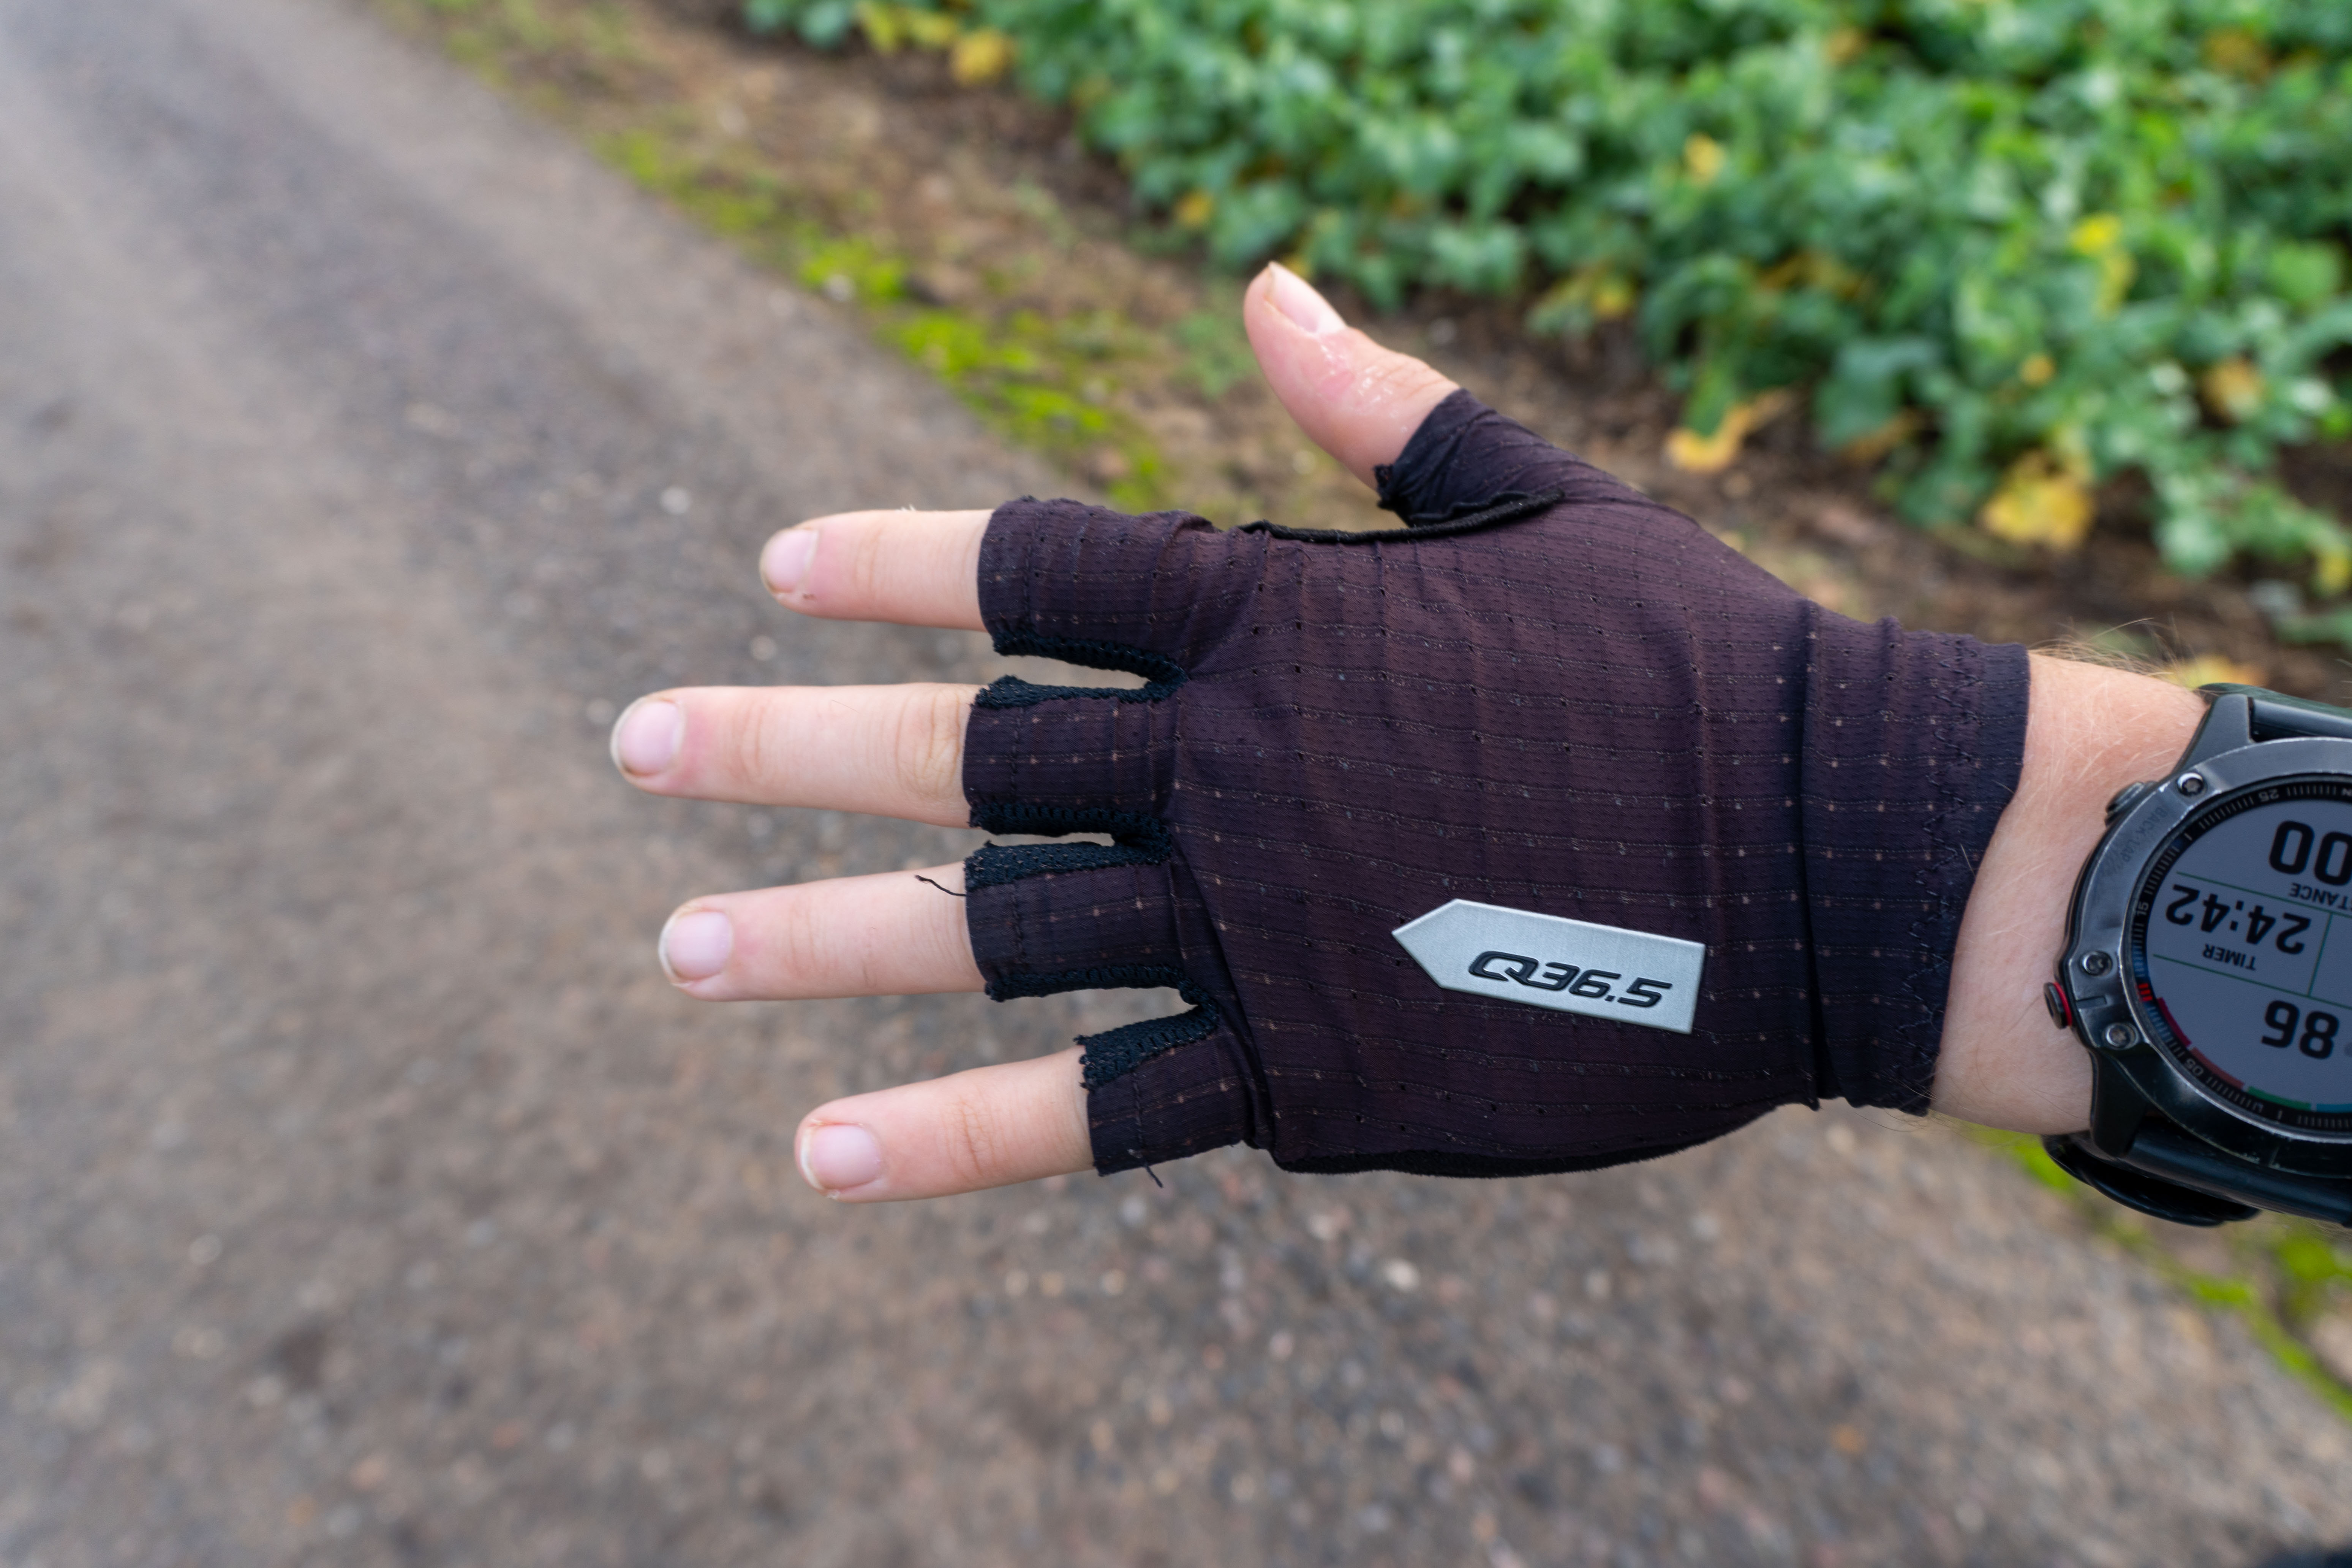
Q36.5 Dottore Pro summer gloves
I’ve finally found my new benchmark pair of gloves. Oscar Huckle / The Cycling Meister
After almost five years, I’ve finally found a worthy successor to my luxuriously comfortable Castelli Rosso Corsa Pro gloves.
Before stumbling across the Q36.5’s, I’d struggled to find anything that fitted me as well and took the sting out of vibrations as well as my beloved Castelli’s.
Various options from Assos and Velocio came close, but nothing ever quite cut the mustard. Things reached a climax where I’d solely reserve my Castelli’s for bikepacking trips or ultra-races – I’ve had to resew one of the seams three times now.
Imagine my relief when the Q36.5 Dottore Pros entered my life, a pair of gloves that finally proved a match for the Castelli’s comfort.
I also discovered the Castelli Premio Evo gloves this year – another set that have earned my approval over long rides, but these Q36.5’s narrowly trump them.
They’ve seen plenty of use this year. Oscar Huckle / The Cycling Meister
The Dottore Pros have kept my paws comfortable on lots of my long distance escapades this year, although they interestingly fell short on the seriously shaky Chilean gravel where my palms started to get red on the second day.
But I’ve never ridden such savage gravel and I reckon any glove would have struggled.
My major mistake with my old Rosso Corsa Pros was not investing in a second pair – I’m wisely already in possession of a second pair of these.
£50 / $68 / €50
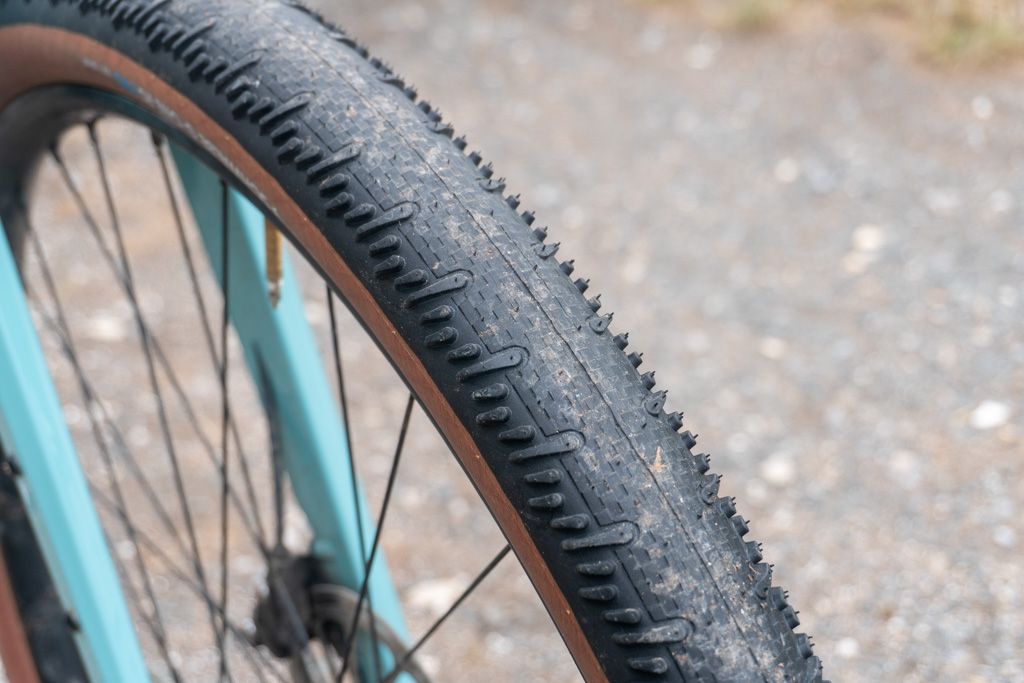
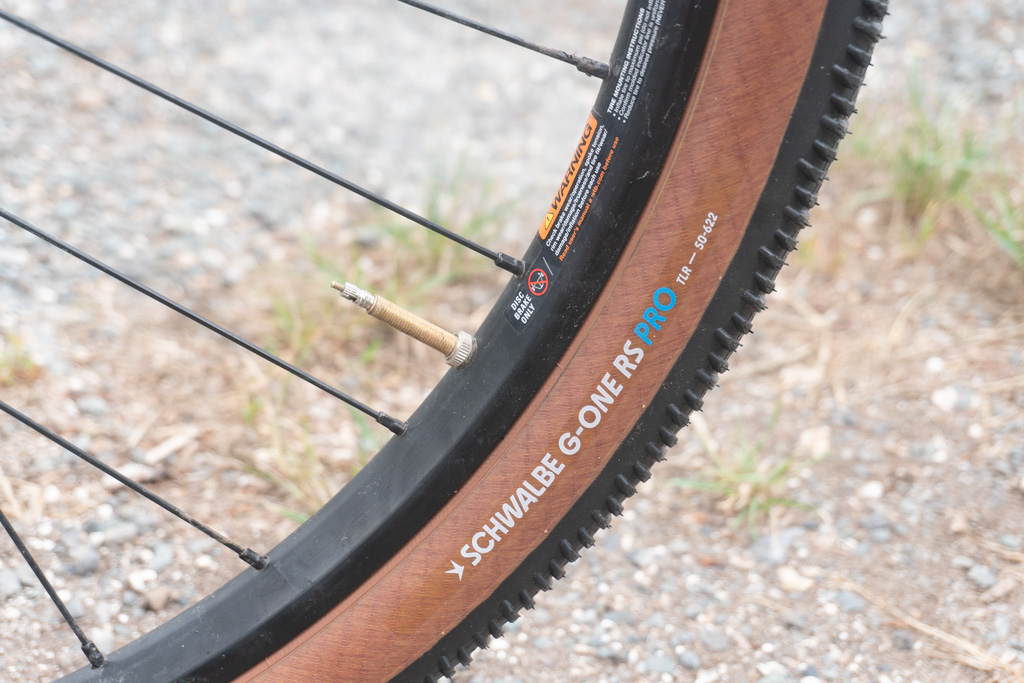
Schwalbe G-One RS Pro tyres
These hardback tyres are more versatile than they’d appear. Oscar Huckle / The Cycling Meister
I’ve tested lots of gravel tyres this year and Schwalbe’s G-One RS Pros stood out from the crowd – they’re excellent hardpack-oriented rubber that are more capable than they look.
Claimed by Schwalbe to be its “fastest gravel tyre”, it has a striking tread pattern and semi-slick design. The edge knobs alternate between large teardrop shapes, with three smaller ones in between.
If you think they look a lot like the old RS Pros, you’d be right but the two updates here are these tyres feature Schwalbe’s new Race Pro construction, designed to offer lower rolling resistance and improve comfort, while boosting puncture resistance.
The Addix race rubber compound has also been updated and is claimed to have a 10 per cent reduction in rolling resitance and improved grip on the shoulders.
Alongside the Pirelli Cinturato Gravel H, I can’t think of a better hardback tyre. Oscar Huckle / The Cycling Meister
I’ve ridden over 2,200km on these tyres and used them on both of my races – I love their sheer speed and suppleness and those extended shoulder knobs really bite into corners.
It doesn’t matter if the surfaces are wet or dry – the abundant grip is always there (understandably outside of mud) and they’ve tested very well in independent tests carried out by BicycleRollingResistance.com, generating 18.2W of rolling resistance at 28psi / 1.9 BAR in a 50mm size.
The tyre’s main weak point is their durability – this is very much race-focussed rubber and they’re also not cheap.
But alongside the Pirelli Cinturato Gravel H (albeit for different reasons), the G-One RS Pros have become my benchmark hardpack tyre.
£74.99 / $80.89 / €74.90 / AU$147.95
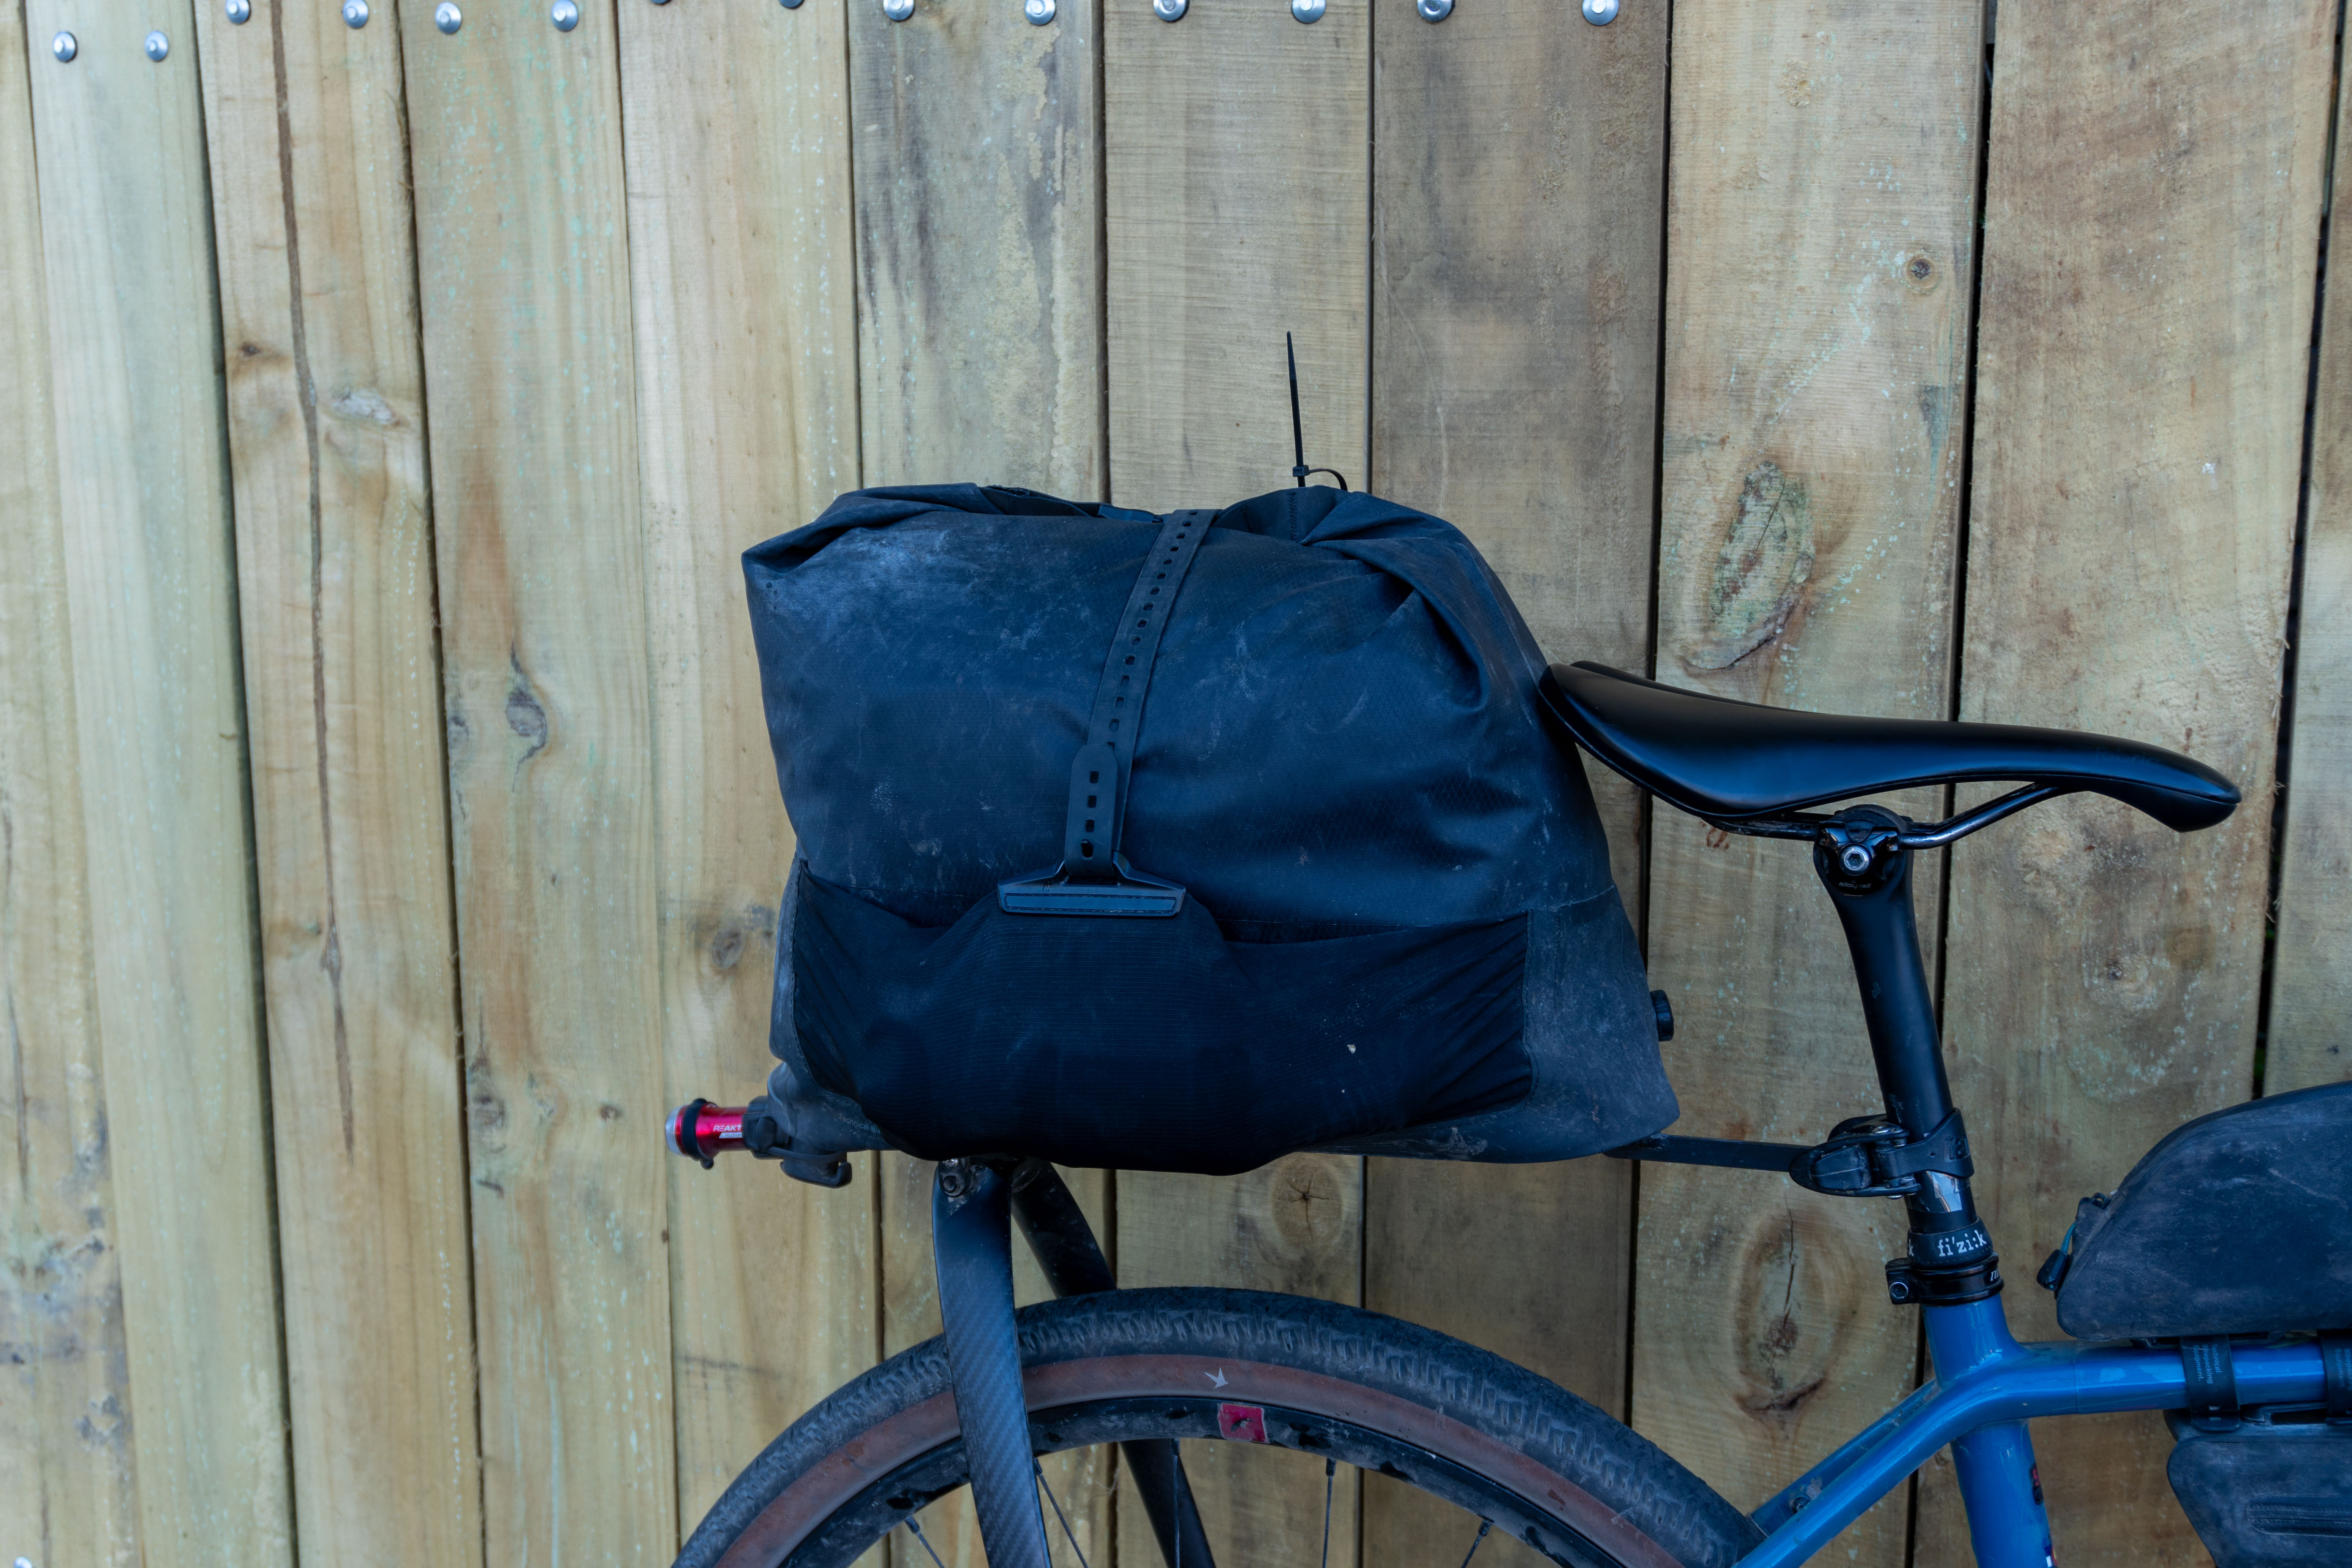
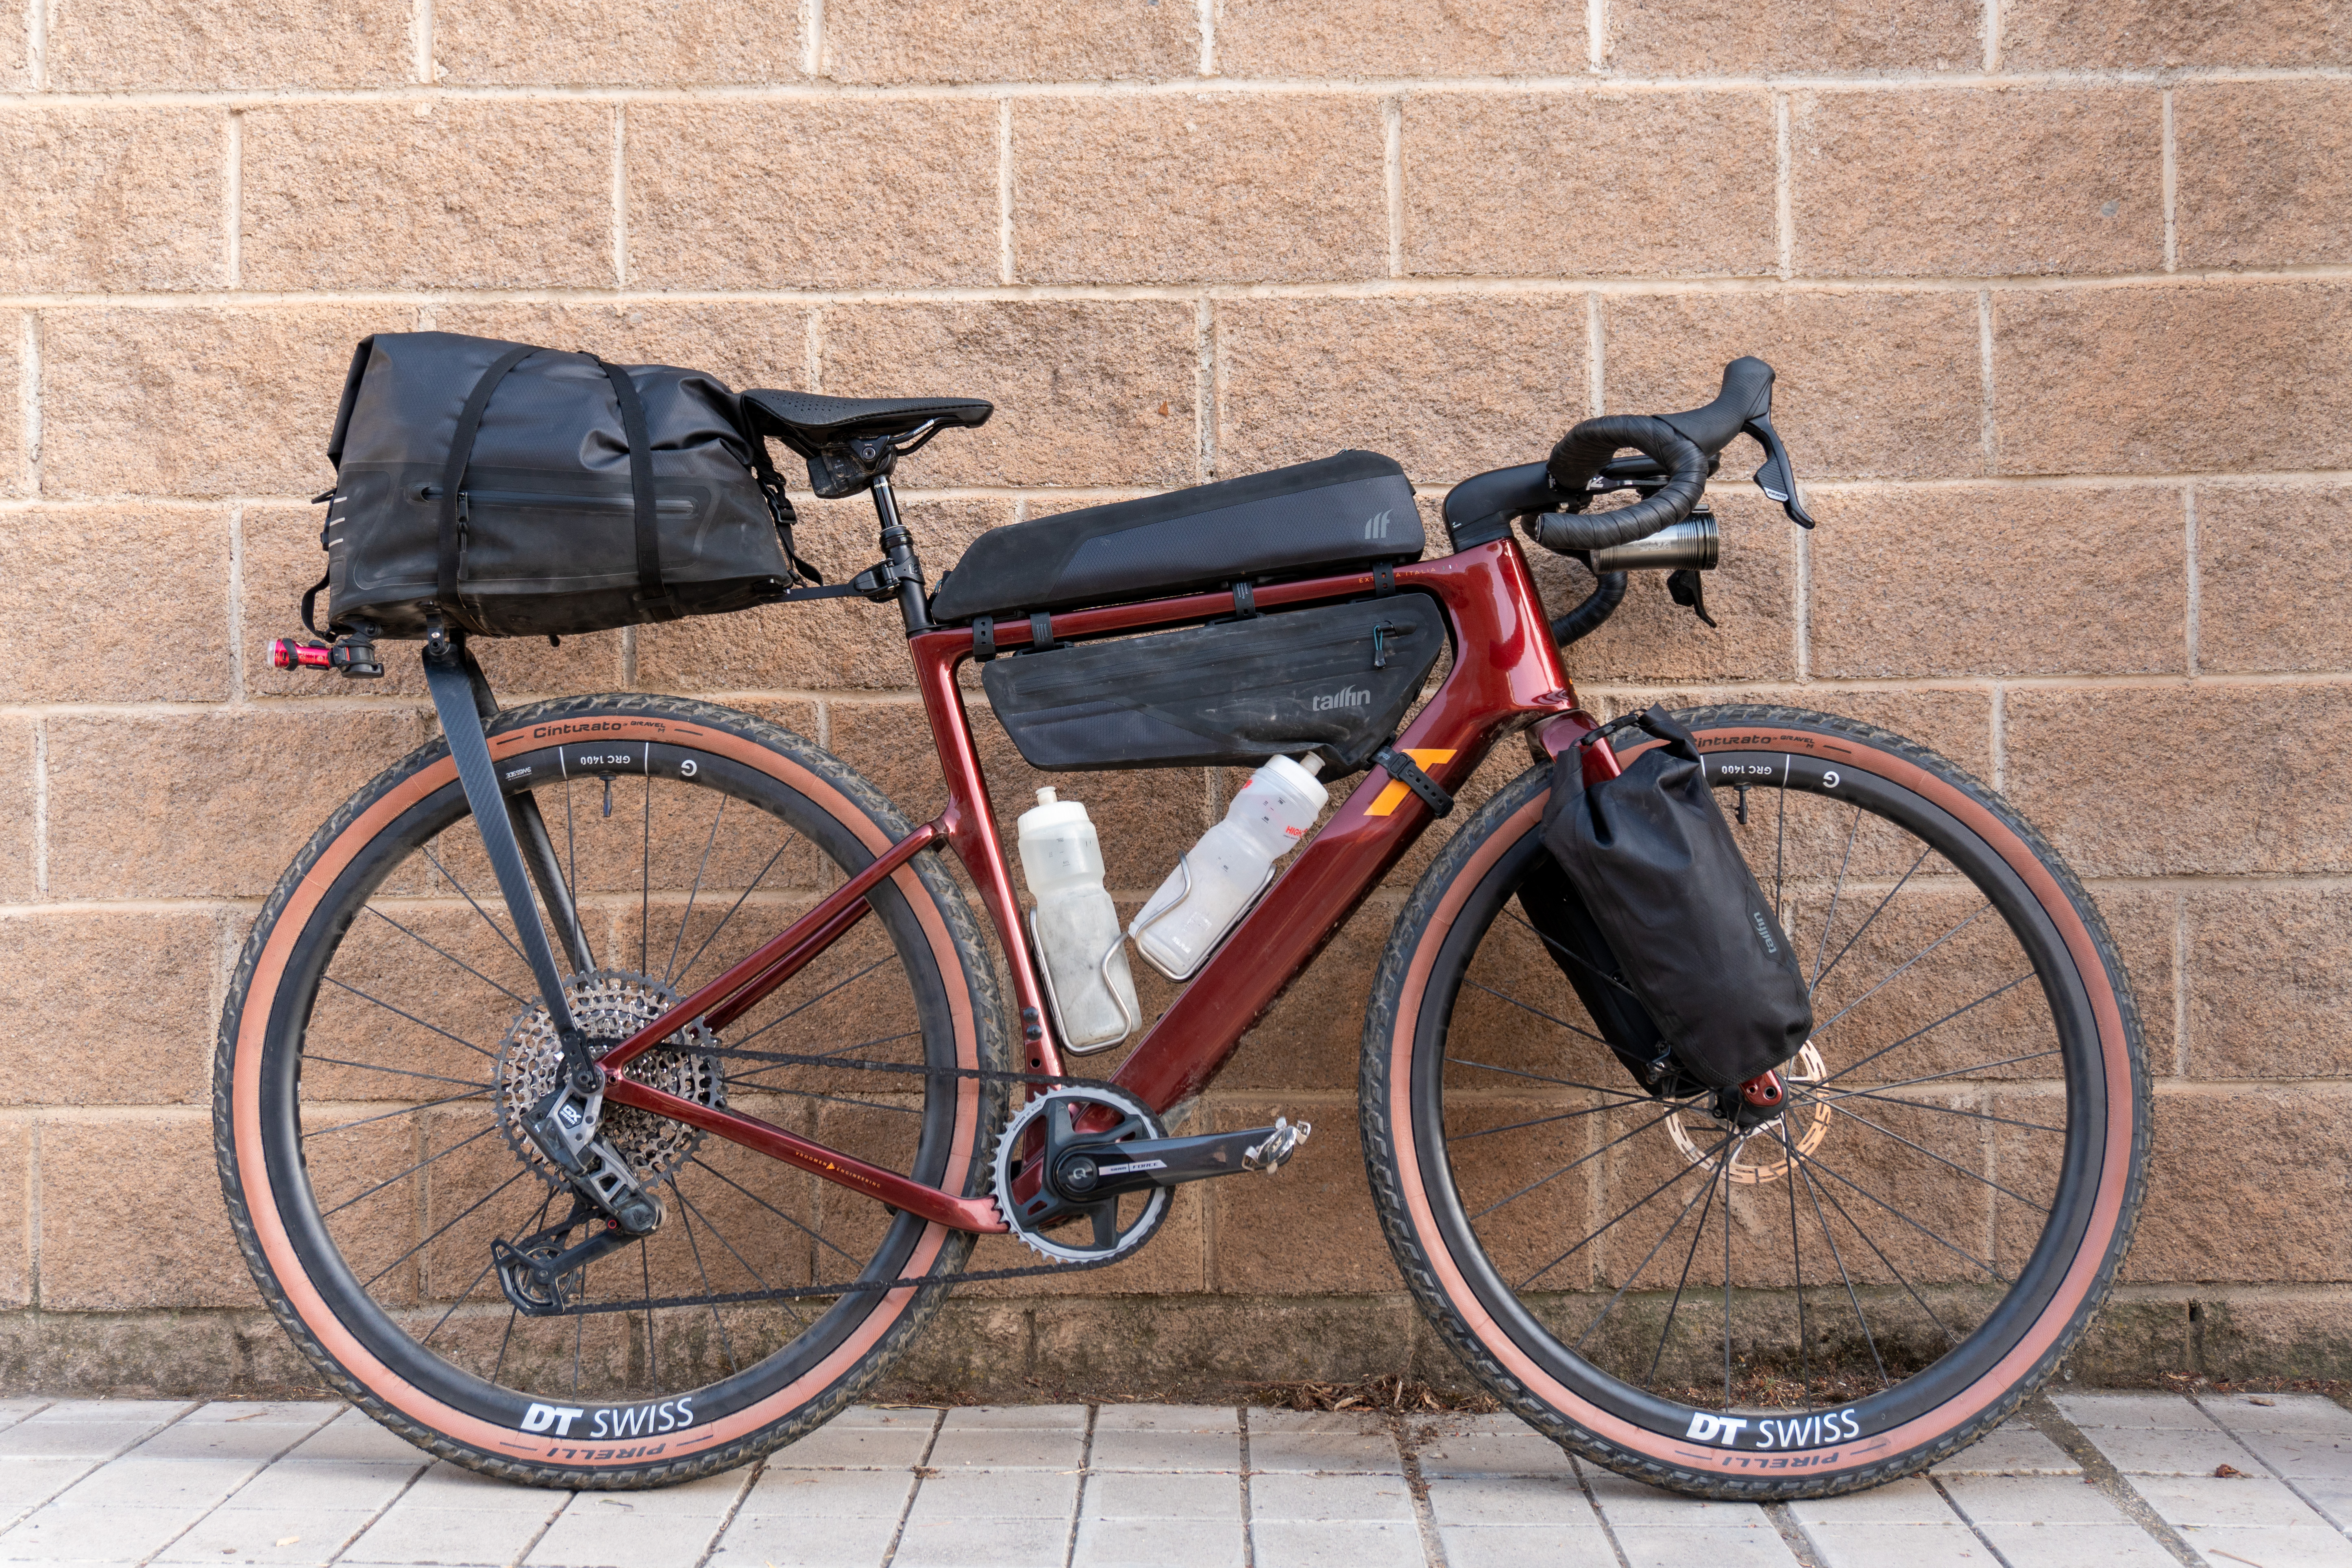
Tailfin CargoPack
The CargoPack has been well travelled this year. Oscar Huckle / The Cycling Meister
The AeroPack took top honours in my Gear of the Year 2024, and Tailfin updated its rear-rack system to even better effect this year.
The CargoPack is a development from the original AeroPack with expandable side mesh pockets for hauling up to three litres of extra cargo, and a simplified closure system.
It does nothing to diminish its predecessor’s reputation – the updates prove welcome extras to a system that was already near-perfect.
This pack has accompanied me on all my trips since April. Regardless of the contents inside, the CargoPack stayed rattle-free without a hint of sway, even when subject to the roughest terrain. This is a real problem with conventional bikepacking saddle bags – no matter how tight you pack them, a little bit of sway is an inevitability.
It’ll even carry a baguette! Oscar Huckle / The Cycling Meister
There’s a slight time saving with the simplified closure system because you don’t have to clip the roll-top closure into two places – perfect for when your brain isn’t fully engaged after bikepacking all day.
The TPU strap keeps any cargo contents very secure, even when the pockets are completely full, and I like that you can really cinch it down.
In terms of value, there’s no denying the CargoPack is a pricey proposition. But, like all Tailfin products I’ve tested to date, it justifies the high initial cost with its top performance and durability.
It’ll no doubt be joining me on all my trips and races for the foreseeable future and I guarantee you’ll never return to a conventional saddle bag once you’ve tried this system.
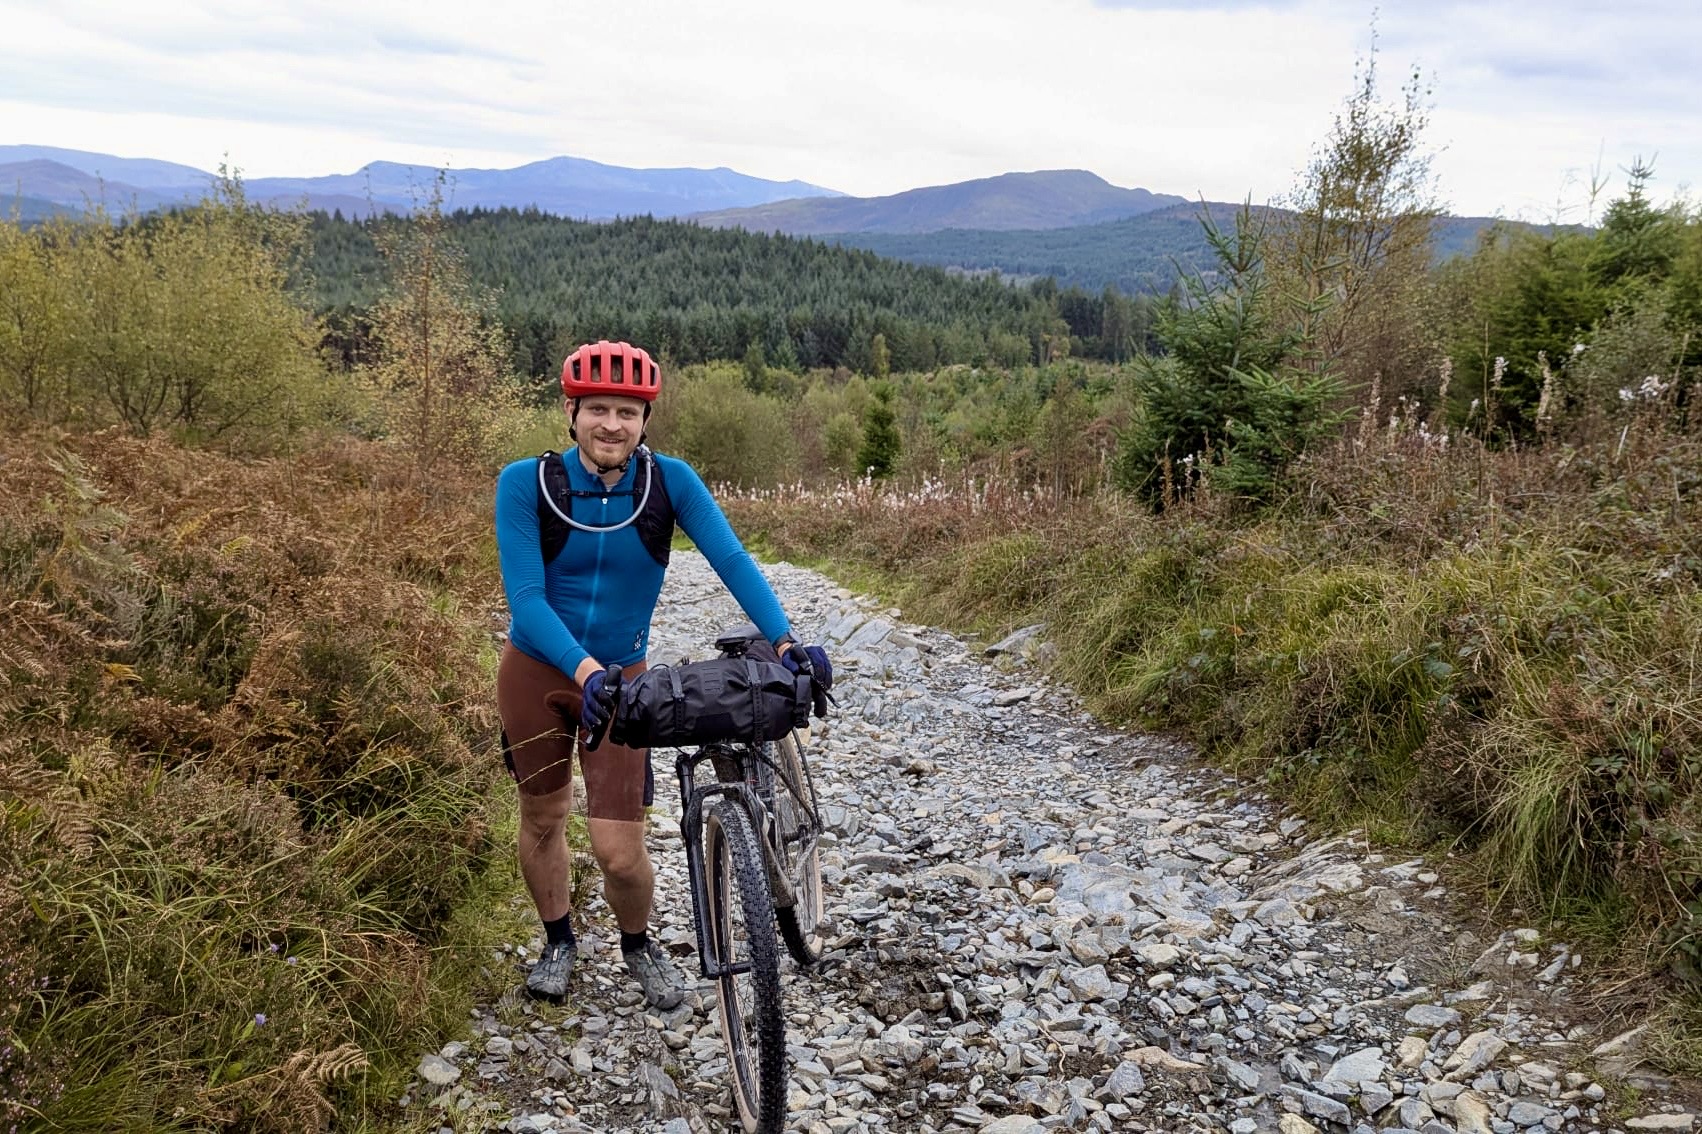
You know you’re in a sorry state when you’re sat by the trailside scoffing a sharing bag of crisps, legs and body completely fried.
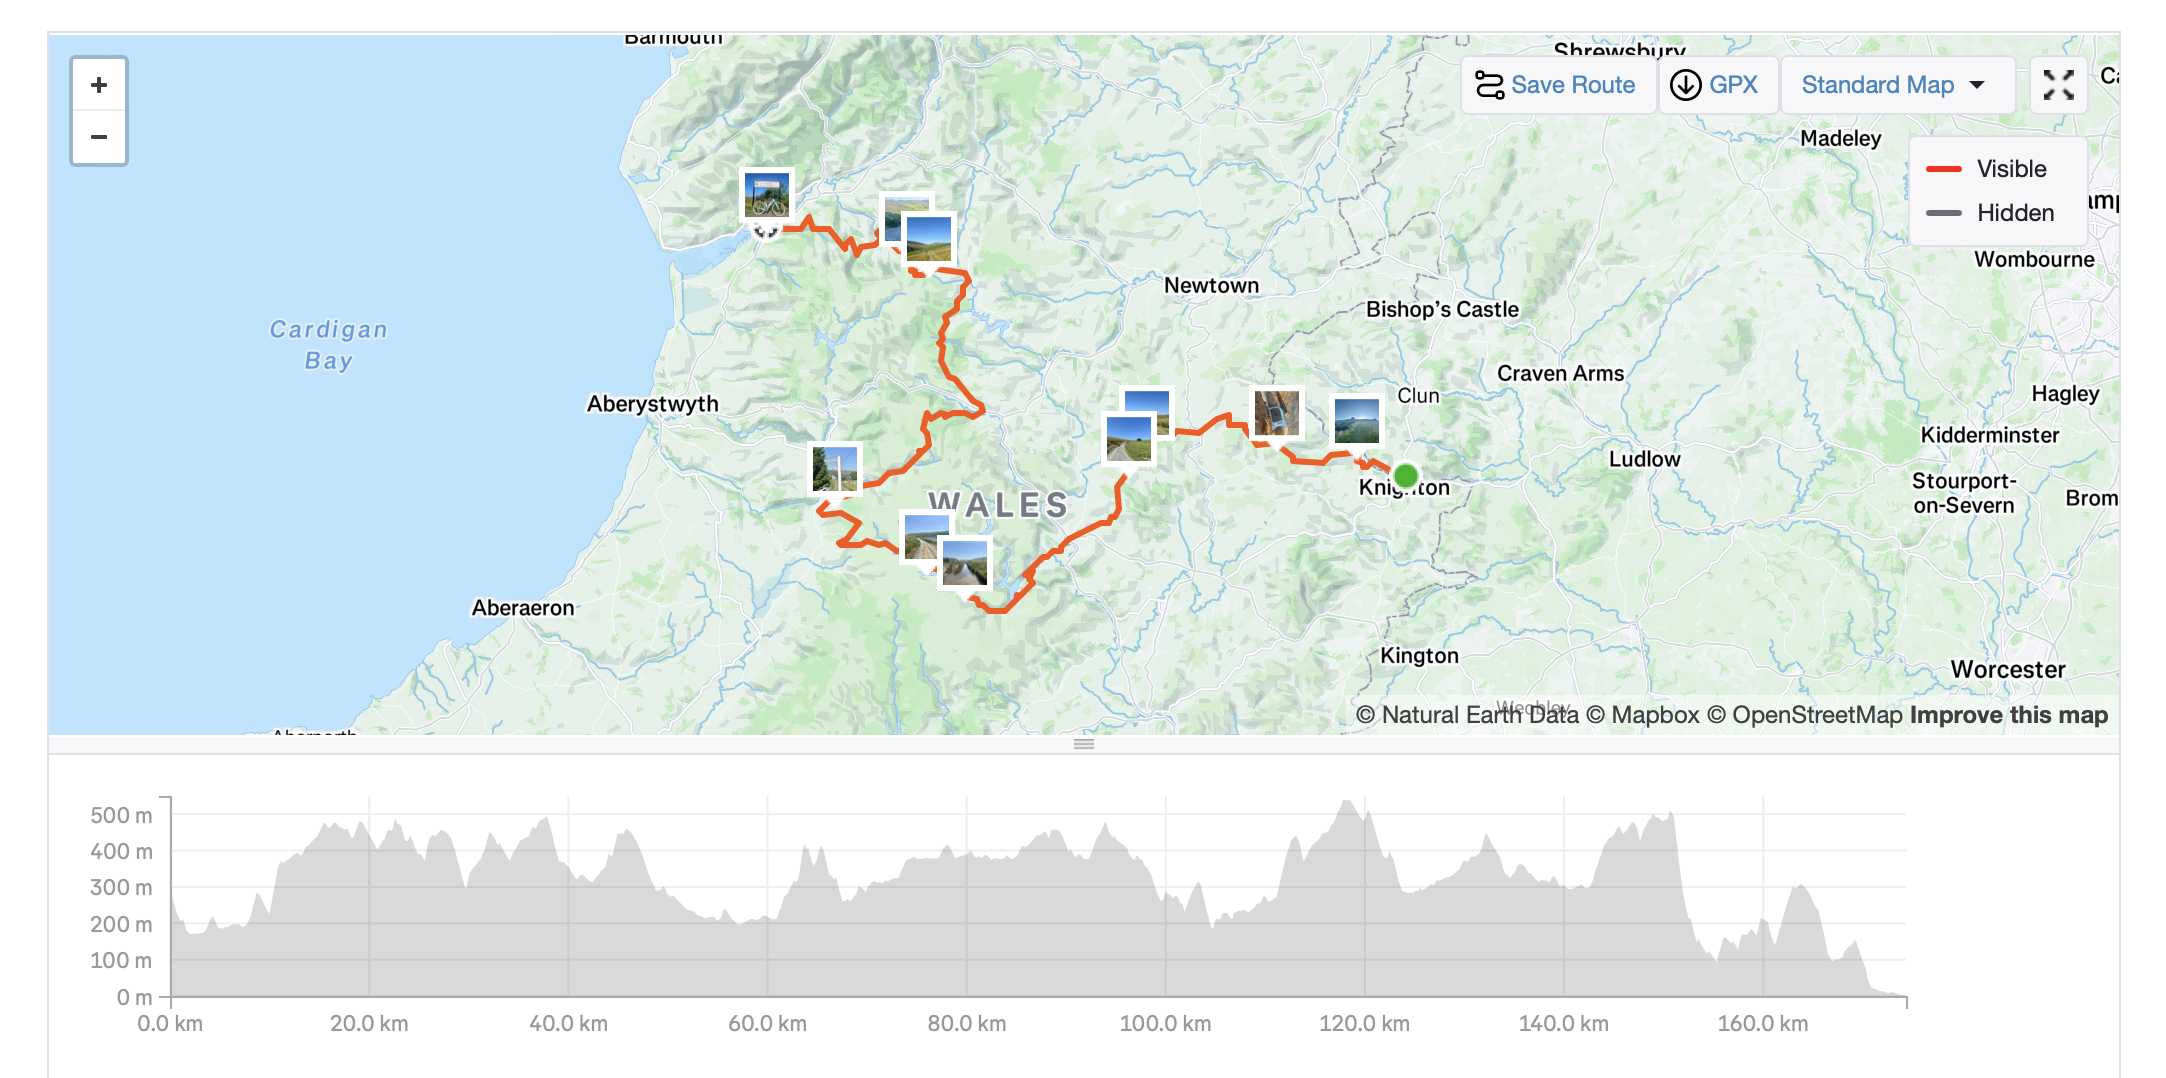
That was one such moment when I bikepacked the Trans-Cambrian Way in Mid-Wales, a 174km route with a smidge over 4,000m elevation earlier this summer.
The route starts in Knighton on the English-Welsh border, taking you deep into the Cambrian Mountains via Rhayader and the Elan Valley, before finishing in Dovey Junction.
It’s recommended you spend three days riding this route, but I planned to do it in just over a day and a half, starting on a Friday evening.
There’s a lot of climbing…
Why? Simple reason – because there are only two trains a day from Dovey Junction on a Sunday, one at 09:54 and another at 14:07 (thankfully since riding the route, it seems as though Transport for Wales have added more trains).
If you think that sounds torturous, there’s a method to the madness.
I’d be riding Mother North in Norway three weeks later – a 1,008km gravel ultra-endurance race with a mammoth 17,000m elevation. Completing the Trans-Cambrian Way under these gruelling conditions would make for a ‘perfect’ last training ride.
Read on to find out if I made it onto that 14:07 train or if I got stranded in deepest, darkest Wales…
Horse for the course
The steed for the deed… Oscar Huckle / The Cycling Meister
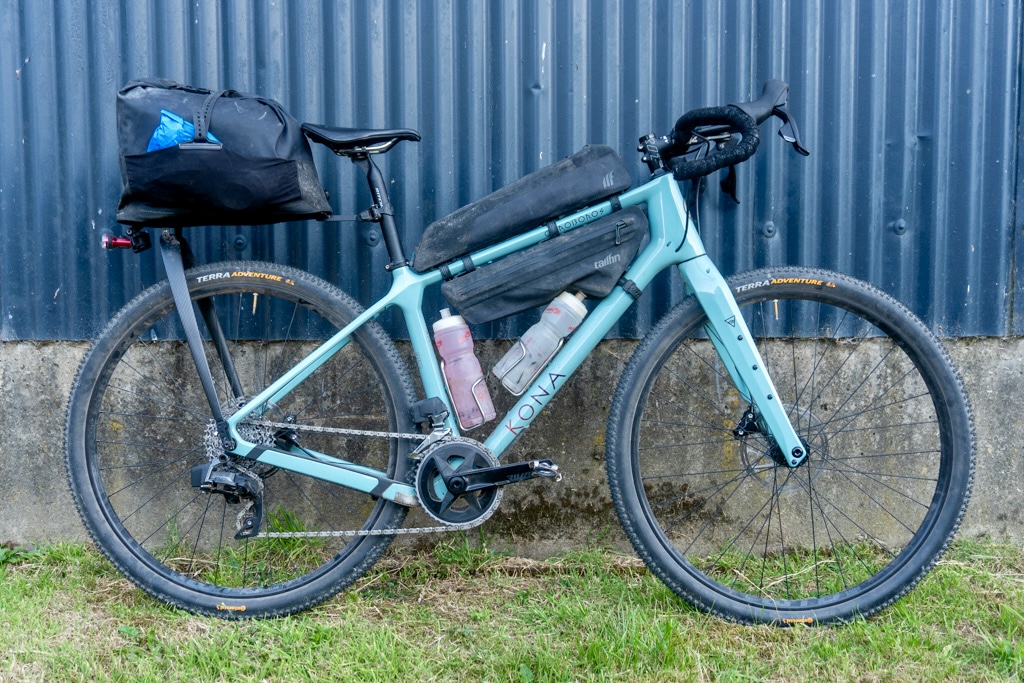
I rode a Kona Ouroboros, a gravel bike I’d received to review for BikeRadar just nine days prior.
Since I was considering using this bike for Mother North, I needed to do some kind of extended ride to know it wouldn’t give me any grief – another reason why I chose this route.
The Ouroboros is rather unconventional in that it straddles the line between gravel and cross-country mountain biking.
The front end is suspension-corrected for a gravel suspension fork, although this CR/DL model wears a rigid carbon fork with a whopping 29×2.5in / 63.5mm tyre clearance. The rear end is less generous with a 29×2.1in / 53.34mm clearance.
The Ouroboros perplexingly comes with a 2x drivetrain. Oscar Huckle / The Cycling Meister
It also differs from most gravel bikes in that it’s built around larger 180mm disc brake rotors and a chunky 31.6mm seatpost to accommodate a wide range of dropper posts.
Somewhat paradoxically, the Ouroboros CR/DL comes specced with a 2x SRAM Rival eTap AXS Wide groupset – despite 1x drivetrains on gravel bikes being de rigeur now.
I ran a set of Continental Terra Adventures. Oscar Huckle / The Cycling Meister
I also happened to be carrying out a ‘wide gravel tyres’ group test at the time and swapped the bike’s stock 45mm Maxxis Rambler tyres for 50mm Continental Terra Adventures.
Prior to this trip, I’d had mixed feelings on these Contis – I thought the grip was commendable but they felt rather draggy. If there was going to be a fitting course to get a definitive verdict on this tyre, it was this one because Continental claims the Terra Adventure bridges the gap between gravel and cross-country.
The CargoPack trumps a conventional saddle bag with its rock-solid stability. Oscar Huckle / The Cycling Meister
As for luggage, I ran my tried-and-tested Tailfin CargoPack (formerly known as the AeroPack Cargo), as well as the brand’s Long Top Tube Pack and Frame Bag. Since this was just a weekender, I went without a handlebar bag.
I also wore an Apidura Racing Hydration Vest with a 2L bladder to get me through the remote 88km section after Rhayader where 27ºC+ temperatures were forecast – tropical for Wales!
Anything that wasn’t sleeping gear or food was kept in these two packs. Oscar Huckle / The Cycling Meister
Given the route’s remote nature, my plan was to wild camp so I wouldn’t be tied to staying at pre-booked accommodation and arriving by a certain time. I took my trusty Big Agnes Fly Creek HV UL1 bikepacking tent, with a Sea to Summit Ether Light XT Insulated Air Sleeping Mat, as well as their Spark Ultralight sleeping bag and Aeros Premium Pillow.
Finally, I relied on my trusty Garmin Edge 1040 Solar for navigation.
First, the worst
A rare image that does the steepness of a climb justice. Oscar Huckle / The Cycling Meister
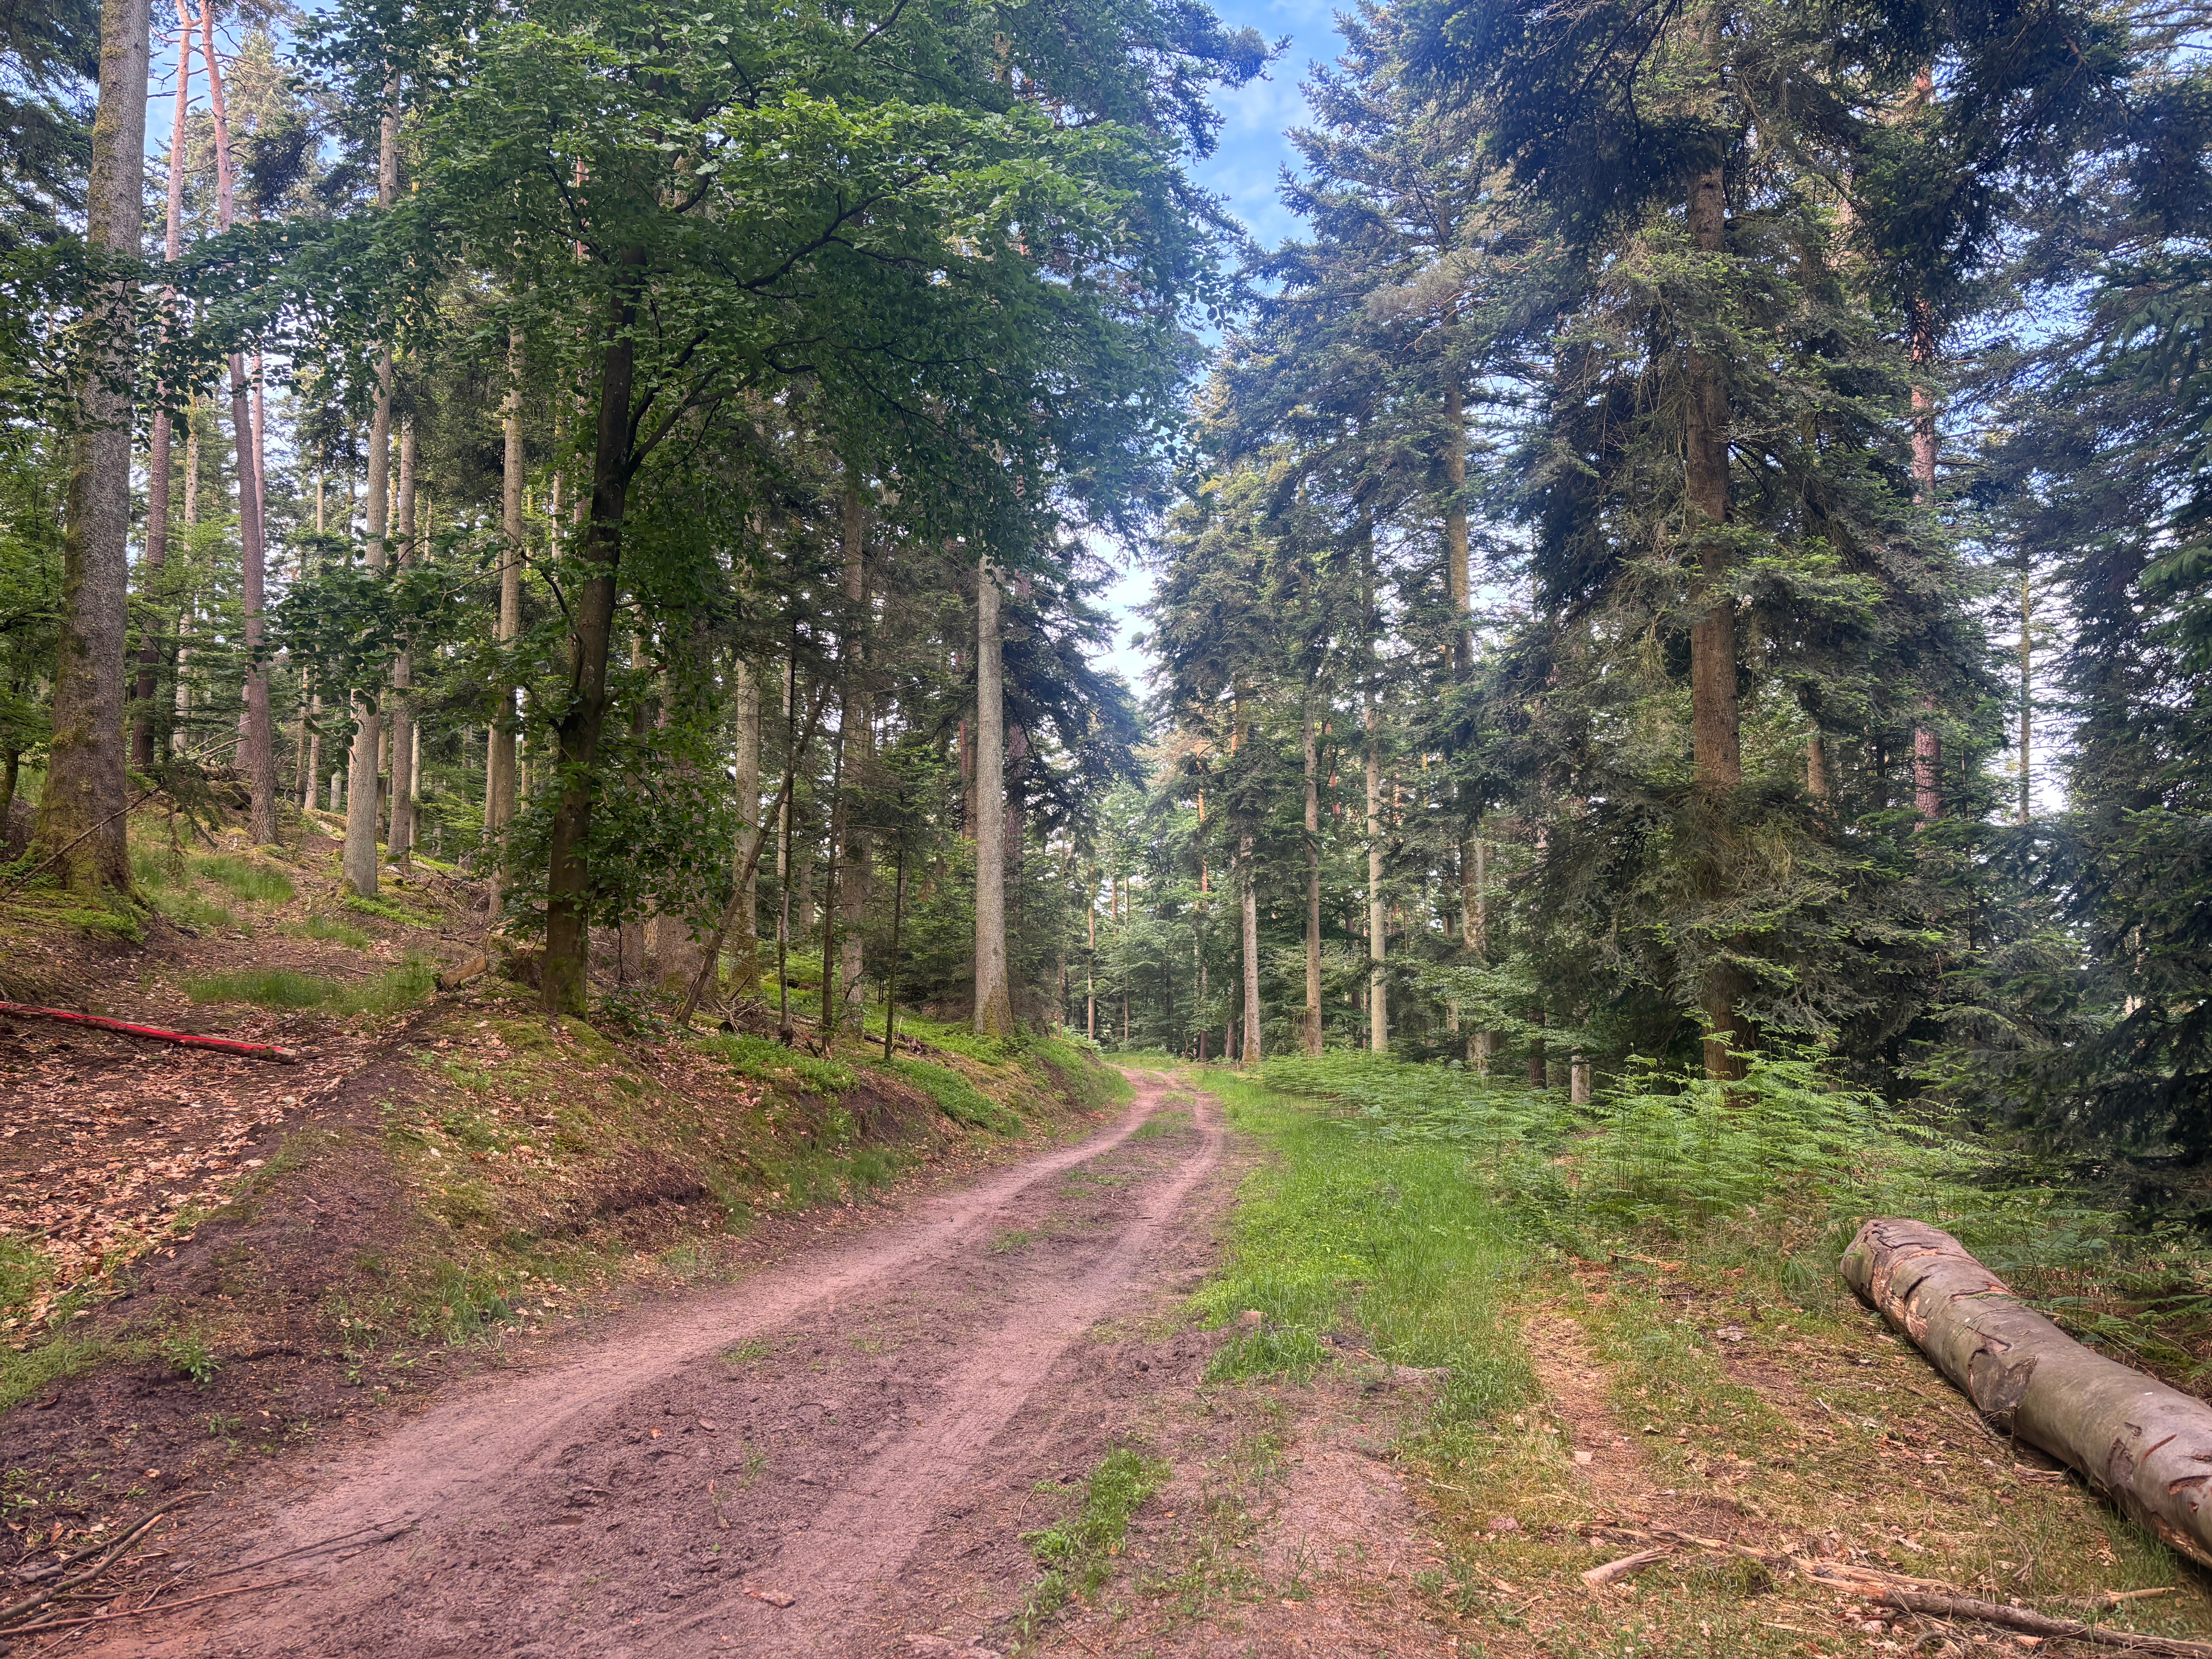
After a traffic-ridden Friday evening journey from Bristol, I parked in a free Forestry Commission car park in Kinsley Wood, just outside Knighton – big mistake because it was at the top of a very steep 130m elevation climb which I’d have to tackle on fried legs at the end.
Starting at 7pm, things get off to a relatively mellow start with an undulating 7km road section before a very rude first off-road climb, which I’d undoubtedly rate as the hardest of the entire route.
It might have been an issue with the GPX file I was following, but I think I was taken further down a descent than I needed to – I was routed onto a narrow and steep footpath with plenty of gates to negotiate before being taken onto the climb proper.
Once I was off the footpath, a view of a near-vertical hill emerged. Even walking, my heart was racing going up this – I hoped I wasn’t going to be in for 100 miles of this nonsense…
The rest of the evening continued through slow-going, sheep-shit-infested fields where the navigation wasn’t always obvious.
The joys of SRAM
Not good… Oscar Huckle / The Cycling Meister
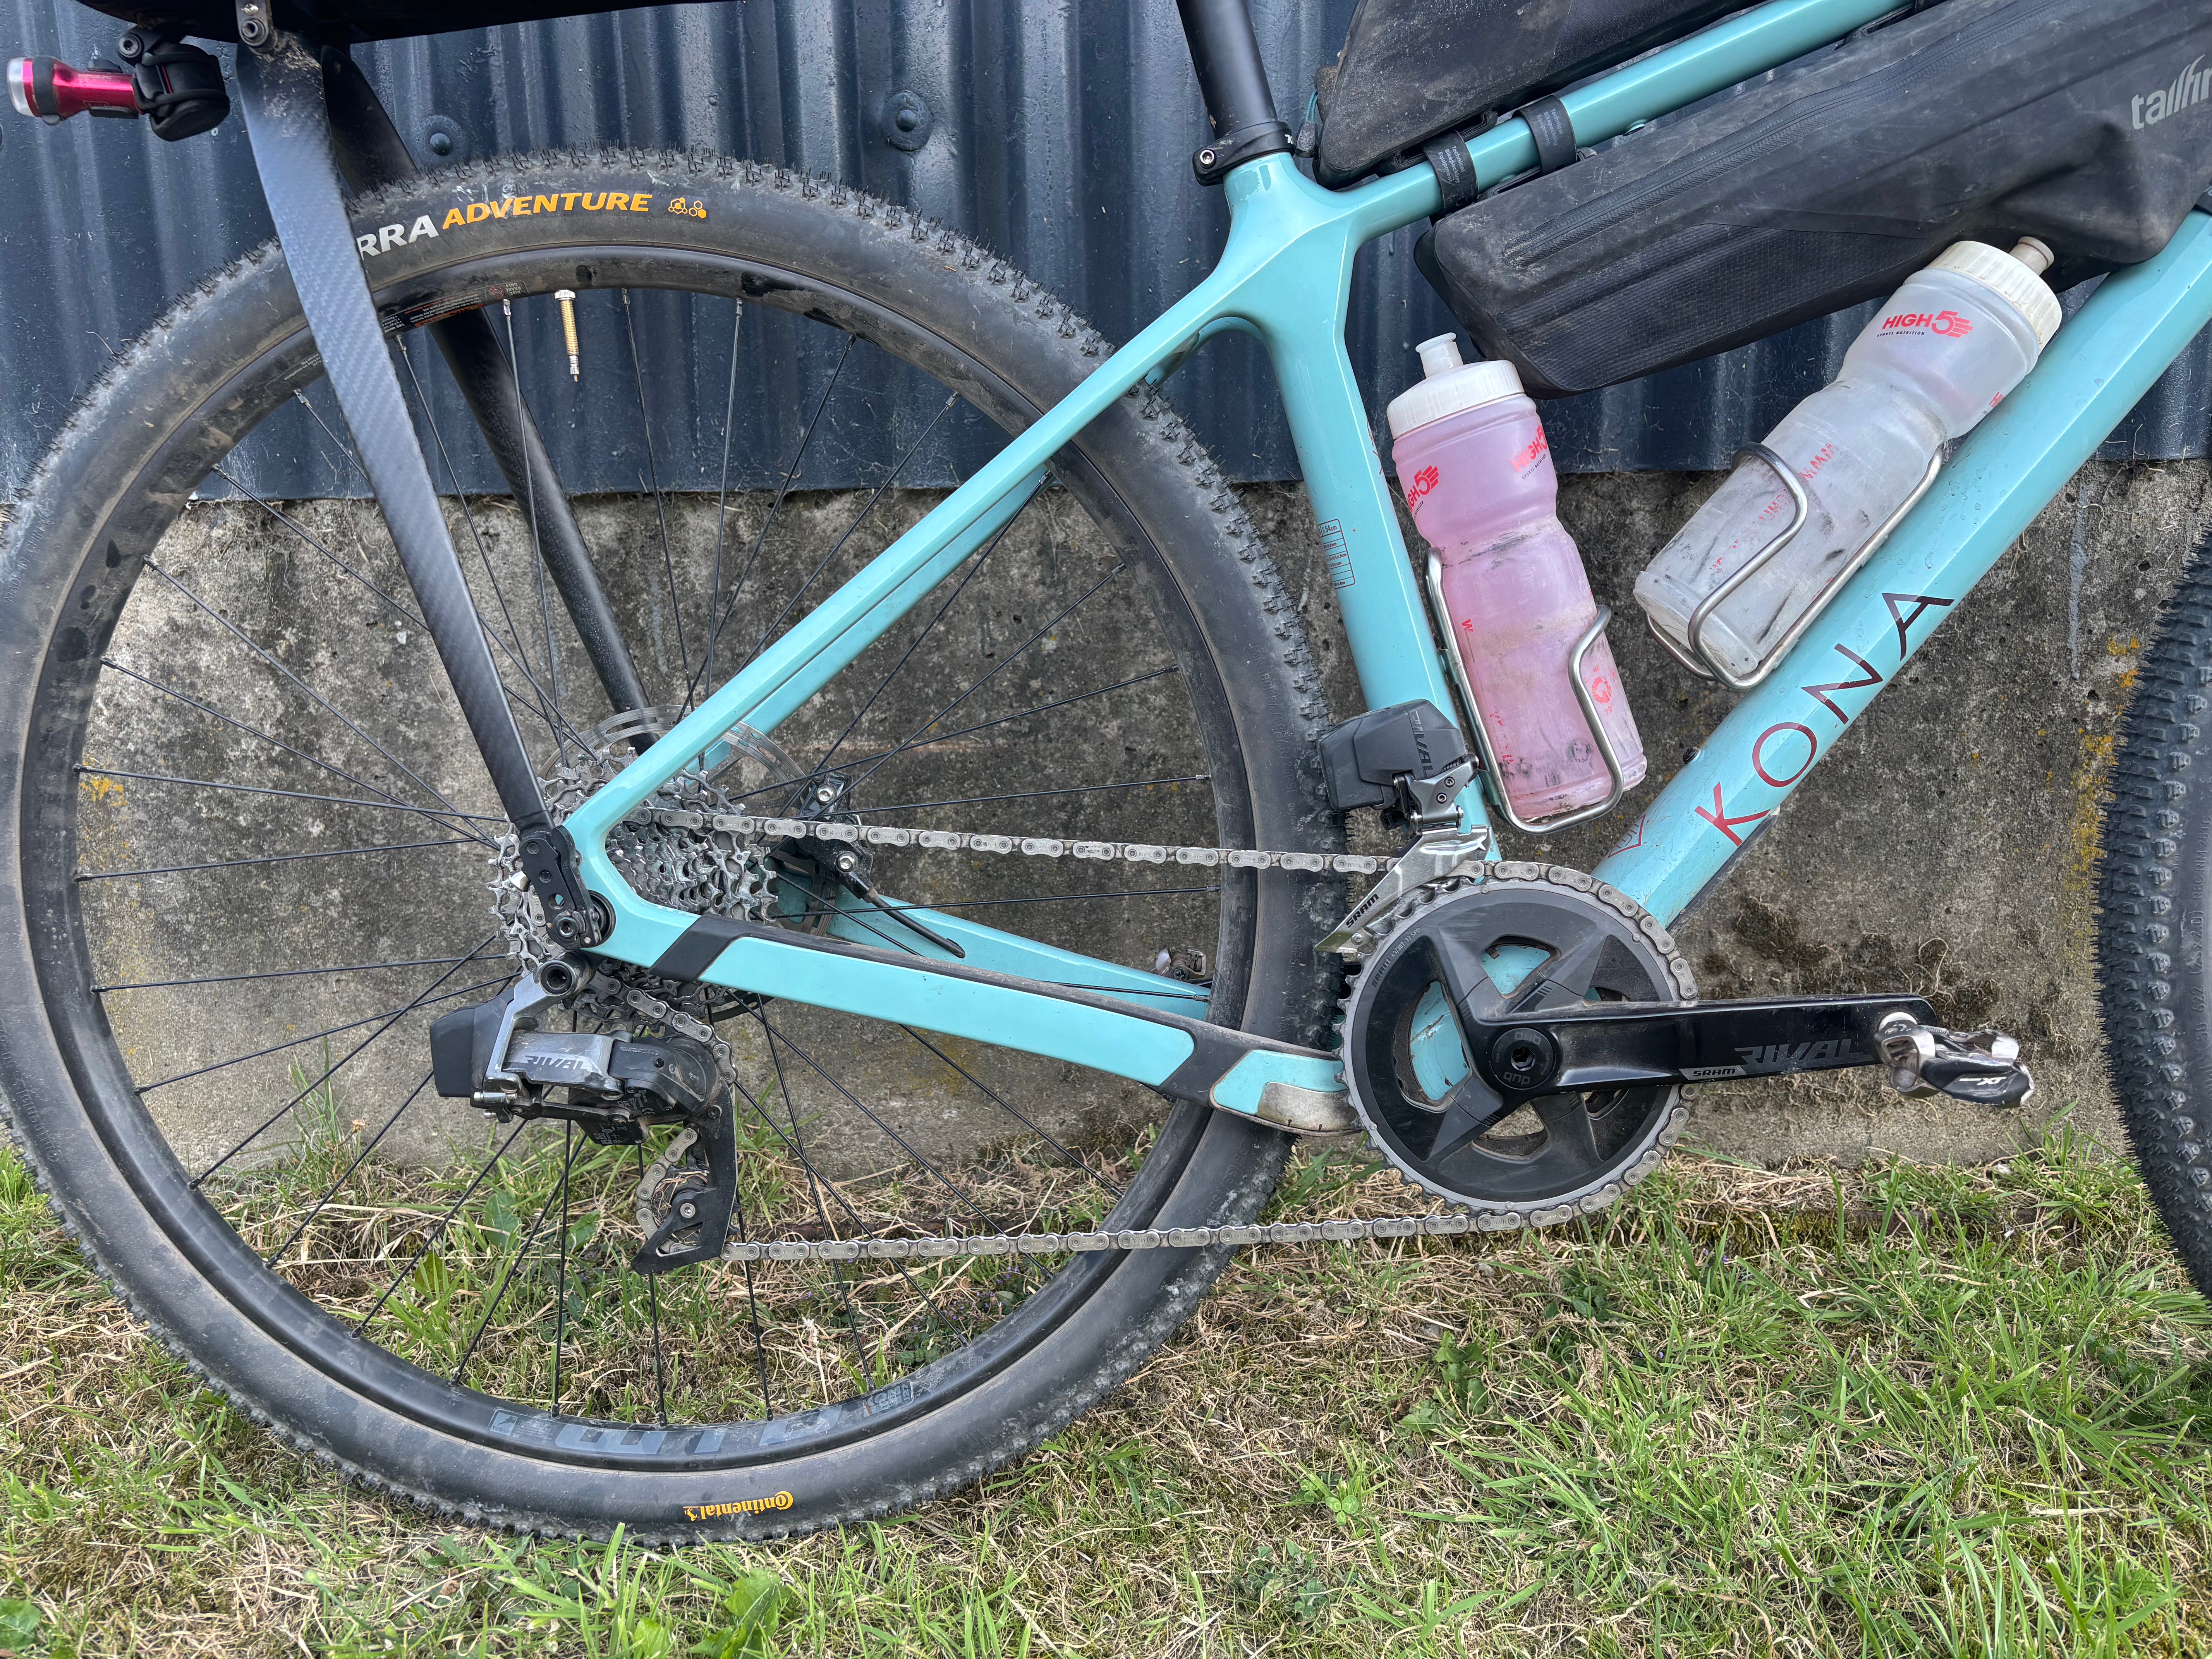
A real lowlight was experiencing a grisly chain drop ten miles into the route.
I was descending and could see the trail was going to go back up very steeply, so I pre-emptively shifted down to the inner chainring and the SRAM Rival eTap AXS Wide front derailleur chucked the chain in between the chainring and the bottom bracket, gouging the shell.
When I realised I couldn’t free the chain because the crankset was in the way, I thought I was a goner (you need a long 8mm hex key to undo the crank bolt and rather a lot of force) and have to do the ‘walk of shame’ back to the car.
I then thought I could try undoing the preload bolt, praying it was wound in enough to shift the chainrings out a little – luckily, that worked!
I was glad I experienced this issue now because I knew I couldn’t rely on a front derailleur for Norway.
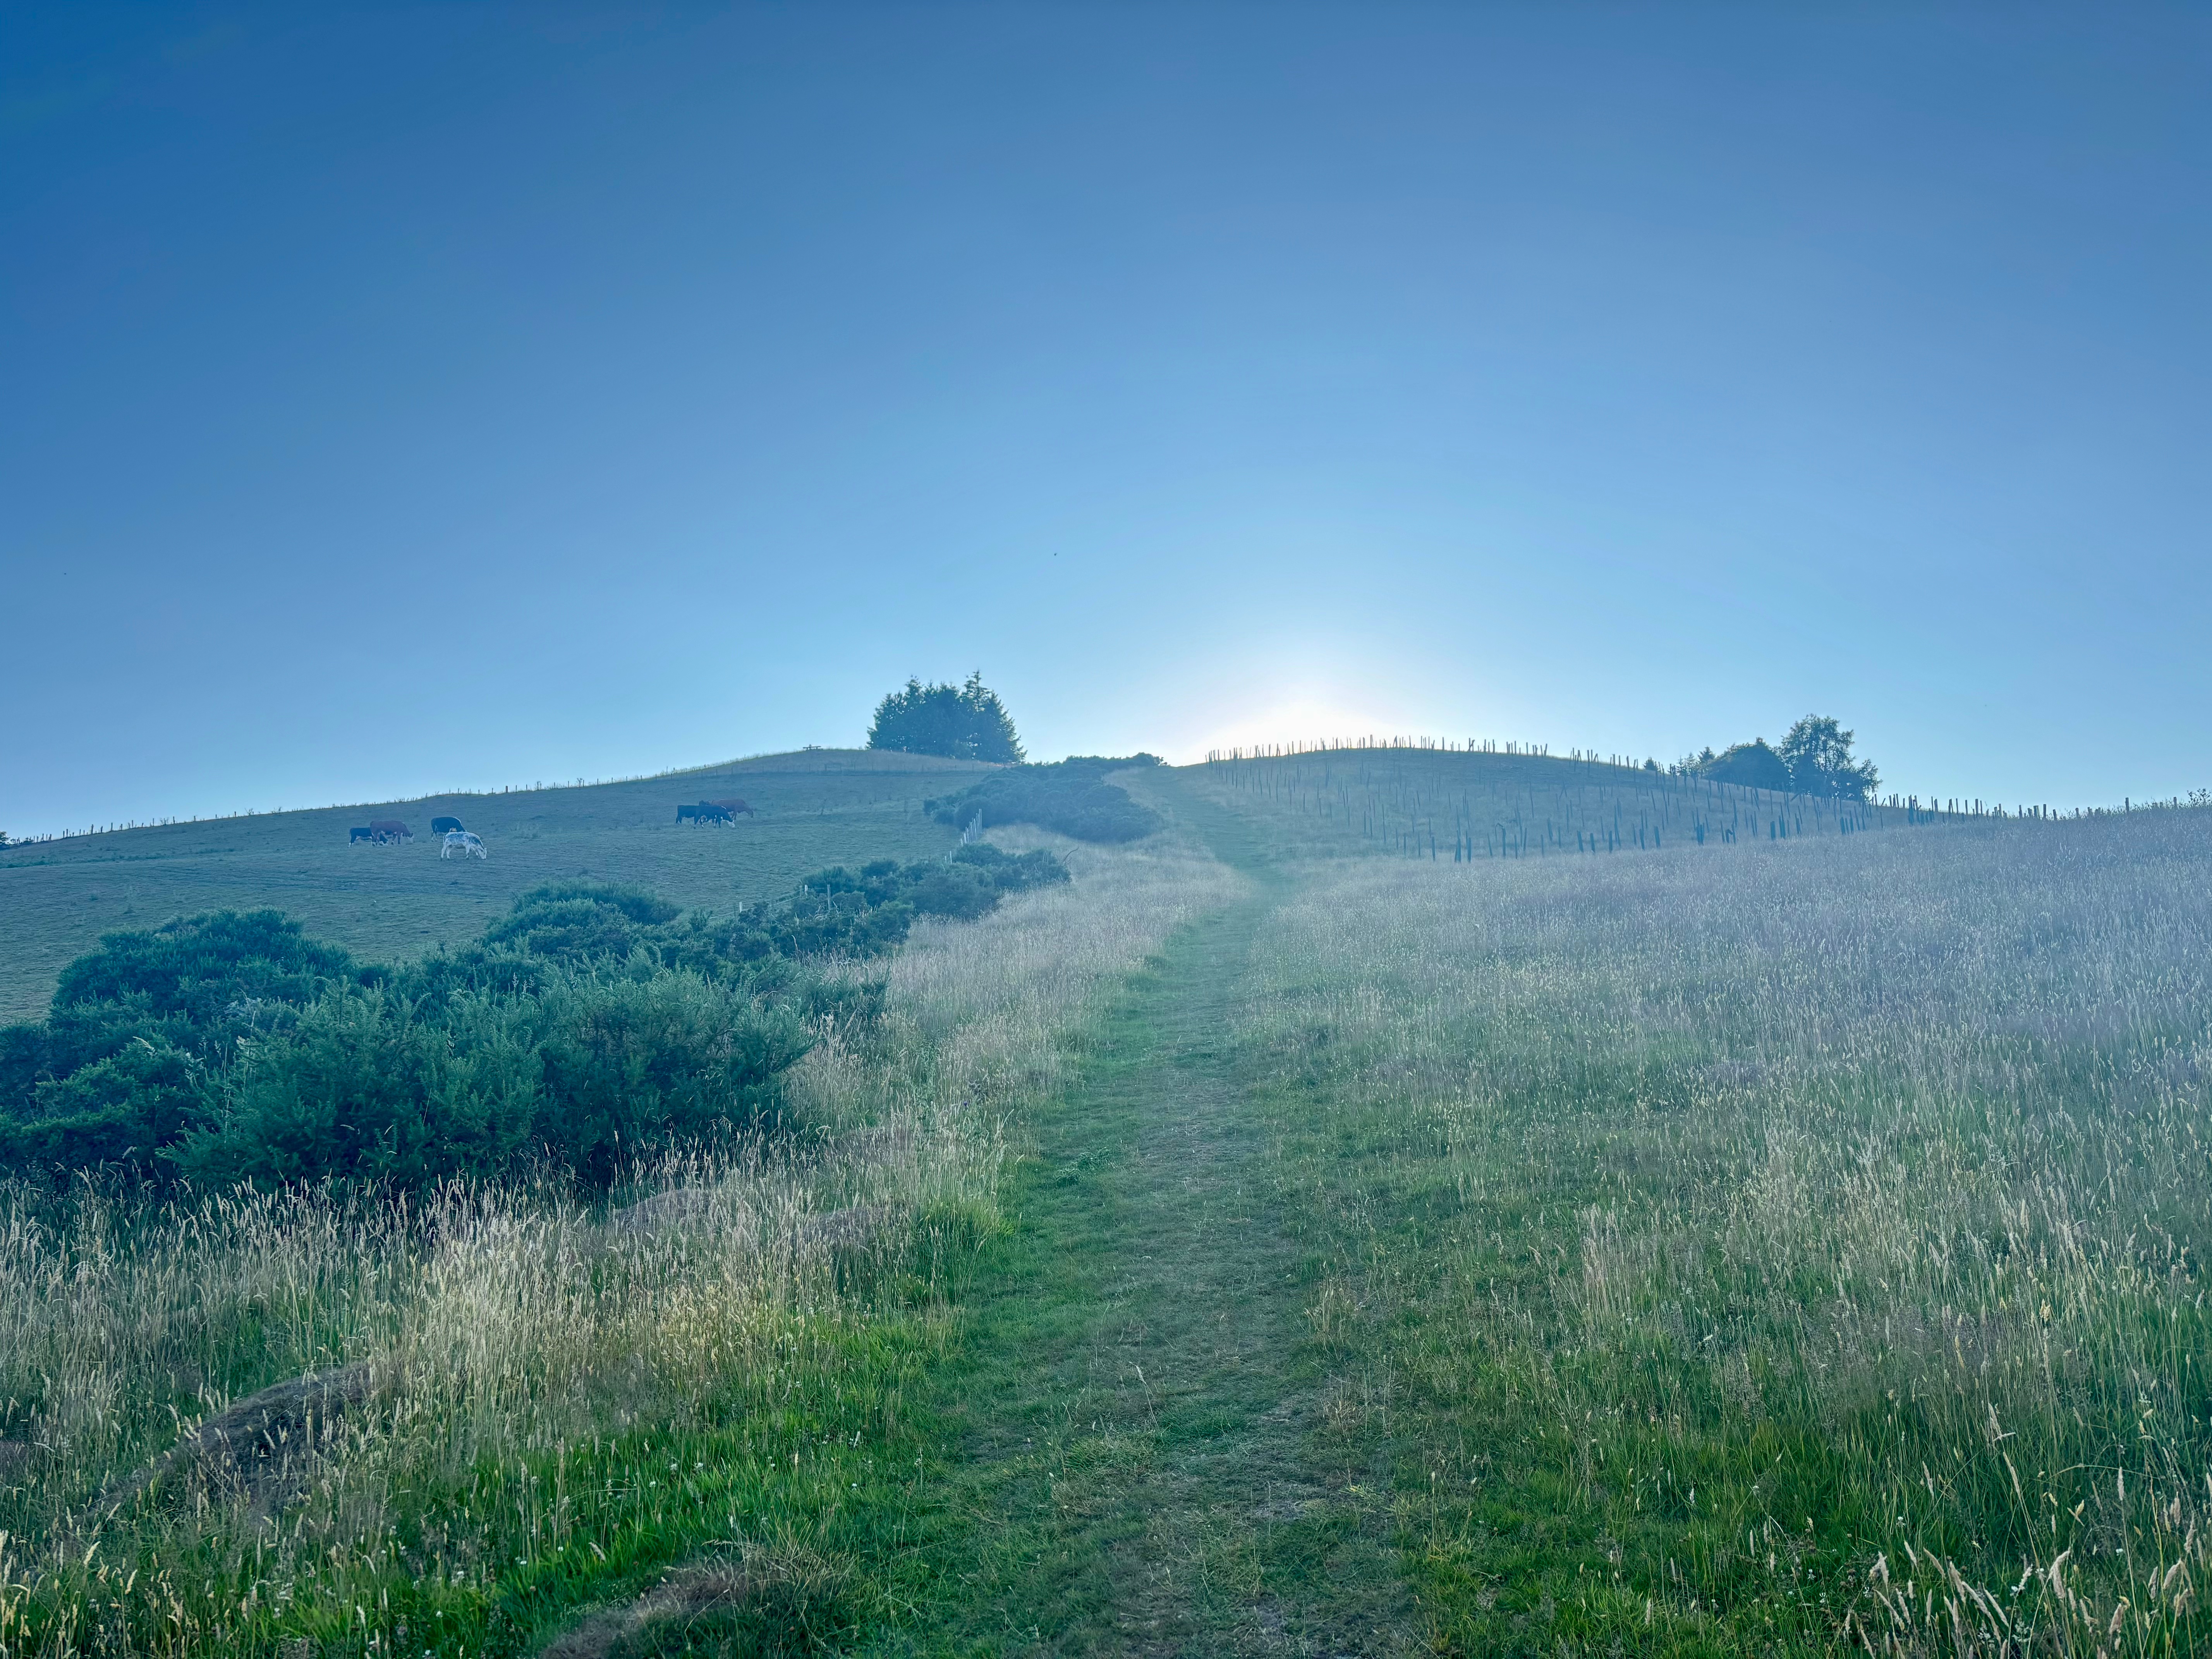
Mechanical sorted, I trundled on and the light was starting to dim after 9:30, but I was still trapped in the sheep field – I wanted a sheep-free night’s sleep.
The first night’s camping spot. Oscar Huckle / The Cycling Meister
Before long, I passed a house and spotted an empty field shortly after – it was more exposed than I’d like but I could see the next section was going to be road, so this’d be my camp spot.
27km ridden, and what a wholesome way to spend a Friday night!
Remote preparations
The pancakes were particularly excellent. Oscar Huckle / The Cycling Meister
After a rather restless night’s sleep (I need to be really banjaxed to sleep comfortably in a tent), I got up at 6am. The plan today was to tick off as much of the remaining 130km as I could and camp again close to the end.
The first 20km were more of the same as yesterday evening – sheep-infested fields with tons of difficult-to-negotiate gates.
I arrived at Rhayader just after 9am and had a substantial breakfast, before resupplying at the Co-Op and a bakery.
I could see there was going to be little civilisation from this point until a shop in Staylittle, which Google reported closes at 6pm.
I was hoping I’d make it there to resupply again, but after knowing how difficult the route was so far, I wasn’t taking any chances and brought enough with me in case I missed it – a bloody good job I did.
All in, I carried 4.2L of fluid.
A tough stint in the chair
The views were worth the arduous climb. Oscar Huckle / The Cycling Meister
The aptly named Puke Hill lived up to its name, starting as a steep road climb that then transitions into a singletrack off-road rockfest. You know it’s tough when you get repeatedly overtaken by a trail runner.
At the brutal hill’s summit, I could see the mellow cycle path that follows the Elan Valley that I’ve ridden in the past. This troublesome alternative climb had taken a lot of willpower and I burnt into my supplies, inhaling my lunchtime pasty, as well as downing a Coke.
Yet more technical singletrack followed, which then turned into an undulating trail with endless water crossings and aggressive rock gardens – another fitting test for the Terra Adventures.
Your feet are going to get wet. Oscar Huckle / The Cycling Meister
Don’t bother trying to carefully negotiate these river crossings – it’s a guarantee you’re getting wet feet.
I kept yo-yoing a load of motocross riders who were also negotiating this section while being slowed up by the numerous gates.
Before the steep tarmac climb up to the Claerwent Reservoir, my water situation started to become severe. I was still ages away from Staylittle, so I started rationing – ironic considering I was next to water!
Not exactly smooth hardback… Oscar Huckle / The Cycling Meister
The reservoir section is described as one of the route’s more forgiving parts, but it still required concentration – the rough surface means line choice is critical.
It was also completely exposed to the baking heat, which made my water situation even more desperate. At one point, I immersed myself in the reservoir to try and combat my thirst.
I was very grateful to a pick-up truck driver who I passed who happened to be carrying a tank of water in the back, who kindly allowed me to refill everything.
Another bout of desperation
Totally cooked! Oscar Huckle / The Cycling Meister
The rest of the afternoon was equally hard-going in the sweltering sun, and I became increasingly run down.
I necked two gels to try and recombust myself up a prolonged ascent and I had to have a sit down shortly after where I smashed down the aforementioned sharing bag of crisps to get some salt into me.
More slow-going technical terrain ensued and I was getting desperate for fluids again at the 120km mark on what seemed like an endless fireroad.
I was very fortunate to spot a campsite where the kind landowner let me use the tap – the fact I guzzled 2,250ml of water in one sitting shows my desperation!
Oh great… Oscar Huckle / The Cycling Meister
After a tarmac stint, the sheep fields made a return, and one particularly tall gate that couldn’t be opened proved particularly tricky where I had to hoist my loaded bike over it.
At the 143km mark, I found an excellent camp spot in another field at the top of the hill. I had 27km left to tick off in the morning – but knowing how slow-going many sections of the route are, I reckoned I’d be on the afternoon train.
Morning mission
This was the view I woke up to at my camp spot. Oscar Huckle / The Cycling Meister
Once I’d awoken and packed everything away, I set off just after 7am through yet more sheep fields and technical singletrack.
This section culminated in a steep and slippery shale-infested descent, where I had to exercise considerable caution as I picked my way down.
The shale-infested descent in question… Oscar Huckle / The Cycling Meister
The route then picked up some narrow, earth-strewn lanes where I was able to make quicker progress – it was at this point I thought I’d try making a beeline for the 09:54 train.
I had to make a split-decision when I could see I was being taken up another off-road climb – do I stick on the tarmac to the end or finish the route proper? Seeing as the climb didn’t look significant, I thought I’d finish what I started.
Just in time for the train. Oscar Huckle / The Cycling Meister
The Dyfi Forest ascent was relatively calm, followed by a fast downhill back to the road. With minutes to spare, I sprinted for Dovey Junction and made it by the skin of my teeth for the train to Shrewsbury – mission accomplished!
Don’t underestimate this route
This is a terrific route, but you’ll have to earn your reward. Oscar Huckle / The Cycling Meister
The Trans-Cambrian Way proved a memorable weekend adventure and was just the training ride I needed ahead of my ultra-endurance race.
Underestimate this route at your peril – of the UK bikepacking routes I’ve completed, it’s up there with the toughest.
Aside from the chain drop, the gravel bike I rode proved perfectly up to the task, but a mountain bike would be more fun on some of the more technical sections.
Bear in mind you’ll lose lots of time negotiating obstacles such as rock gardens, deep river crossings and tricky descents – I’d definitely advise this as a summer-only route.
The Welsh love a gate. Oscar Huckle / The Cycling Meister
And I can’t not mention all of the gates, – I counted 88! That works out to almost a gate every mile, but my arms are sadly not Arnold Schwarzenegger-like after bikepacking this route.
I’m also unsure of the advice to take three days riding this route – you’ll be in a tight spot for food after Rhyader at 50km unless you make a lengthy diversion off the route.
My advice would be to end your first day at Rhayader so you can have dinner and breakfast there in the morning, and then stock up for the rest of the journey.
I highly recommend sticking this route on your list. Oscar Huckle / The Cycling Meister
You may also want to consider packing a water filter or purification tablets for the remote sections, but I’ll chalk my water woes down to bad luck in that I picked one of the hottest weekends of the summer to attempt this route.
Still, I’d thoroughly recommend the Trans-Cambrian Way for the scenic mountain views and varied terrain, but perhaps not the sheep!. However, be warned – it’s not for the faint-hearted.
Earlier this summer, I rode the Traversée du Massif Vosgien, a 408km bikepacking route running through the Vosges mountains in Alsace, France.
The predominantly off-road route snakes its way from Wissembourg, a picturesque town on the German border, and finishes in Thann, close to the city of Mulhouse.
I rode with my friends Rob and Jeremy – Rob and I have been on many bikepacking trips together and I used to regularly ride with Jeremy when we worked at a bike shop together.
Little did we know at the start just how memorable a journey this would be . Oscar Huckle / The Cycling Meister
This was an excellent trip – I really enjoyed the varied route that increased in technicality each day and the laid-back French culture.
What’s more, it was my first time cycling in France – sacrilege considering I live in the UK and I’ve been seriously cycling since 2013.
From relying on baguette and pizza vending machines when entire towns were closed to encountering a raunchy shoot while riding a remote trail (it seemingly all happens in France!), read on to learn my key takeaways from riding this route.
What is the Traversée du Massif Vosgien?
Yes, those climbs are punchy… Strava
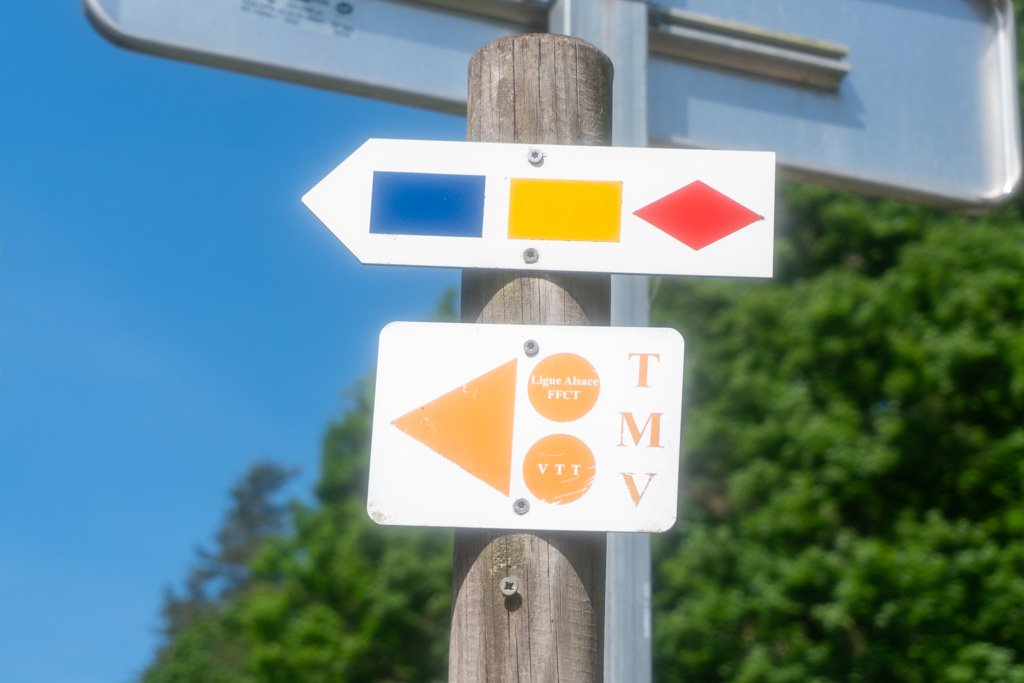
Although Rob initially encountered the route on Bikepacking.com, the Traversée du Massif Vosgien dates all the way back to 1897, where it was designed by Club Vosgien (a hiking club) to celebrate their 25th anniversary.
In 2005, it was officially mapped by the Alsacien chapter of the FFCT (French Cycle-Touring Federation).
White and orange placards with TMV lettering can be regularly found along the route (but don’t solely rely on them!), which is 85 per cent unpaved, with the highest point of the journey 1,248m.
You’ll see TMV signs like this dotted around the route. Oscar Huckle / The Cycling Meister
The route is best described in three sections – the first 90 miles or so is punctuated by short and sharp hills that rarely rise above 400m elevation. You’ve then got around 70 miles where the climbs start to extend up 800m elevation and then for the remainder of the route, you’re in the Vosges proper as the ascents head above the 1,000m mark.
Bikepacking.com rates the route as a five out of ten on its arbitrary scale, and suggests it will take six days to complete the route – advice we ignored.
Gravel or mountain bike?
I rode my Niner RLT 9 RDO gravel bike. Oscar Huckle / The Cycling Meister
Delve into the comments section on the Bikepacking.com route and you’ll see there’s a pretty even split between those who rode the route on a gravel bike and others on a mountain bike.
I’m pretty confident on a gravel bike, so that felt the obvious choice – ideally a model with generous tyre clearances that could handle the more aggressive terrain.
Unfortunately, none of the test bikes I was thinking might be contenders for this route materialised, and my 3T Extrema Italia (with its massive 57mm tyre clearance) was out of action while I waited for a hard-to-find lower headset bearing to arrive.
My Niner accompanied me on the fearsome Seven Serpents. Enrica Pontin / Seven Serpents
So I rode my tried-and-tested Niner RLT 9 RDO – a familiar gravel bike and my other main testbed for anything gravel-related I review.
The bike runs a Campagnolo Ekar groupset with Fulcrum Rapid Red 500 wheels, paired with a set of flared Easton EC90 carbon handlebars, a bump-taming Roval Terra seatpost and a Fabric Scoop saddle.
I wanted all the comfort I could get. Oscar Huckle / The Cycling Meister
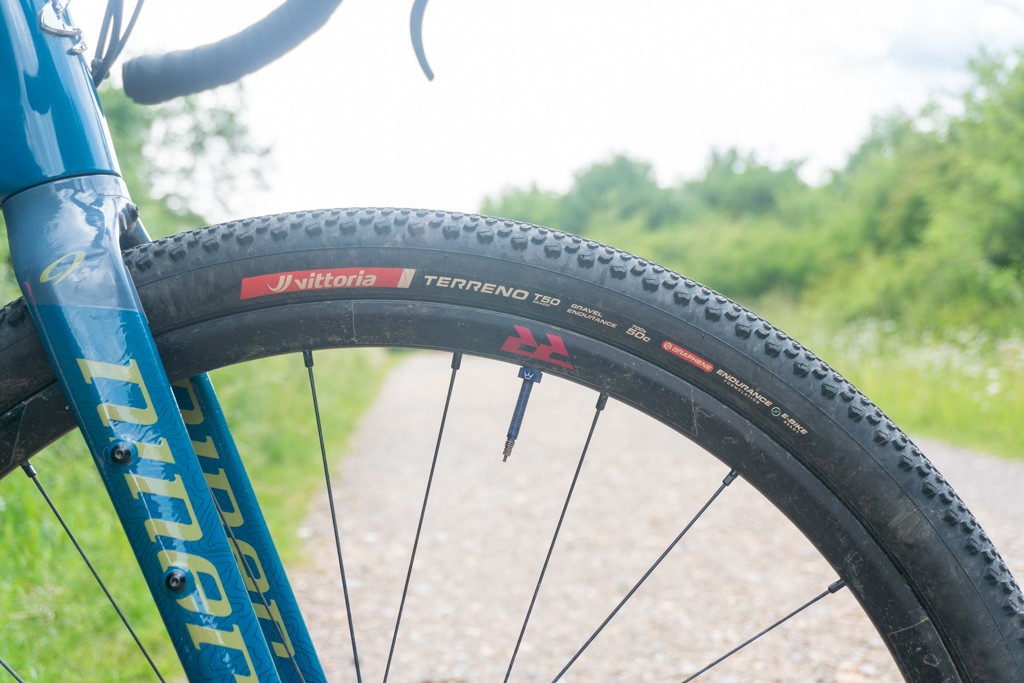
I’d recently started a ‘wide gravel tyres’ group test for BikeRadar, so I fitted a pair of 50mm Vittoria Terreno T50 tyres onto the bike for more comfort and control on the technical sections, otherwise I kept things mostly as they were already.
As for luggage, I ran a predominantly Tailfin set-up, including their recently launched AeroPack Cargo rear set-up.
I ran fork packs instead of a handlebar bag, but the 5L Tailfin ones I had were too small, so I thought it’d be a great opportunity to test the Old Man Mountain Hemlock fork packs I was recently sent.
Other than a stick getting caught in the rear derailleur, the set-up was excellent. Oscar Huckle / The Cycling Meister
Since there were remote sections without civilization, I also wore an Apidura Racing Hydration Vest with a 2L bladder, in addition to two 750ml bottles.
All of the equipment worked perfectly – except for the Ekar rear derailleur. Riding what appeared to be an unassuming trail on the third day, a large stick managed to find its way in between the derailleur cage and cassette.
With the offending stick removed, I couldn’t get the rear derailleur to work optimally in all 13 gears despite extensive trailside fettling. I ended up replacing the rear derailleur after the trip.
All the weather
When it was hot, it was boiling. Oscar Huckle / The Cycling Meister
We experienced a real mixed bag of weather from baking heat to torrential rain.
Things started off perfectly, with the first day a dreamy 21ºC – what more could you ask for?
But the rain arrived late at night and we woke up to heavy, cold and miserable rain. It was a good job we camped under the cover of some trees in the forest, rather than on an open castle moat we’d considered camping in beforehand.
The first half of the second day was rather character building, with heavy and at times, torrential, rain.
We were all very grateful for a mid-morning stop at a house run by a hippie that advertised free coffee (yes, really!). The generous lady had to dash off part-way through our stop and left us alone in the place, encouraging us to make a charity donation, which we did with our loose change.
The weather U-turned from the third day onwards when the heat arrived. While not as oppressive as my Badlands odyssey, it was pretty uncomfortable when you were in the sun, but fortunately large portions of the route are in shaded forest.
My Apidura Hydration Racing Vest came in very handy. Robert O’Keefe / The Cycling Meister
A memorable moment on the final day was when we had just crested an Alpine-like mountain and came across a fountain. We all immediately dunked our heads under it, much to the amusement of some onlooking hikers.
Speaking of water, I was very grateful I’d packed a hydration pack. While I was never desperate for water, I felt reassured knowing I wouldn’t need to constantly fill up (although there are several fountains dotted throughout the route) and I’d suggest you do the same if you ride this route in summer.
It’s not a race
Take time to enjoy the wonderful views. Oscar Huckle / The Cycling Meister
Over the past 18 months, I’ve been getting into ultra-endurance racing, completing the aforementioned Seven Serpents in 2024, as well as Badlands.
Since this was my first extended bikepacking trip of 2025 (by the way, I’d never recommend working for a straight six months without any annual leave ever again), it was difficult to get out of ultra-mode.
I wanted to finish the route and to do that, I aimed for us to get a set amount of distance done every day. I also treated this trip as a training ride for the 1,000km Mother North ultra-endurance race in Norway that was looming in August.
But when things didn’t quite work out, such as the aforementioned rain, that plan started to go out the window.
You need the chill-out moments too. Jeremy Woodward / The Cycling Meister
It’s all well and good having a plan but you need to balance this with fun – this is a holiday after all with friends. It’s not just about the riding – it’s about the evening restaurant or campsite meals, exploring picture-postcard French towns and just having a laugh.
What I will say though is always bear in mind the recommended length of time to do the route – we were overzealous with this and we should have had one more day to build in a buffer for bad weather.
Always have enough food for a day
I never thought life would resort to a vending machine… Oscar Huckle / The Cycling Meister
I described the French culture as ‘laid back’ earlier on – and that’s definitely the approach they take to opening hours.
While I expected shops to shut at lunchtimes and be closed on Sundays and Mondays, I didn’t expect establishments to be closed, well, all the time.
There were multiple occasions where we were let down, where entire villages were shut – they must all be millionaires in the Alsace region.
The French counteract this by having vending machines – yes, you read that right.
Many small villages with nothing open had vending machines which the local boulangerie had stocked up that morning – baguettes, loaves of bread, cakes, you name it, it was there.
On Thursday, it was a bank holiday (Ascension Day) and when there was nothing to eat for lunch in a local town, a local pointed us to a pizza vending machine.
The pizzas were certainly edible. Robert O’Keefe / The Cycling Meister
Having made it known he was hungry for some time, Rob gorged himself silly by straight-on inhaling two full-size pizzas.
However, he may not quite have realised the enormity of the 400m climb in the baking sun we’d have to go up afterwards… the sight of Rob wheezing up that brute of an ascent after his gluttonous pizzafest will be a memory that will long live in my brain.
But poking fun at myself, I admit I got ratty in a town later on the next day (Friday wasn’t a bank holiday, but what’s the point of working for one day before the weekend?!) where there wasn’t any breakfast. Luckily, after some searching, we found a baguette vending machine and order was restored.
When in France… Oscar Huckle / The Cycling Meister
With all this in mind, I’d recommend carrying enough food with you for a day, should the worst happen. It came in handy for us multiple times, for example when we shared a baguette at the top of an energy-sapping climb, or some cake as a much-needed pick-me-up.
That said, when we got to eat ‘real’ food, most of it was excellent. One thing’s for sure, the French know how to bake and some of the restaurant meals we had were top-notch too – I had one of the best steaks (an entrecôte) I’ve had in a while in Wissembourg.
You’ll long for the quiet
If you’re after a people-free route, this one ticks the boxes. Oscar Huckle / The Cycling Meister
Save for the towns of Saverne (the route skirts the town, but we diverted into the centre) and Châtenois, most of the places the route passes through are small villages.
On our fifth day, we were taken on the road up to Bike Park du Lac Blanc and despite the fact we’d previously yearned for places to be open, what we didn’t expect was a noisy busy main road with people everywhere.
We had some superb camping spots. Oscar Huckle / The Cycling Meister
After four days of peace and quiet, we yearned for idyll again and it was blissful once we’d headed off-road after this section.
Sometimes, you want to get away from the hustle and bustle and be at one with your thoughts, and if you stick to the route, the Traversée du Massif Vosgien will give you that.
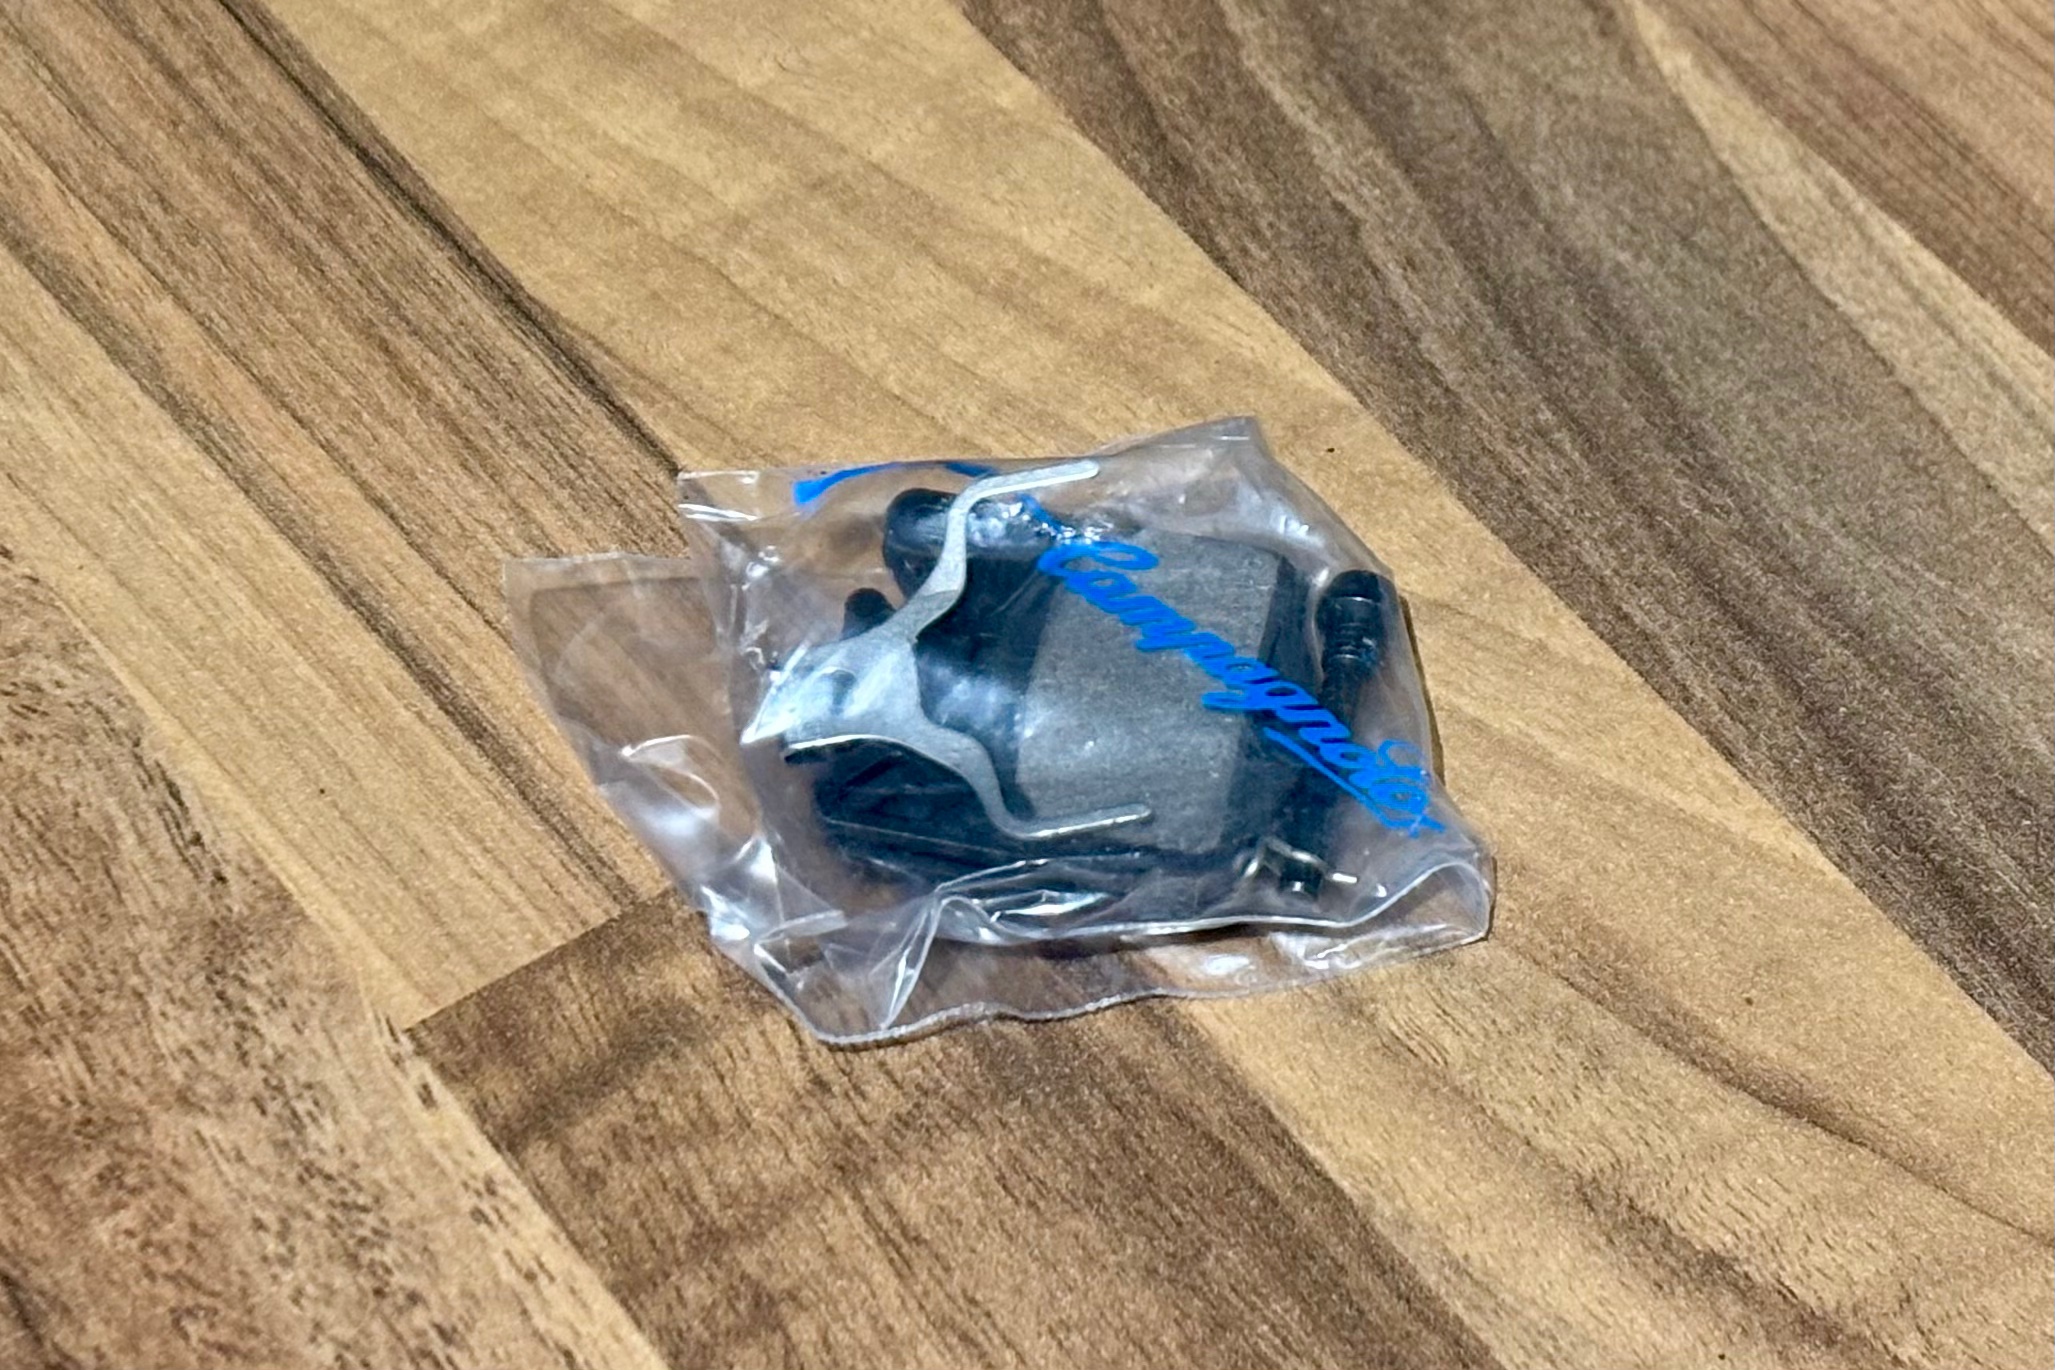
Take brake pads
Leave brake pads behind at your peril…
The thrilling, prolonged fireroad descents and technical sections really do a number on your brake pads on this route and both myself and Jeremy had to replace ours part-way through.
I knew I’d need to change mine because I intentionally started on half-worn pads, but Jeremy’s were pretty new.
It goes without saying you should always carry spare brake pads on a bikepacking trip, and while we knew this, it was interesting that we had to replace ours so quickly into the trip.
Worried we’d wear another set out, both Jeremy and I stocked up at a bike shop in Châtenois. I didn’t want to not finish the route because I didn’t have sufficient spares, but I certainly paid the price – €50 for a set of Campagnolo brake pads (although admittedly they were the fancy DB-410s with an aluminium backing plate)!
Expect the unexpected
You wouldn’t expect to have a view like this disturbed in the way it did. Oscar Huckle / The Cycling Meister
I mentioned how this trip was my first time in France, but that wasn’t the only first I ticked off.
Never in my wildest dreams did I expect we’d encounter a raunchy forest shoot while on a bike ride. There we were, idly riding along a remote fireroad where we suddenly saw a 4×4 parked up.
Nothing dodgy there but to the vehicle’s side was a giggling lady and a man, lumberjack shirt hastily half-buttoned back up, with a third man quickly tucking a camera into the 4×4’s boot.
It took us all a moment to process what we’d just witnessed, but clearly the Vosges region is a fine location for a porno.
A French fancy
This is a superb route. Robert O’Keefe / The Cycling Meister
The Traversée du Massif Vosgien proved an excellent route that I’m still looking back fondly on and a fine introduction to cycling in France.
The route has everything you could ask for – tough, but not insurmountable climbs, wide open vistas and delectable French cuisine. It’s also distinctive for the obvious German influence the Alsace region has, which stands it apart from other areas of France I’ve visited.
Take Bikepacking.com’s advice though, and budget six days to complete this trip to really savour the surroundings.
This route has got me itching to return and explore more of France and I highly recommend it to experienced bikepackers.
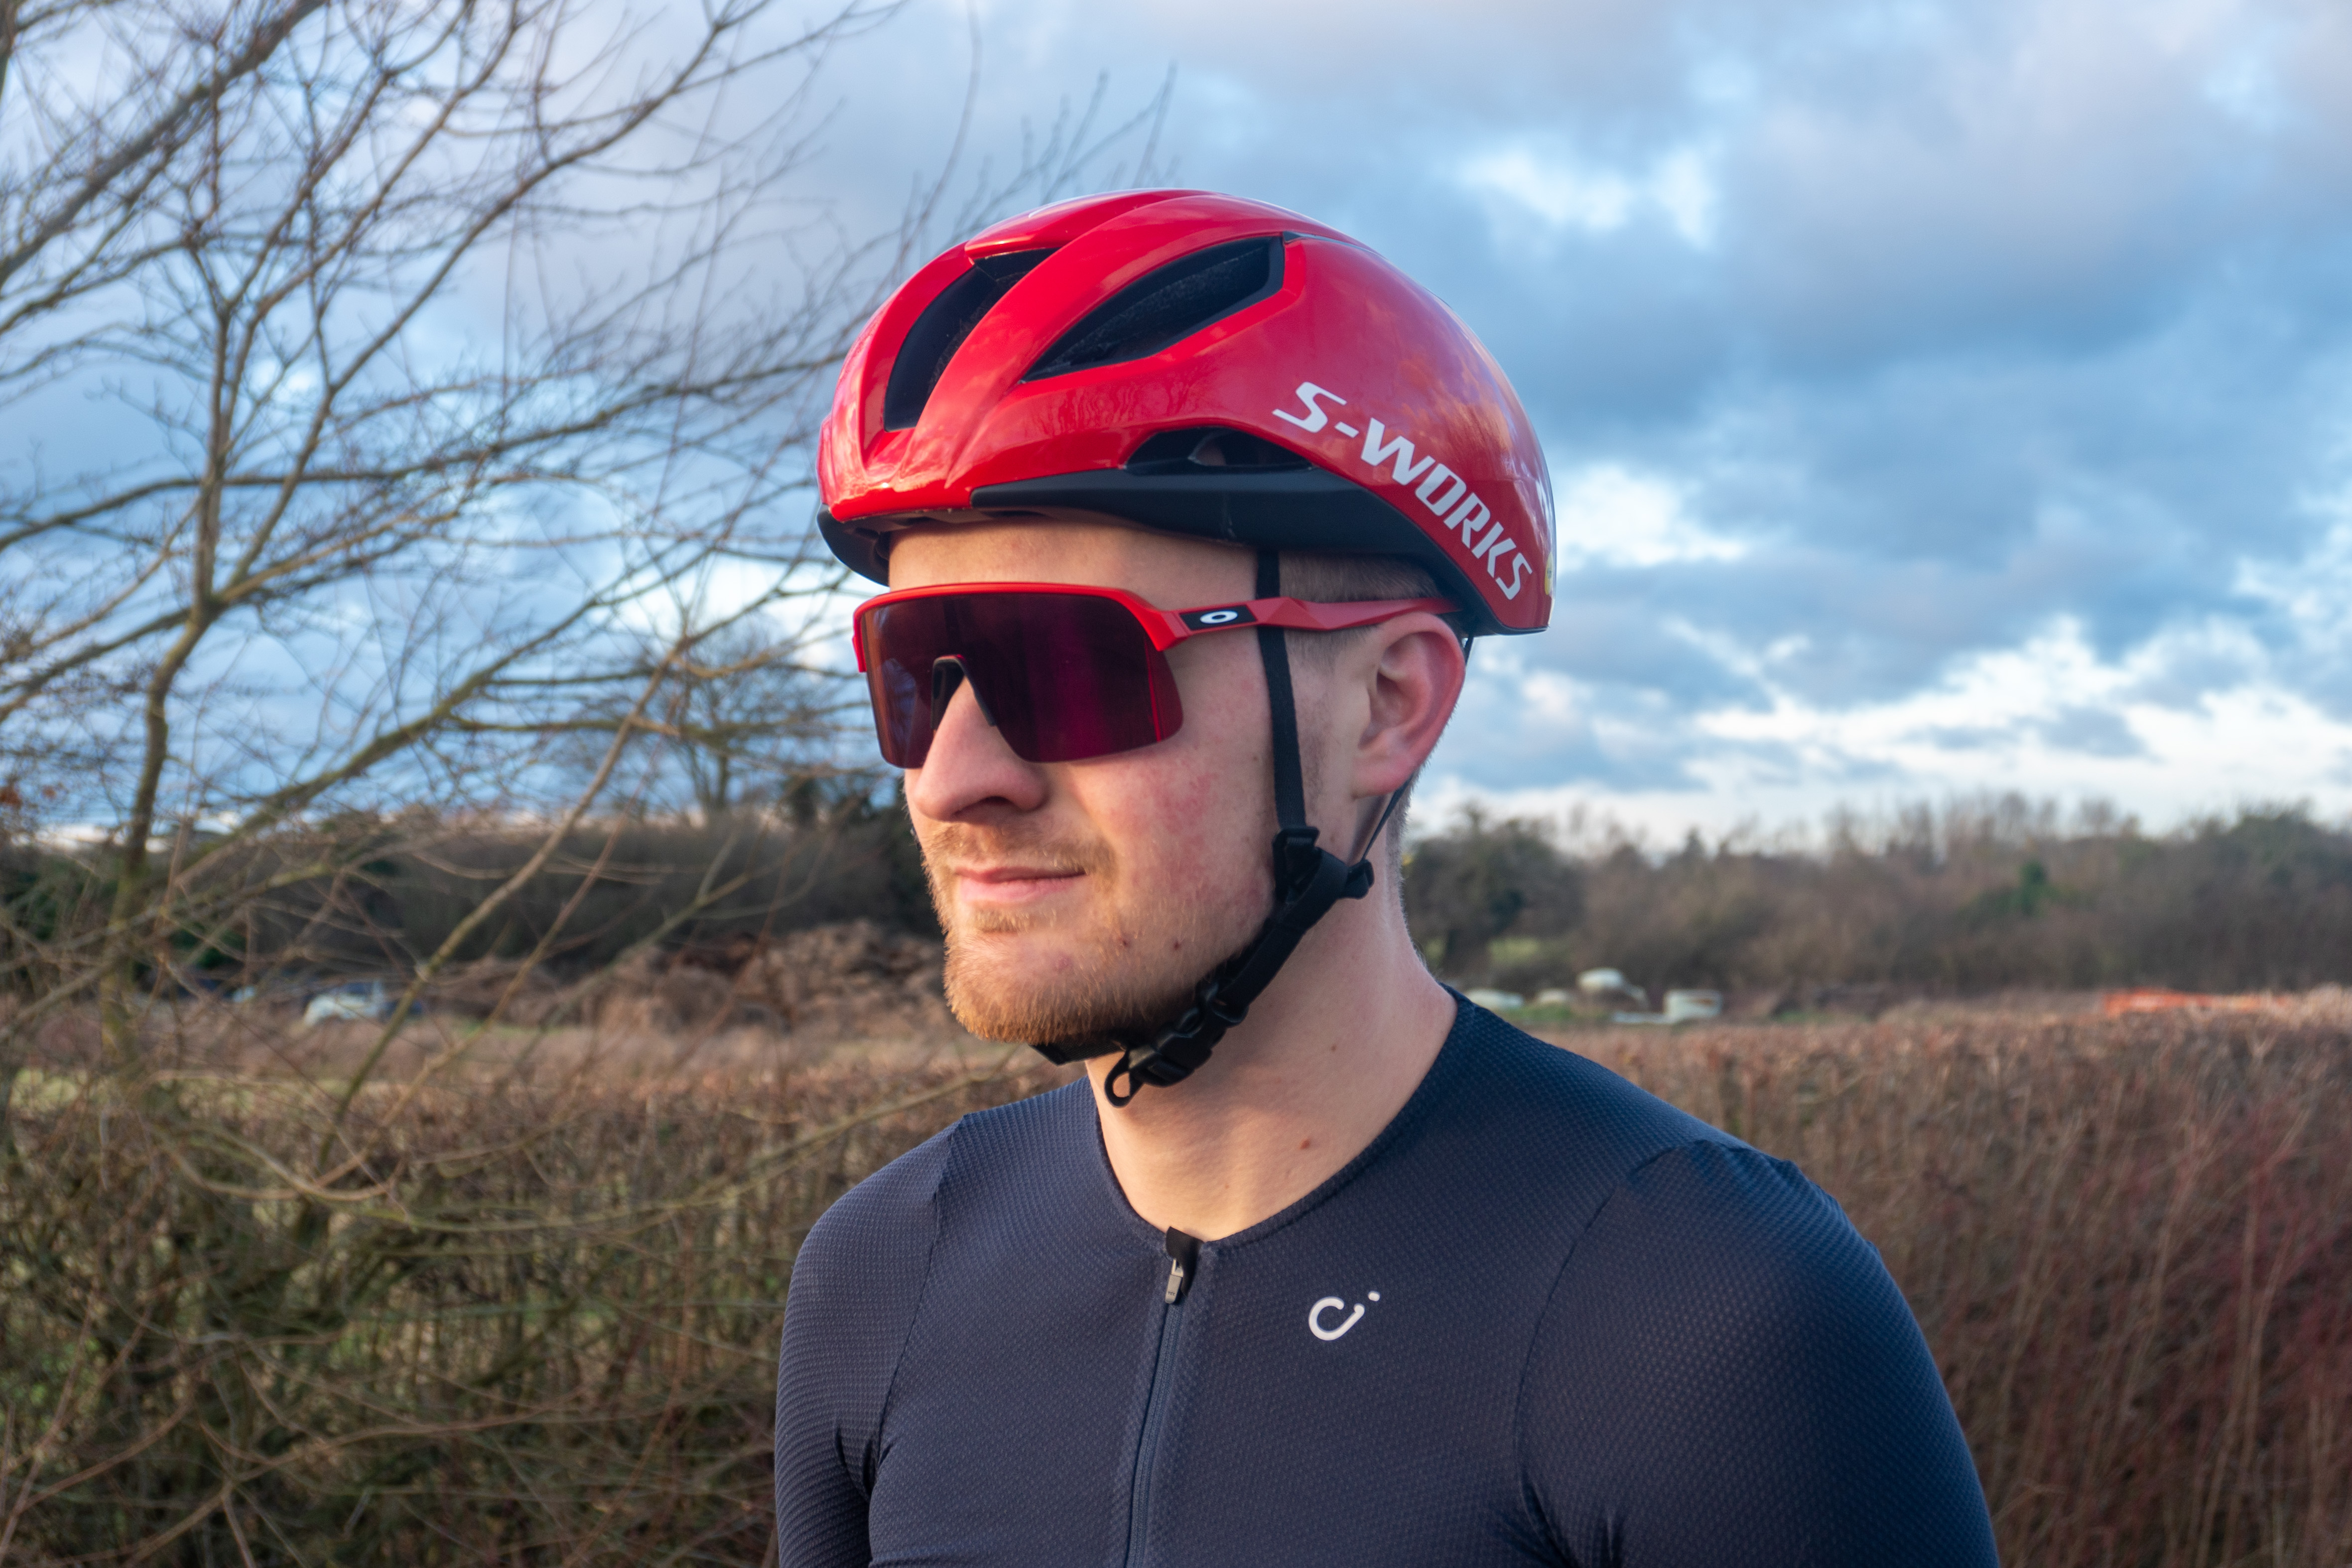
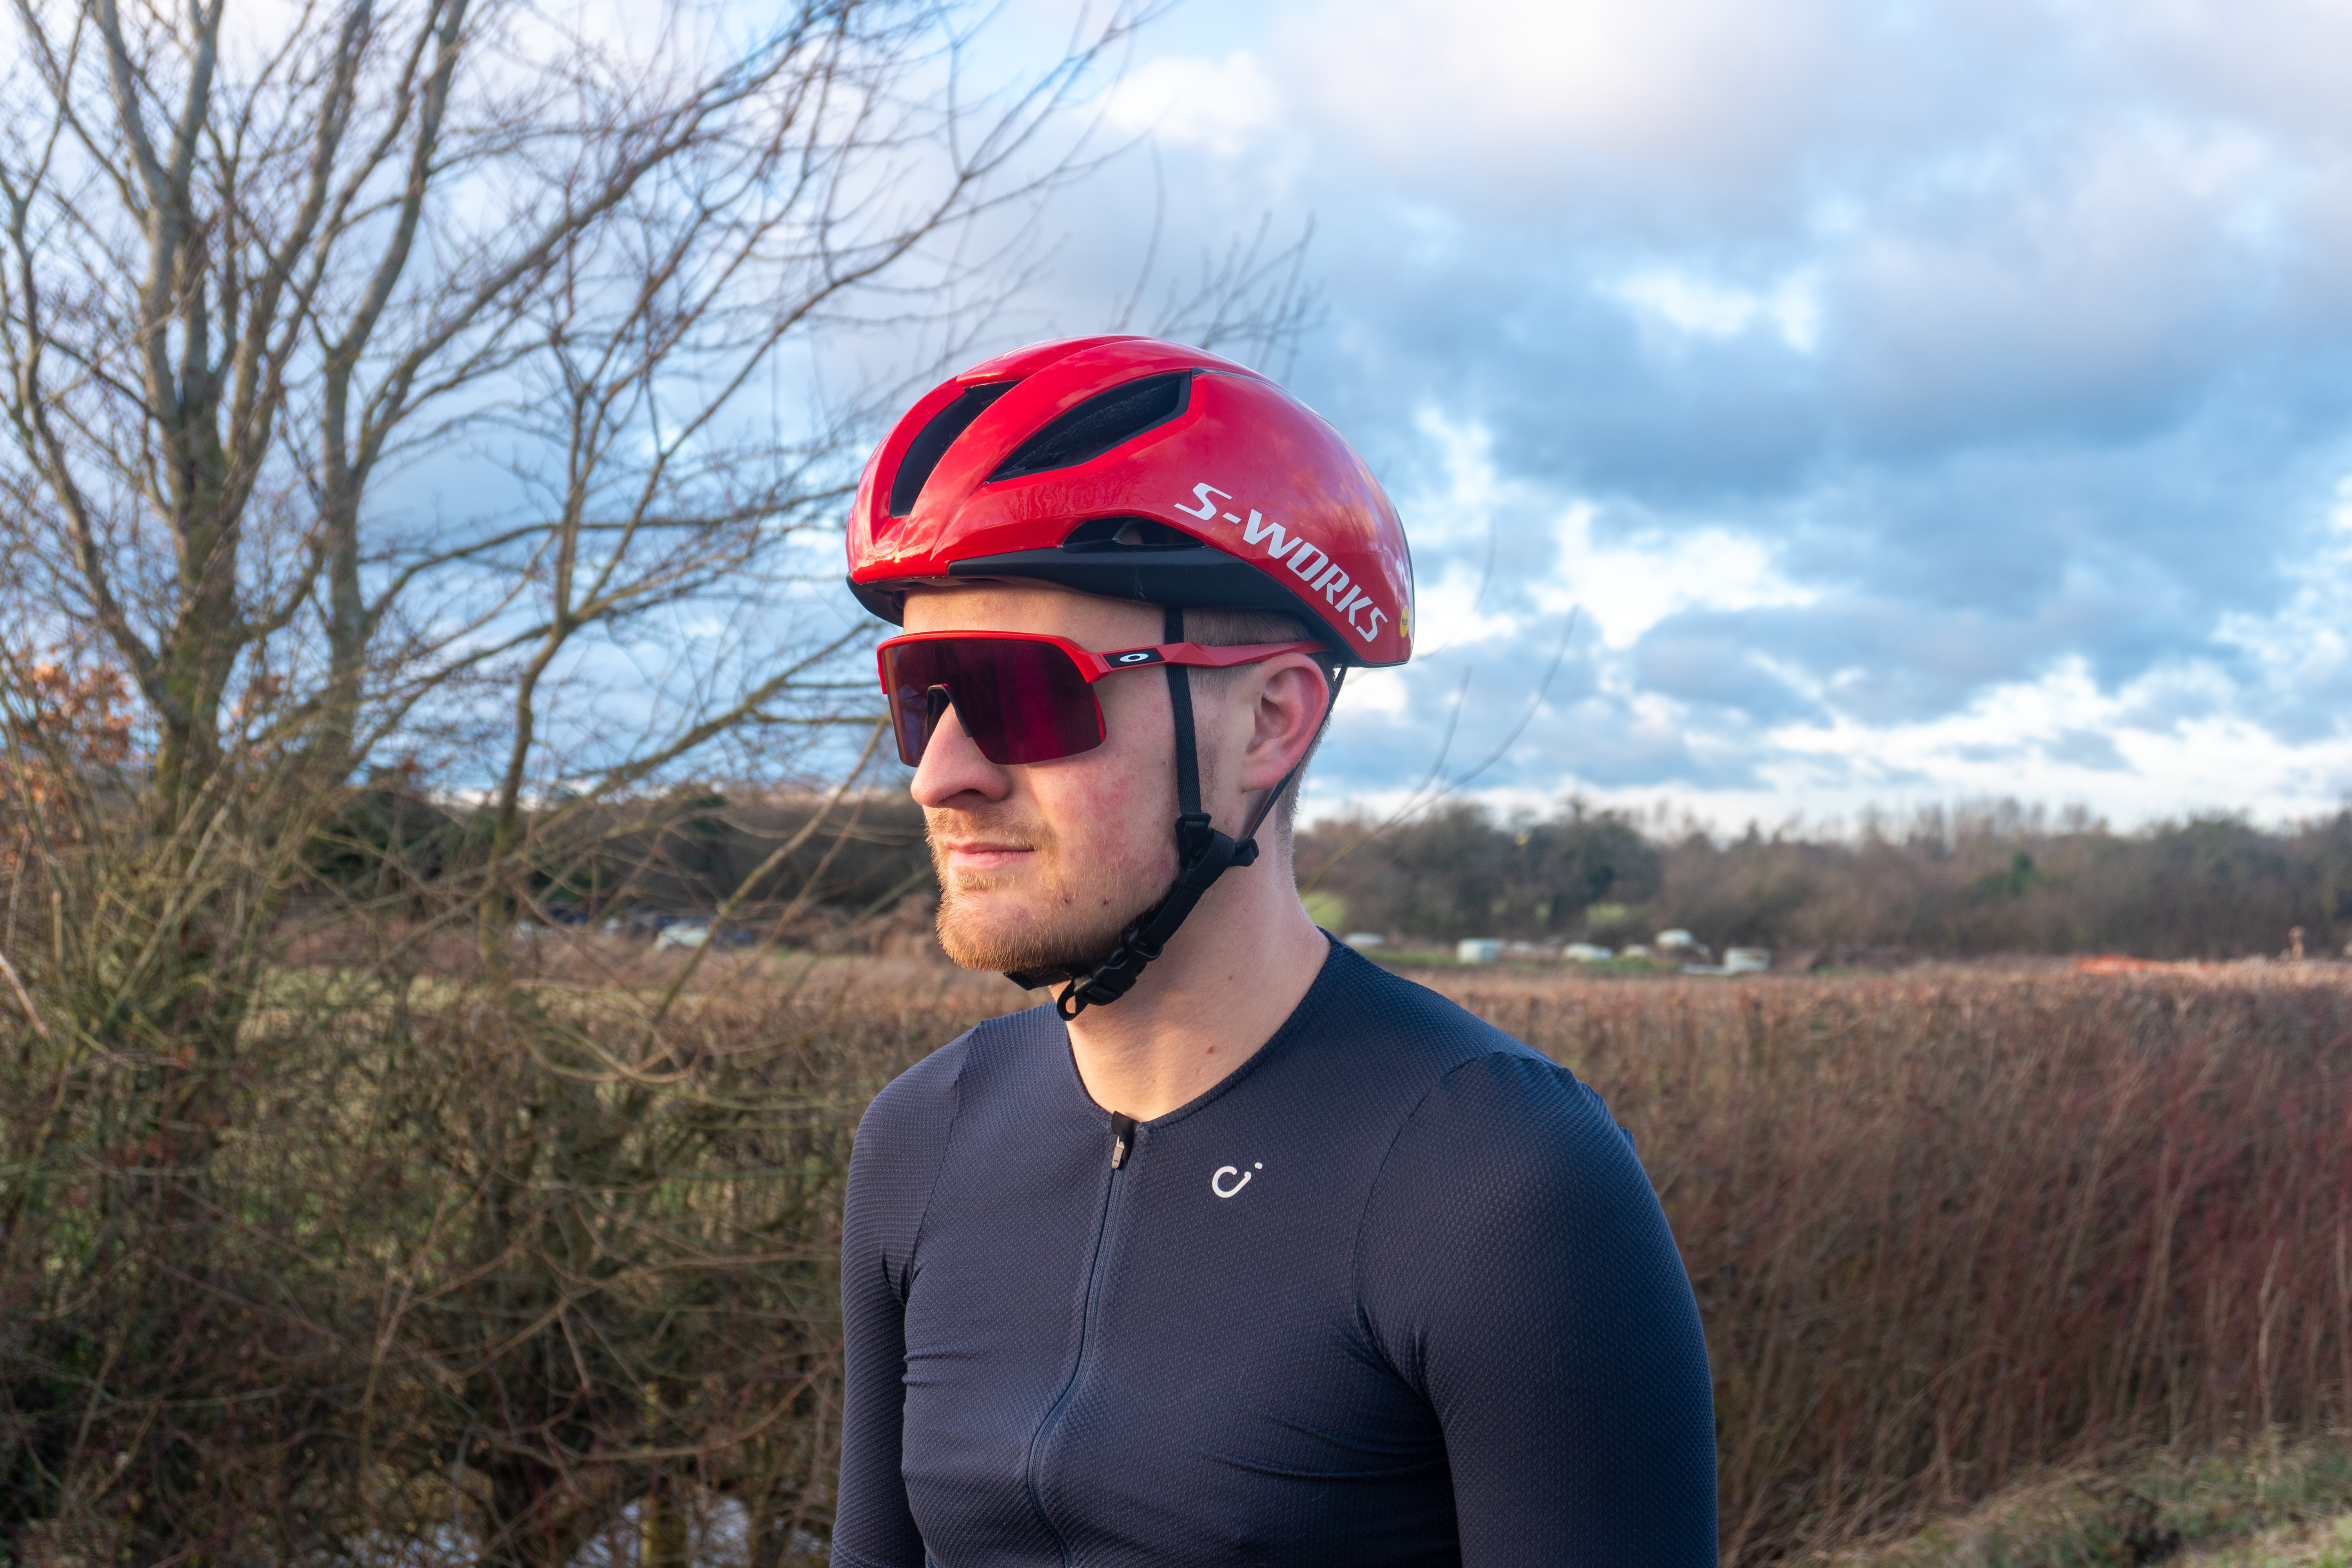
Verdict: A great all-round helmet with excellent ventilation and a reassuringly high safety rating
Pros
+ Good fit + Light weight + Very comfortable + Excellent safety rating + Striking appearance + Wide range of colour options
Cons
– Cranial support could use more up-down adjustment – MIPS Air Node liner gets sweaty at the brow in warmer temperatures
£250 / $299.99 / €290 / AU$425
Annabel Huckle / The Cycling Meister
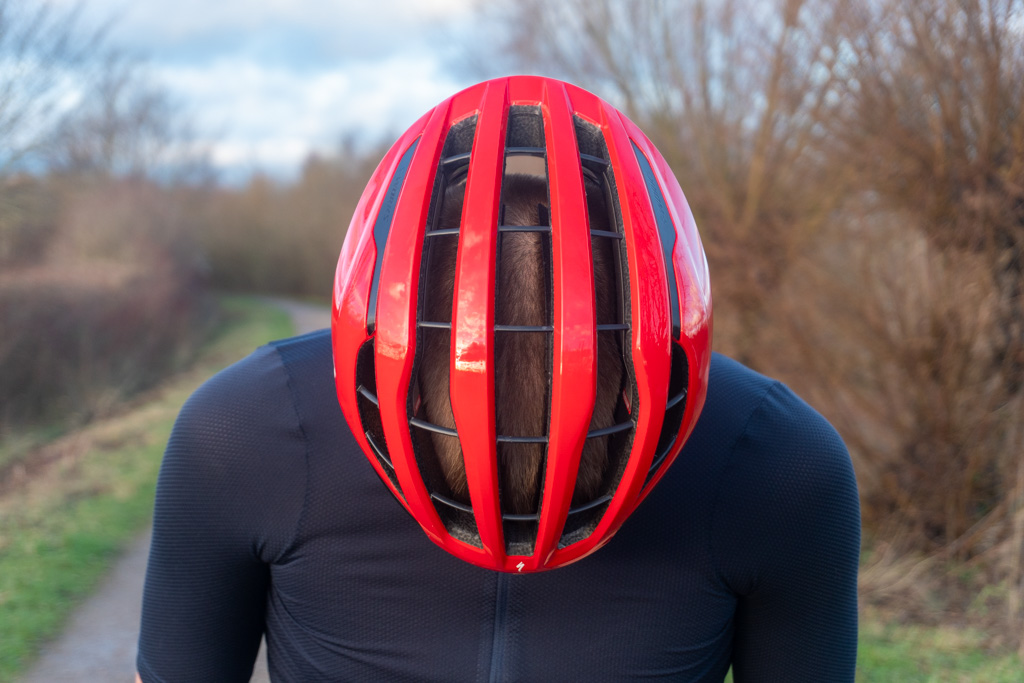
The S-Works Prevail 3 helmet is Specialized’s flagship lightweight road helmet, with the brand claiming it’s “the ultimate all-round helmet that excels in hot conditions, strenuous climbs and mountainous stages”.
The helmet has received quite the overhaul in its third generation, with the various updates culminating in a claimed 24.5 per cent improvement in surface area ventilation over the outgoing Specialized S-Works Prevail Vent II helmet.
Specialized, in fact, goes even further to claim that the S-Works Prevail 3 is the most ventilated helmet it’s ever made.
In testing, the S-Works Prevail 3 has proven a top performer, impressing with its smart design and the ventilation improvements are instantly noticeable on the road or trail.
It’s a shame the brow pad of the MIPS Air Node liner is the only real weak link of the package.
Specialized S-Works Prevail 3 helmet details and specification
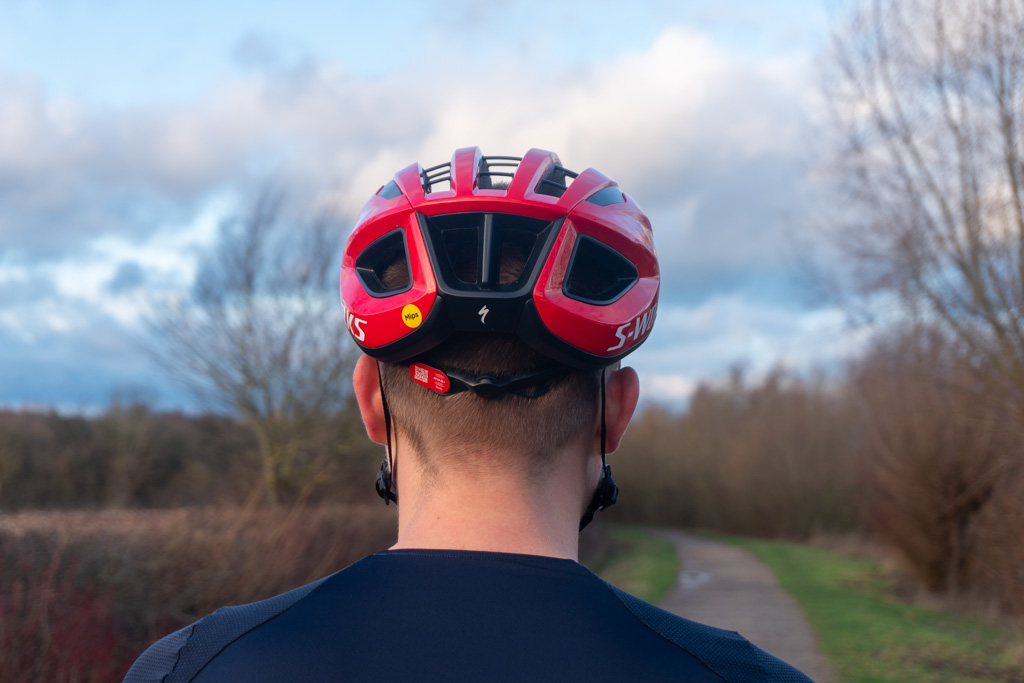
The S-Works Prevail 3 (left) next to the S-Works Evade 3 (right) – Oscar Huckle / The Cycling Meister
The S-Works Prevail 3 sits alongside the S-Works Evade 3 at the top of Specialized’s helmet pecking order, with the Evade prioritising aerodynamics over all-out ventilation.
The key way in how the Prevail 3 is more ventilated than its predecessor is that Specialized has removed the foam bridges from the helmet’s centre, effectively creating through-air channels.
There’s also no shortage of vents – by my count, there are 30.
The vents are sizeable – Annabel Huckle / The Cycling Meister
The S-Works Prevail 3 incorporates MIPS’ Air Node technology, which Specialized says is integrated directly into the helmet padding, with a “sleek, low-friction layer designed to dissipate rotational forces”.
Specialized has also used a new system called ‘Air Cage’, which sees woven aramid cables (five of them) traverse the helmet that are anchored to carbon fibre side panels – most brands will typically use more EPS foam instead.
Should these be impacted, Specialized says these cables effectively work as a suspension bridge, and are designed to distribute the forces throughout the helmet.
The S-Works Prevail 3 has earned a 5-star rating in independent tests conducted by Virginia Tech’s Helmet Lab.
The ANGi sensor fits next to the thumbwheel – Annabel Huckle / The Cycling Meister
The helmet is also compatible with the ANGi Mindset fit system, a small node that fits to the back of the helmet and sends an alert to a pre-designated contact should you experience an impact. It’s a £45 add-on that doesn’t come with the helmet.
The S-Works Prevail 3 features in-built storage for cycling sunglasses and Specialized continues to use its Adjustable Tri-Fix web strap systems for claims of boosted comfort.
Some gaping vents at the rear – Annabel Huckle / The Cycling Meister
The helmet is available in three size options, from small to large.
As well as the Vivid Red helmet on test, you can also pick between eight other colours, including Black, White Sage Metallic, White Mountains, White, White / Black, Black / Chrome and Hyper Dove Grey.
On the scales, my size-large S-Works Prevail 3 CE helmet weighs 305g , 5g heavier than claimed.
Specialized S-Works Prevail 3 helmet performance
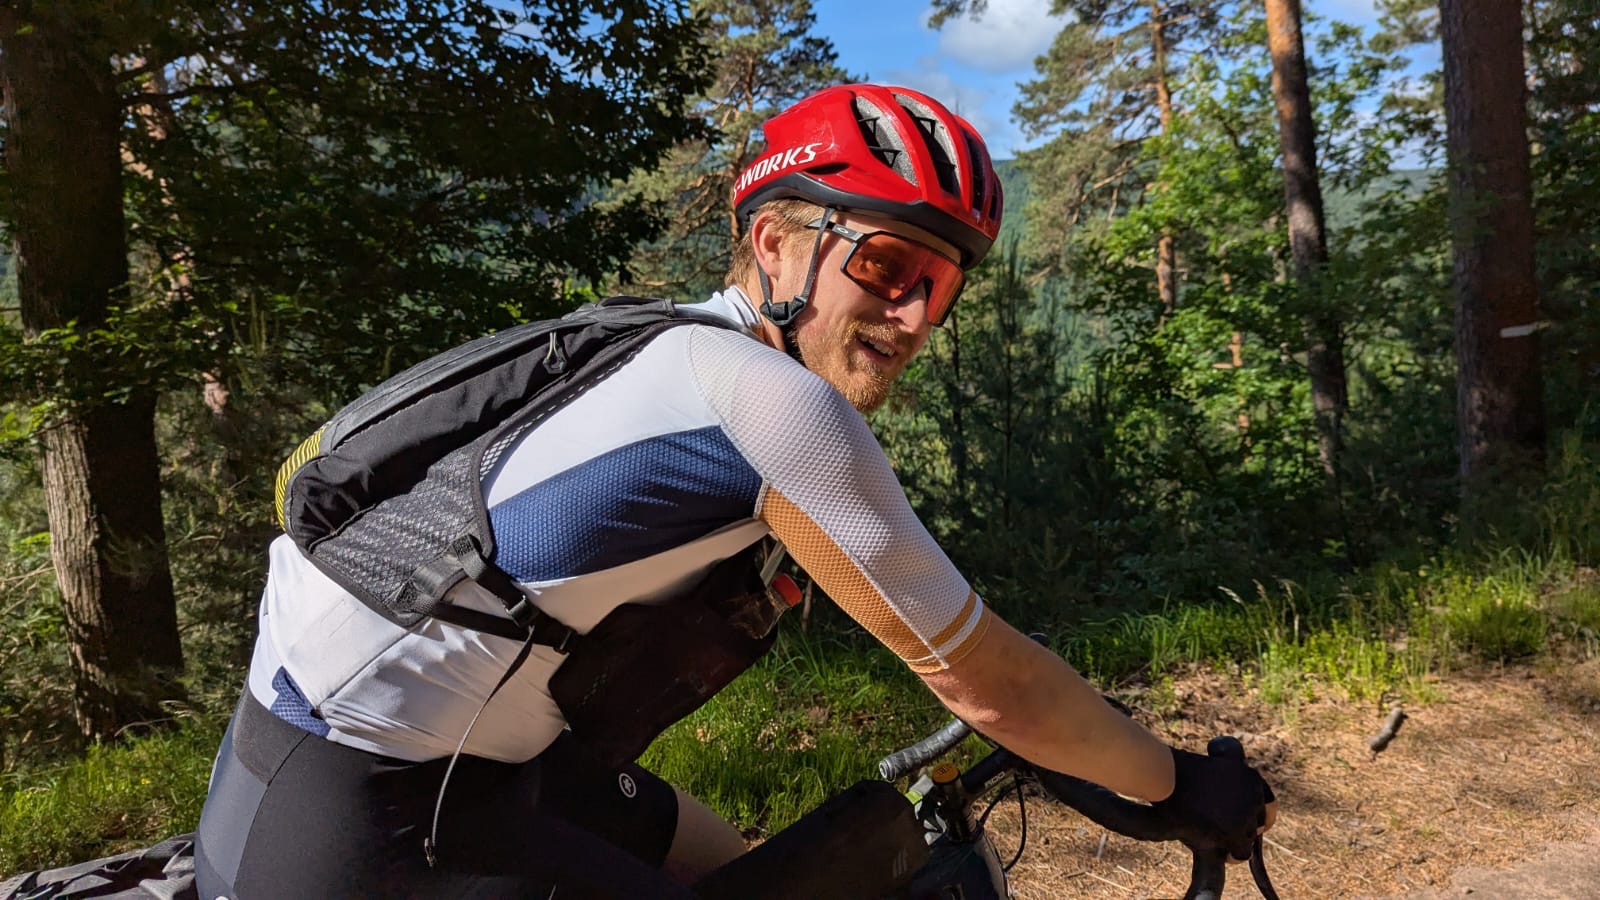
The S-Works Prevail 3 even saw use on a bikepacking trip – Jeremy Woodward / The Cycling Meister
I’ve been testing the S-Works Prevail 3 over the past three months from the middle of spring and into the summer, predominantly in the UK but also on a 400km French bikepacking trip in the Vosges mountains. Conditions have ranged from mid single-digit temperatures to 30ºC heat.
Starting with its appearance, the S-Works Prevail 3 is a smart-looking helmet, with those gaping vents particularly at the front of the helmet, making it stand out from the crowd.
It’s much sleeker looking than the S-Works Prevail II Vent it replaces, with its awkwardly high and pointy rear.
The helmet looks much sleeker at the rear than its predecessor – Annabel Huckle / The Cycling Meister
The Prevail 3’s finish is very premium, and I love the Vivid Red colourway – but if that’s not your cup of tea, there’s plenty of other colour options you can choose from.
Like Specialized’s other helmets, the S-Works Prevail 3 is better suited to fairly wide oval-shaped heads (like mine).
It sits a little higher on my head than the Kask Valegro, my benchmark lightweight helmet, but not as high as Specialized’s second-tier Propero 4 helmet.
It’s easy to adjust the fit – Annabel Huckle / The Cycling Meister
The tried-and-tested Adjustable TriFix webbing system proved easy to adjust in tailoring the fit of the helmet, but a common complaint I have with Specialized helmets is that I wish the cranial support had more up-down adjustment for greater coverage.
While the thumbwheel on the S-Works Prevail 3 is easy to adjust, the Kask Valegro continues to be my gold standard when it comes to fit because it has in-built up-down adjustment.
The S-Works Prevail 3 proved a top performer when riding and not just on sweltering days – my head never felt cold riding in mid single-digit temperatures, even without a cap or buff.
The helmet is a great performer on warm escapades – Robert O’Keefe / The Cycling Meister
On warmer days, the sizeable vents do a great job of guiding the wind through the helmet, which was something I appreciated particularly on the long days of my bikepacking trip, as well as on extended training rides.
On rides over 27ºC heat, I noticed the brow pad of the MIPS Air Node padding would get more saturated than the rest of the helmet.
It never got to the point where sweat dripped into my eyes, but it’s certainly something I was conscious of, and this isn’t something I’ve experienced wearing the Kask Valegro.
It’s worth noting that I’m not a heavy sweater and that I tend to feel warmer temperatures more than most, so your threshold may vary.
The helmet played nicely with my sunglasses – Jeremy Woodward / The Cycling Meister
The sunglasses storage worked as described, with the S-Works Prevail 3 ably holding my Oakley Sutro S and Sutro Lite glasses, as well as my 100% S3’s.
However, I found I had to concentrate when fitting my sunglasses into the dock, and it wasn’t something I could do while riding.
At £250 / $299.99 / €290 / AU$425, the S-Works Prevail 3 is far from a cheap helmet. Kask’s Valegro pips the helmet in terms of performance and is cheaper, retailing for £185 / $250 / €209 / AU$330.
Specialized S-Works Prevail 3 helmet bottom line
It’s mostly a big thumbs up – Annabel Huckle / The Cycling Meister
The S-Works Prevail 3 is an excellent helmet in the American brand’s line-up and isn’t just well-suited to warm conditions – it’s a top performer in milder temperatures too.
It also offers a very comfortable fit (even if it sits a little high and I wish the cranial support were better) and it’s a great-looking helmet to boot.
The fact it comes with a 5-star safety rating from the Virginia Helmet Tech Lab is very reassuring, too.
If you regularly ride in hot conditions, the S-Works Prevail 3 will be a trusty companion but the brow pad of the MIPS Air Node liner is a limiting factor – although your mileage and heat tolerance will vary.
Kask’s Valegro remains my top pick if you’re after a ventilated, lightweight road helmet.
– Arms needed to be fitted under helmet straps to be secure – Lens replacement process a little finicky
from £168 / $214 / €188
Annabel Huckle / The Cycling Meister
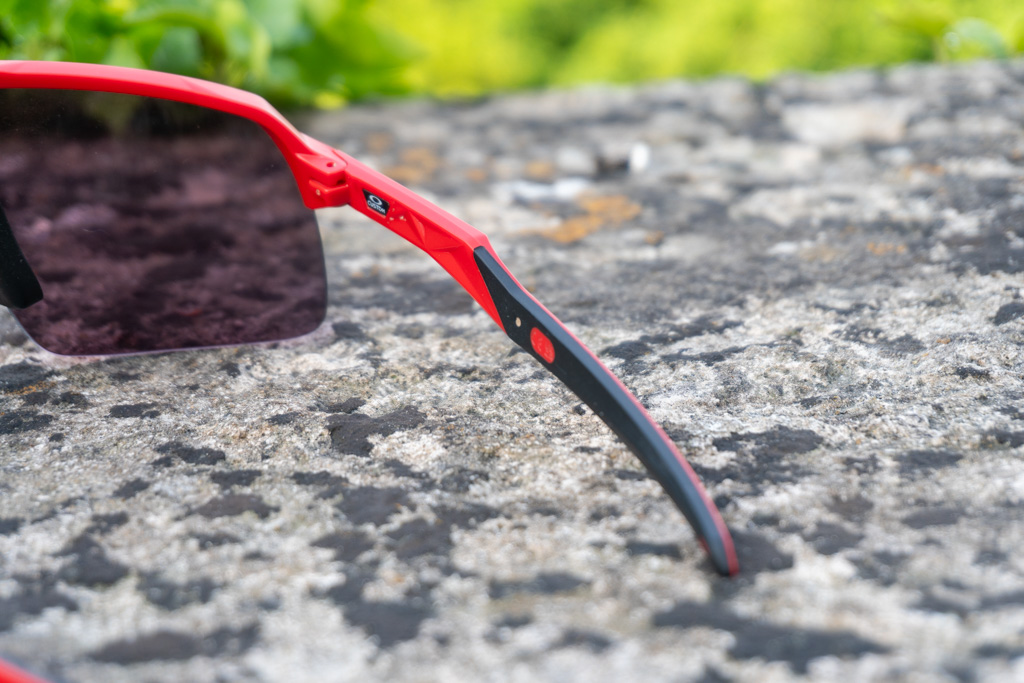
Oakley’s Sutro Lite glasses share the same retro-inspired look as the Sutro but with a semi-rimless design, which the brand claims allows for a greater field of view and improved ventilation.
I’ve found the Sutro Lite to be impressive performers in testing, with the standout Prizm lens continuing to be leaps-and-bounds above the competition. There’s one annoying flaw you’ll need to learn to live with, though.
Oakley Sutro Lite specifications and details
Oscar Huckle / The Cycling Meister
The Sutro Lite is one of eight designs in the Sutro range – there’s the Sutro, Sutro S (a scaled-down Sutro) and Sutro Ti, with each model then having a ‘Sweep’ version, which uses the brand’s famous sweep lens shape. Rounding out the range are a vented lens option for the Sutro Lite Sweep and Sutro Ti Sweep.
Oakley says the Sutro Lite’s design is inspired by the daily life of urban cyclists, with the high-wrap shield lens creating a bold look.
Big glasses are the trend in cycling, with models such as the 100% S3, POC Devour and the Koo Hype’s to name a few, but the Sutro Lite’s are slightly more subdued than those examples.
Oscar Huckle / The Cycling Meister
Oakley’s signature O-Matter frame material is claimed to be durable and provide all-day comfort, and the brand uses its Unobtanium rubber on the inside of the temple and the nose pad for optimal grip.
The Sutro Lite’s are offered in 21 options, so there’ll likely be a frame colour and lens to suit you.
I’ve got a custom set of Sutro Lite’s in for test, blending a ‘Matte Redline’ frame with a Prizm Road Iridium lens, which retail for £192.
These glasses come with the Prizm Road Iridium lens, which have a 20 per cent light transmission and are optimised to accentuate the blacks and greys on the road.
The lenses are interchangeable, so you could buy multiple lenses if you also want to use them for mountain biking or more casual use, for example, with a replacement Prizm lens setting you back £73 / $85 / €80 apiece.
Oscar Huckle / The Cycling Meister
Be aware the lens replacement method differs from the Sutro and Sutro S. You first need to push the nosepiece back and disengage it from the frame, before pulling the frame away from the lens hooks and then working the lens out from the rest of the frame.
This is reasonably straightforward, although it can be a little disconcerting pulling the frame away from the lens. You’ll also want to make sure the nose pad is kept in position, otherwise it can fall off the frame’s metal hook and the last thing you want to do is scratch your lens.
There’s just one-size-fits-all for the Sutro Lite’s and my glasses tipped the scales at 32g – 1g lighter than the Sutro S’s.
Oakley Sutro Lite performance
Annabel Huckle / The Cycling Meister
I tested the glasses for three months from wintry conditions to warm and sunny days on road and gravel rides, and I’ve also used them casually.
Starting with their appearance, I prefer the Sutro Lite’s look over the regular Sutro’s because the semi-rimless design doesn’t make their base stand out – although I appreciate that’s a subjective opinion.
While they look a little odd for casual use, the retro-inspired aesthetic is certainly softer on the eye than the brand’s Encoder or Kato glasses, which are purely performance-oriented.
You get an impressively wide field of view when the Sutro Lite’s are on your face, although you can just see where the arms meet the frame if you really look to the side. That said, the full frame of the Sutro’s doesn’t negatively intrude into your eyeline either, so it’s horses for courses.
As is always the case with Oakley glasses, the Prizm lens is the star of the show. The visual clarity is superb, with zero distortion and the glasses have never fogged up outside of rain, even in humid conditions. You can easily pick out road imperfections and the lens gives you ample sun protection.
While the Prizm Road lens is perfectly adequate for gravel riding, I prefer Oakley’s Prizm Trail option which accentuates greens and browns and would rather have this benefit on technical trails and take a slight hit on tarmac sections.
Annabel Huckle / The Cycling Meister
My only real qualm with the Sutro Lite’s are that when worn outside of the helmet straps (as fashion dictates), they’d slip downward ever so slightly and require occasional adjustment.
I think this happens because the arms are a little on the long side, rather than it being a fault of the Unobtanium rubber (which I’ve always found to perform as claimed).
I found I needed to position the arms under my helmet straps to keep them secure and they never slipped.
In terms of value, the Sutro Lite’s command a premium but as with any Oakley glasses, they’re an investment. I have no reason to suspect the frame won’t be durable and the Prizm lenses are worth stumping up for alone.
100%’s S3 glasses are marginally cheaper at £150 / $139 / €159 and while I really like their shape, the HiPER lens is a step-down from Oakley’s Prizm range.
Oakley Sutro Lite bottom line
Oscar Huckle / The Cycling Meister
Oakley’s Sutro Lite is an excellent addition to its popular Sutro line, with a superb Prizm lens and a cool aesthetic.
The fact that I have to wear the glasses under my helmet straps for optimal security is a niggle, which prevents the Sutro Lite’s from scoring higher.
That said, I’m sure I’ll still be reaching for the Sutro Lite’s for years to come.
“Badlands is the only ride where 1km is like riding 2km,” fellow rider Josep Santoyo emphatically exclaims, as we slowly struggle our way to the top of a 1,000m col in the aggressive 32ºC heat.
Tales of the brutality of Badlands, perhaps Europe’s highest-profile gravel ultra-endurance race, have not been exaggerated. I can confirm this 790km epic through Southern Spain with an upsetting 16,500m of elevation was one hot and arduous but very memorable undertaking.
I somewhat knew what to expect going into this after completing the Seven Serpents earlier in the year, but Badlands proved quite a different flavour.
While the terrain was challenging, the blazing temperatures significantly complicated proceedings and after suffering the beginnings of heatstoke twice, the only way I could realistically finish the race was to become a vampire, with the sleep deprivation eventually taking its toll.
That said, despite my suffering, I felt incredibly honoured to arrive at the finish line. Badlands has provided me with lifelong memories and (save for that outrageous final 120km), I think I’d like to do it again.
From tactics to coping with the heat to experiencing major sleep deprivation, here are the lessons I learned from racing Badlands.
The calm before the storm… (Oscar Huckle / The Cycling Meister)
What is Badlands?
The route for 2024 (Badlands.cc)
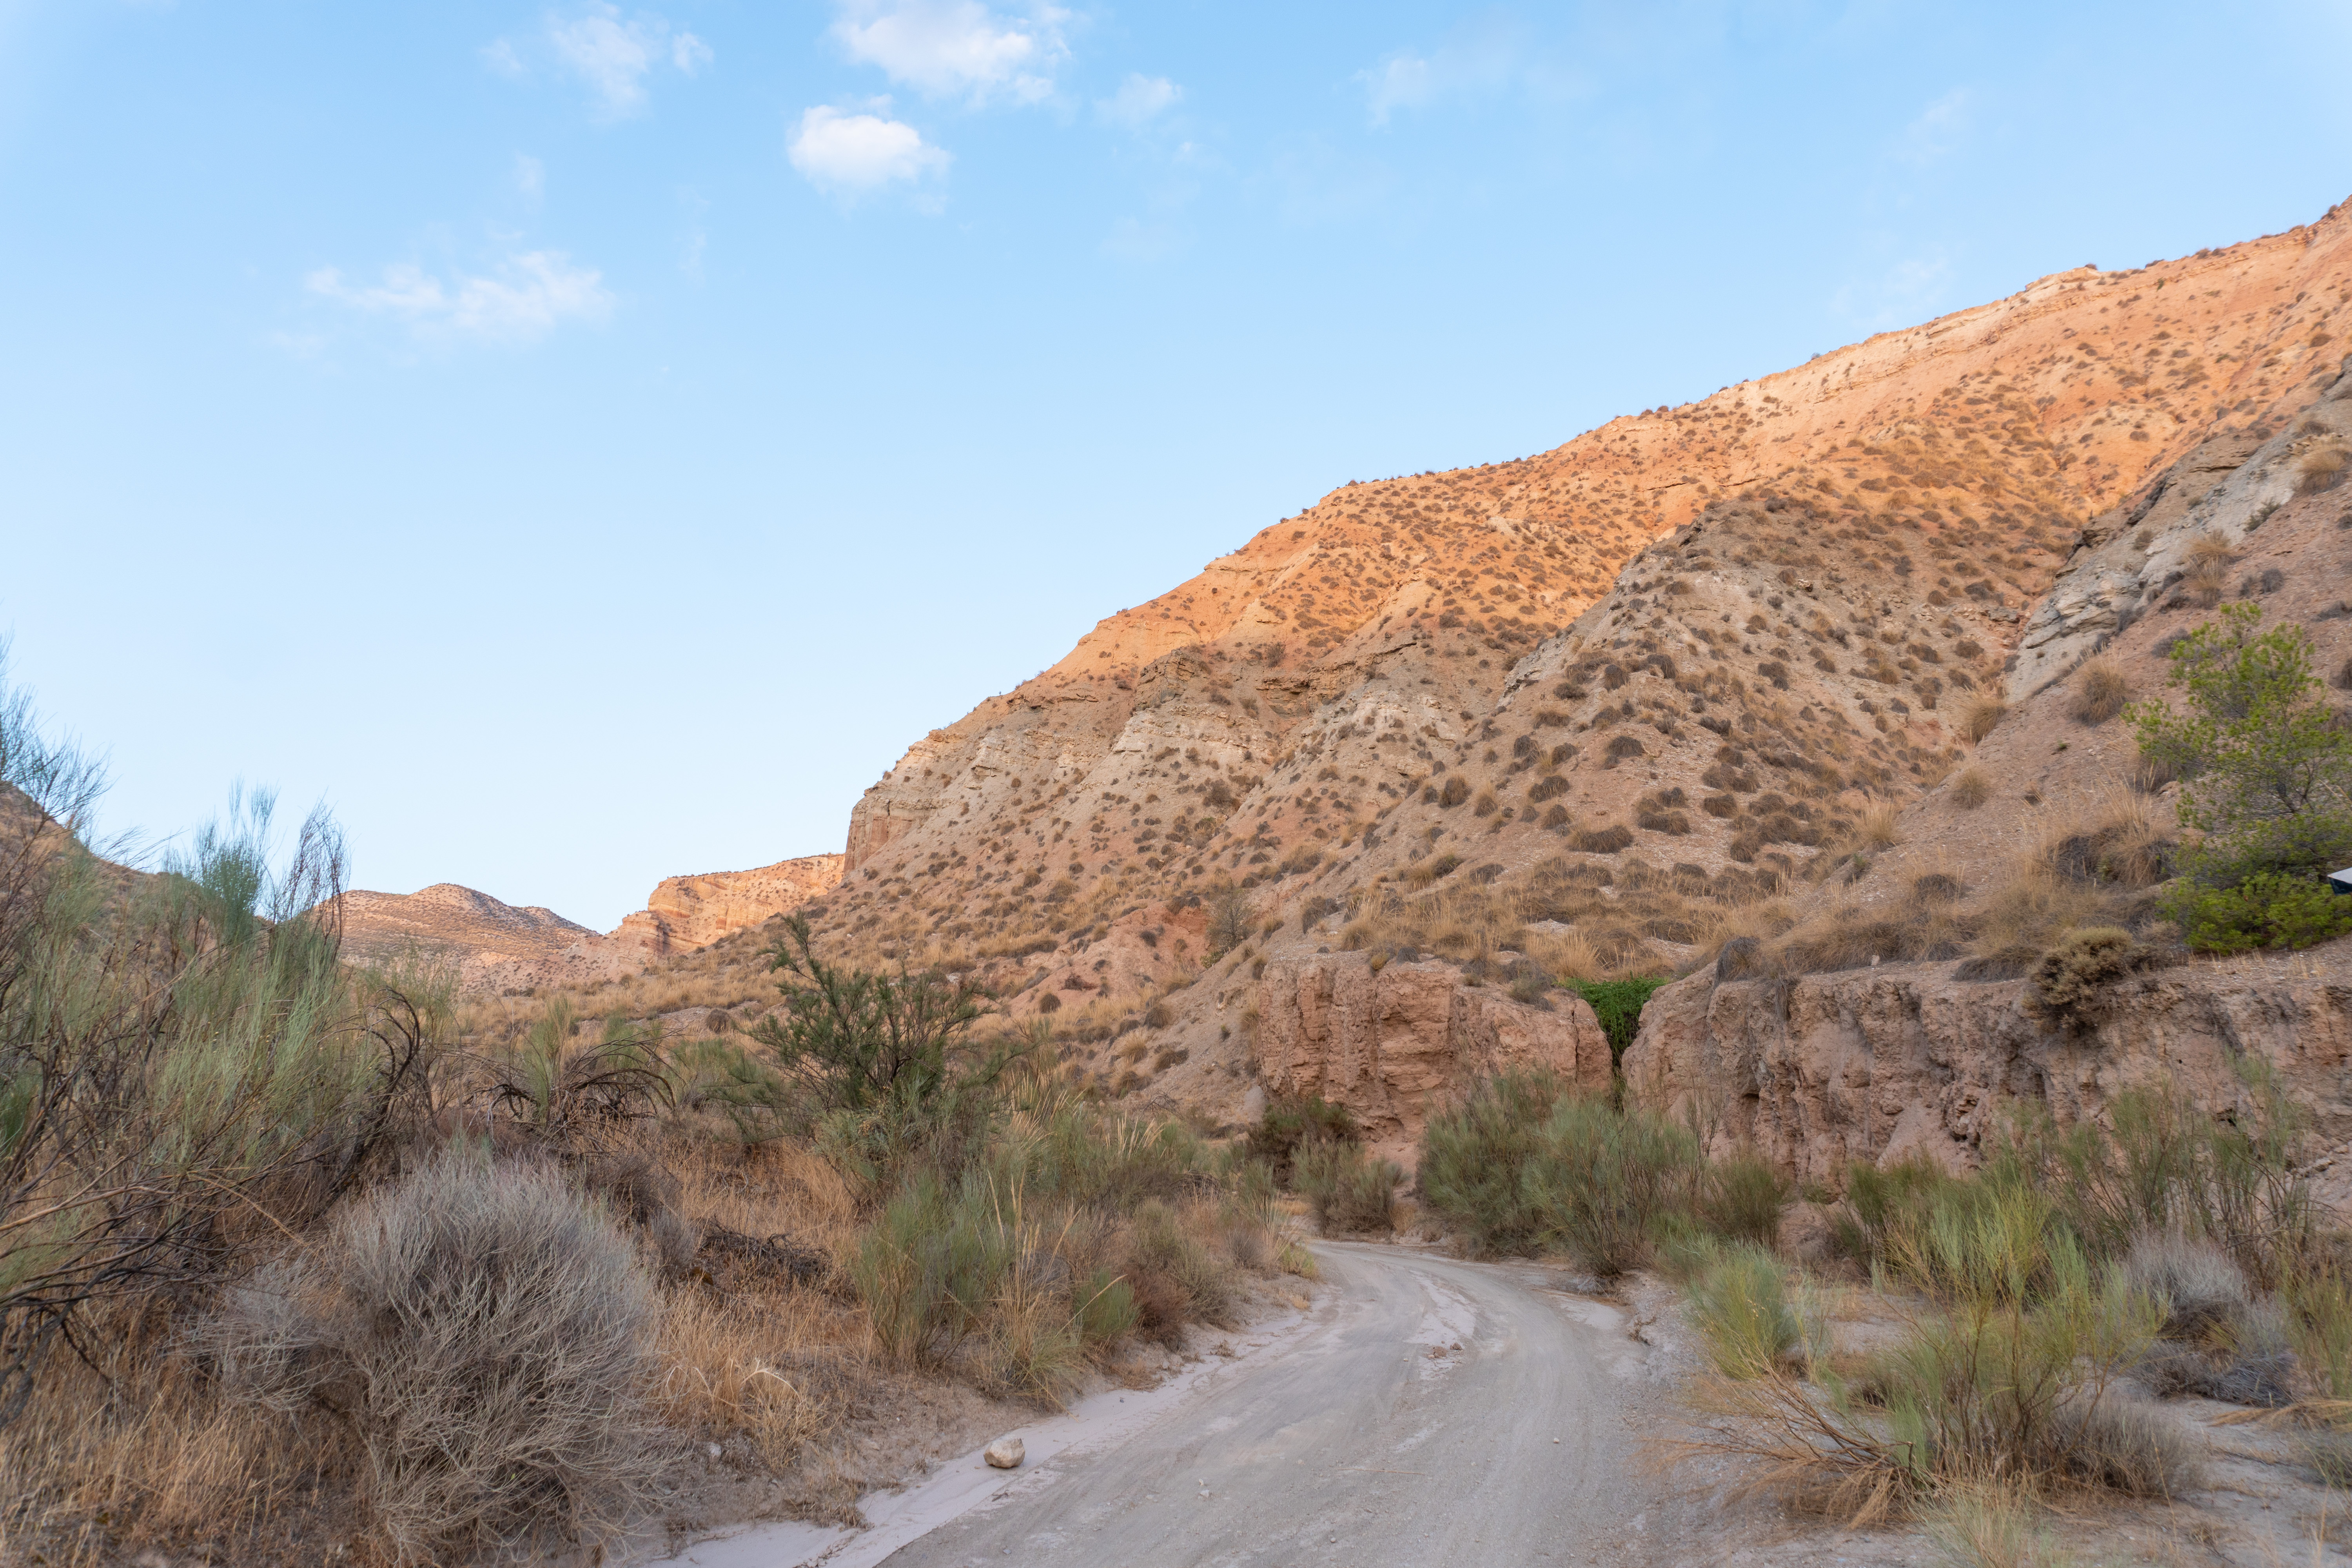
Badlands starts in Granada, Spain and traverses through the Gorafe Desert and the Cabo de Gata coastline, before heading back inland through the Tabernas Desert and finishing in Capileira, a small town in the Sierra Nevada mountains.
The route is the brainchild of David Rodríguez, who previously co-ran Transibérica Ultracycling with Carlos Mazón, behind races such as Transibérica and Transpyrenees.
It’s worth noting that the route varies each year, but you can expect the stats to be around the 800km mark with 16,000m elevation.
I finished Badlands in 121 hours and 12 minutes, placing 132nd out of 213 solo riders. To put into context how tough the race is, the 2024 edition saw 69.7 per cent of riders arrive at the finish line.
In addition, 88 riders rode as pairs in a separate category. While my result is nothing to write home about, I was simply glad to finish this epic adventure.
This year’s race was won by Alejandro Martínez, who finished in a barnstorming 42 hours and 18 minutes, closely followed by Team Amani’s Kenneth Karaya in 43 hours and 58 minutes. Cara Dixon was this year’s winner in the women’s category.
Horse for the course
Oscar Huckle / The Cycling Meister
I rode a 3T Extrema Italia – a bike I reviewed for BikeRadar which I’d specifically cherrypicked thinking it would be the ideal tool for the job. I was right.
The Extrema Italia stands out from the crowd with its colossal 57mm tyre clearance – it’s essentially a monster aero gravel bike. I love the way it bulldozes its way down descents – it simply rips its way through terrain you’d typically exercise caution on the vast majority of gravel bikes.
Oscar Huckle / The Cycling Meister
Further sealing the deal was the mullet drivetrain – SRAM Rival shifters paired with a Force power meter crankset and GX AXS Transmission out back, with a whopping 10-52t cassette. The derailleur does away with a conventional hanger, so in theory, there is no derailleur hanger to worry about bending.
Tailfin very kindly decked me out with a full suite of bikepacking bags, which I’d heavily tested prior to the ride.
Oscar Huckle / The Cycling Meister
The only real chink in the 3T’s armour was the fact I couldn’t run a Tailfin, or any modular handlebar bag.
3T specs its Aeroghiaia Integrale handlebars and because the tops have an aero profiling, there isn’t enough of a rounded section to fit a mount. This meant I used fork bags instead which were more than fine, but I had to pack more intelligently to avoid a weight imbalance.
Because of the lack of handlebar real estate, it also meant I had to mount my Exposure Maxx-D light under my Garmin Edge 1040 Solar, so I’d have been scuppered with a strap-on handlebar bag, too.
Oscar Huckle / The Cycling Meister
But the set-up ultimately worked, even if I made some compromises.
I started the ride on new 50mm-wide Pirelli Cinturato Gravel M tyres, as well as a new chain to eliminate any potential issues.
One thing I learned in the Seven Serpents was to stick with familiar equipment, so I made sure I got used to the bike over many months and I had it fitted, to reduce any chances of injury.
I’d suffered with a knee injury for more than half of the Seven Serpents, and there was no way I was going to put myself through that turmoil again.
You can’t prepare for the heat
You know things are serious when you’re wearing a summer-specific jersey at 7am in the morning (Athletic Affair)
Badlands is famed for its fierce temperatures and it’s very easy to come a cropper from dehydration.
This was an element of the race I was particularly worried about – I don’t do well with heat, especially since I’m accustomed to the UK’s rather temperate climate.
Many riders had trained specifically for racing in the hot weather – I even heard stories of people sitting in saunas.
It’s rare for temperatures to exceed 30ºC back home, so I made a point of getting out when it was hot and wearing less breathable clothing to try and simulate the race – for example, wearing a midweight jersey rather than a lightweight summer-specific option.
But despite my training and eating, drinking and religiously applying suncream, none of this really helped. The scratch rate was high this year and I was even aware of many native Spanish competitors struggling with the heat.
Heaven! (Oscar Huckle / The Cycling Meister)
Going up a climb about 100km into the first day, my body started to feel tingly as I crested the top in the blazing heat. I decided to take shade under a tree with four other riders, and a German chap (I didn’t get his name) looked in a terrible state.
This was the right decision and having half an hour to recompose myself made a big difference. I felt rather shaky for the next 30km until I stopped at a restaurant in Gorafe – this was no doubt the beginning of heatstroke.
Andalusia is rather arid… (Oscar Huckle / The Cycling Meister)
The next day, I made a point of sitting in a bar in the lively town of Gor during the hottest hours – I didn’t want to experience this sensation again, especially because the section following this town was completely remote for 110km.
Unfortunately, this tactic didn’t work on the third day, where I’d been targeting a village to stop at lunchtime.
Little did I know when I foolishly told fellow rider Steve Midgley (who was in a worse state than me at this point ) that it looked like the town was just coming up only for a brutal unrideable climb to stand in our way.
It was roasting hot by the coast (Oscar Huckle / The Cycling Meister)
When I eventually got to the village, nothing was open and the thought of another 16km in the blazing early afternoon heat was not well-received. It’s safe to say I ransacked the supermarket in the next village and if I’d have had to have ridden for another ten minutes, I reckon I’d have been sick.
This experience came back to bite me later in the day – I suddenly felt terrible a few hours later and had to stand by the side of the trail in the shade to compose myself.
Become a vampire
The shade was appreciated on many occasions (Oscar Huckle / The Cycling Meister)
It was at this point it became evident I couldn’t handle the heat – if I was going to finish and I didn’t have the benefit of daylight, I’d have to go longer into the night (I’d already been finishing after 1am the previous two nights).
After my first (and as it would later transpire, only) hotel stop of the race, I strategised by taking regular ‘shade breaks’ up climbs so I could make some progress during the day but then get the bulk of my riding done at night.
This was the tactic I used on Collado Colativí, a long and steep climb that rises up to 1,387m from the coast, and I hit it in the late morning. While the town of Nijar was a serene place to watch the world go by, it felt a waste of time to wait all day so I thought I’d scale the climb in sections.
The Tabernas desert delivered on its name (Oscar Huckle / The Cycling Meister)
As I descended into the Tabernas desert (the backdrop to films such as Indiana Jones and the Last Crusade), it was my first time I’d ever been roasting while descending.
I would go on to ride through the ramblas (Spanish for dry river beds) until gone 3am that night, before I bivvied half-way up yet another monotonous climb, where I hallucinated there was a vicious dog in the distance.
I’d like to thank a Spanish family who invited me onto their patio for refreshments at 11pm, where I joined two fellow Malaysian riders (Rozaimi Suladin and Hajjaj Mustaffa) I’d been yo-yoing throughout the race – a very kind and selfless gesture.
Sleep is everything
On the final night, I slept on a bench by a church (Oscar Huckle / The Cycling Meister)
It was eye-opening to see just how much faster my competitors could ride when they’d properly slept.
Rozaimi and Hajjaj had had a bad day on that fourth day and told me they got eight hours of sleep at the Spanish family’s house.
The duo caught me up the next day when I’d been running on less than three hours of shut-eye. They slept wherever they could – in Tabernas, one of them even had a lie down at the back of the restaurant we ate at.
Next time, I will sleep for longer. I got myself into a proper state during the final 24 hours and I’ve learnt it’s better to stop and rest because then you’ll go much faster if you choose to soldier on.
The Malaysians proved that point by finishing a couple of hours ahead of me on far more sleep.
Don’t expect the finest Spanish cuisine
Tostada was a breakfast staple (Oscar Huckle / The Cycling Meister)
Sadly, Spanish tapas were nowhere to be found on the menu on the Badlands route.
Instead, riders had to settle for bocadillos (ham sandwiches) and tostada at breakfast (toasted bread drizzled with tomato sauce and olive oil). While I was happy enough with tostada, bocadillos just didn’t cut it, especially when you carried a spare sandwich for later in the day and the contents had been in a salty, sweaty pack, or when you wanted a hot meal at lunch or dinner. I quickly got sick of them.
My largest gap between a hot meal was from the afternoon of the first day to the night of the third day, where I had a gluttonous seafood feast at the coast. Boy, was I thankful for that meal.
Fortunately, the food from that point in improved considerably, with more bars and restaurants along the way. Regularly stocking up at supermarkets also proved a godsend.
The last 120km is outrageous
A rare bit of downhill (Oscar Huckle / The Cycling Meister)
After most of the pack are finished off by the heat and ferocity of the course, the last 120km packs in a cruel 4,200m of climbing to kill off any remaining survivors.
Aggressively steep 1,000m cols, near-vertical roads between mountain towns, hike-a-bike and endless nadgery off-road climbs – this section had it all.
To put into context how tough this section was, I rode a measly 100km on the fifth day, having started at around 6:30am and finished at almost midnight.
I was so tired that I had to stop for three hours of sleep on a bench outside a church 36km from the finish because my body had completely shut down and I just couldn’t carry on.
Some say that the 110km remote section after Gor is the hardest part of the race – I’d argue it’s definitely this final stretch by a long shot.
I think I’d ride Badlands again
I think about riding in the Gorafe desert again every day (Oscar Huckle / The Cycling Meister)
I didn’t go into Badlands in the best frame of mind for various reasons and although I was determined to finish, I didn’t have anything to prove after my Seven Serpents victory.
But Badlands really proved to be one hell of a character-building experience, despite my suffering.
Certain images, in particular the Gorafe desert section, have been burned into my mind and I’m still thinking about the race fondly six months on – I haven’t reflected back on the Seven Serpents anywhere near as positively.
This medal’s one for the mantelpiece (Oscar Huckle / The Cycling Meister)
Badlands taught me a lot not only about my strengths as a cyclist but my character as a person. It’s since inspired me to carry on pursuing ultra-racing and I’ve signed up for two events this year – Mother North and Across Andes.
I’m itching to go back and soak up the rugged Spanish scenery again. Whether that be in the form of racing Badlands again, or revisiting the course in my own time when the sun is less fierce, I’m not sure but Andalusia has really captured my heart.
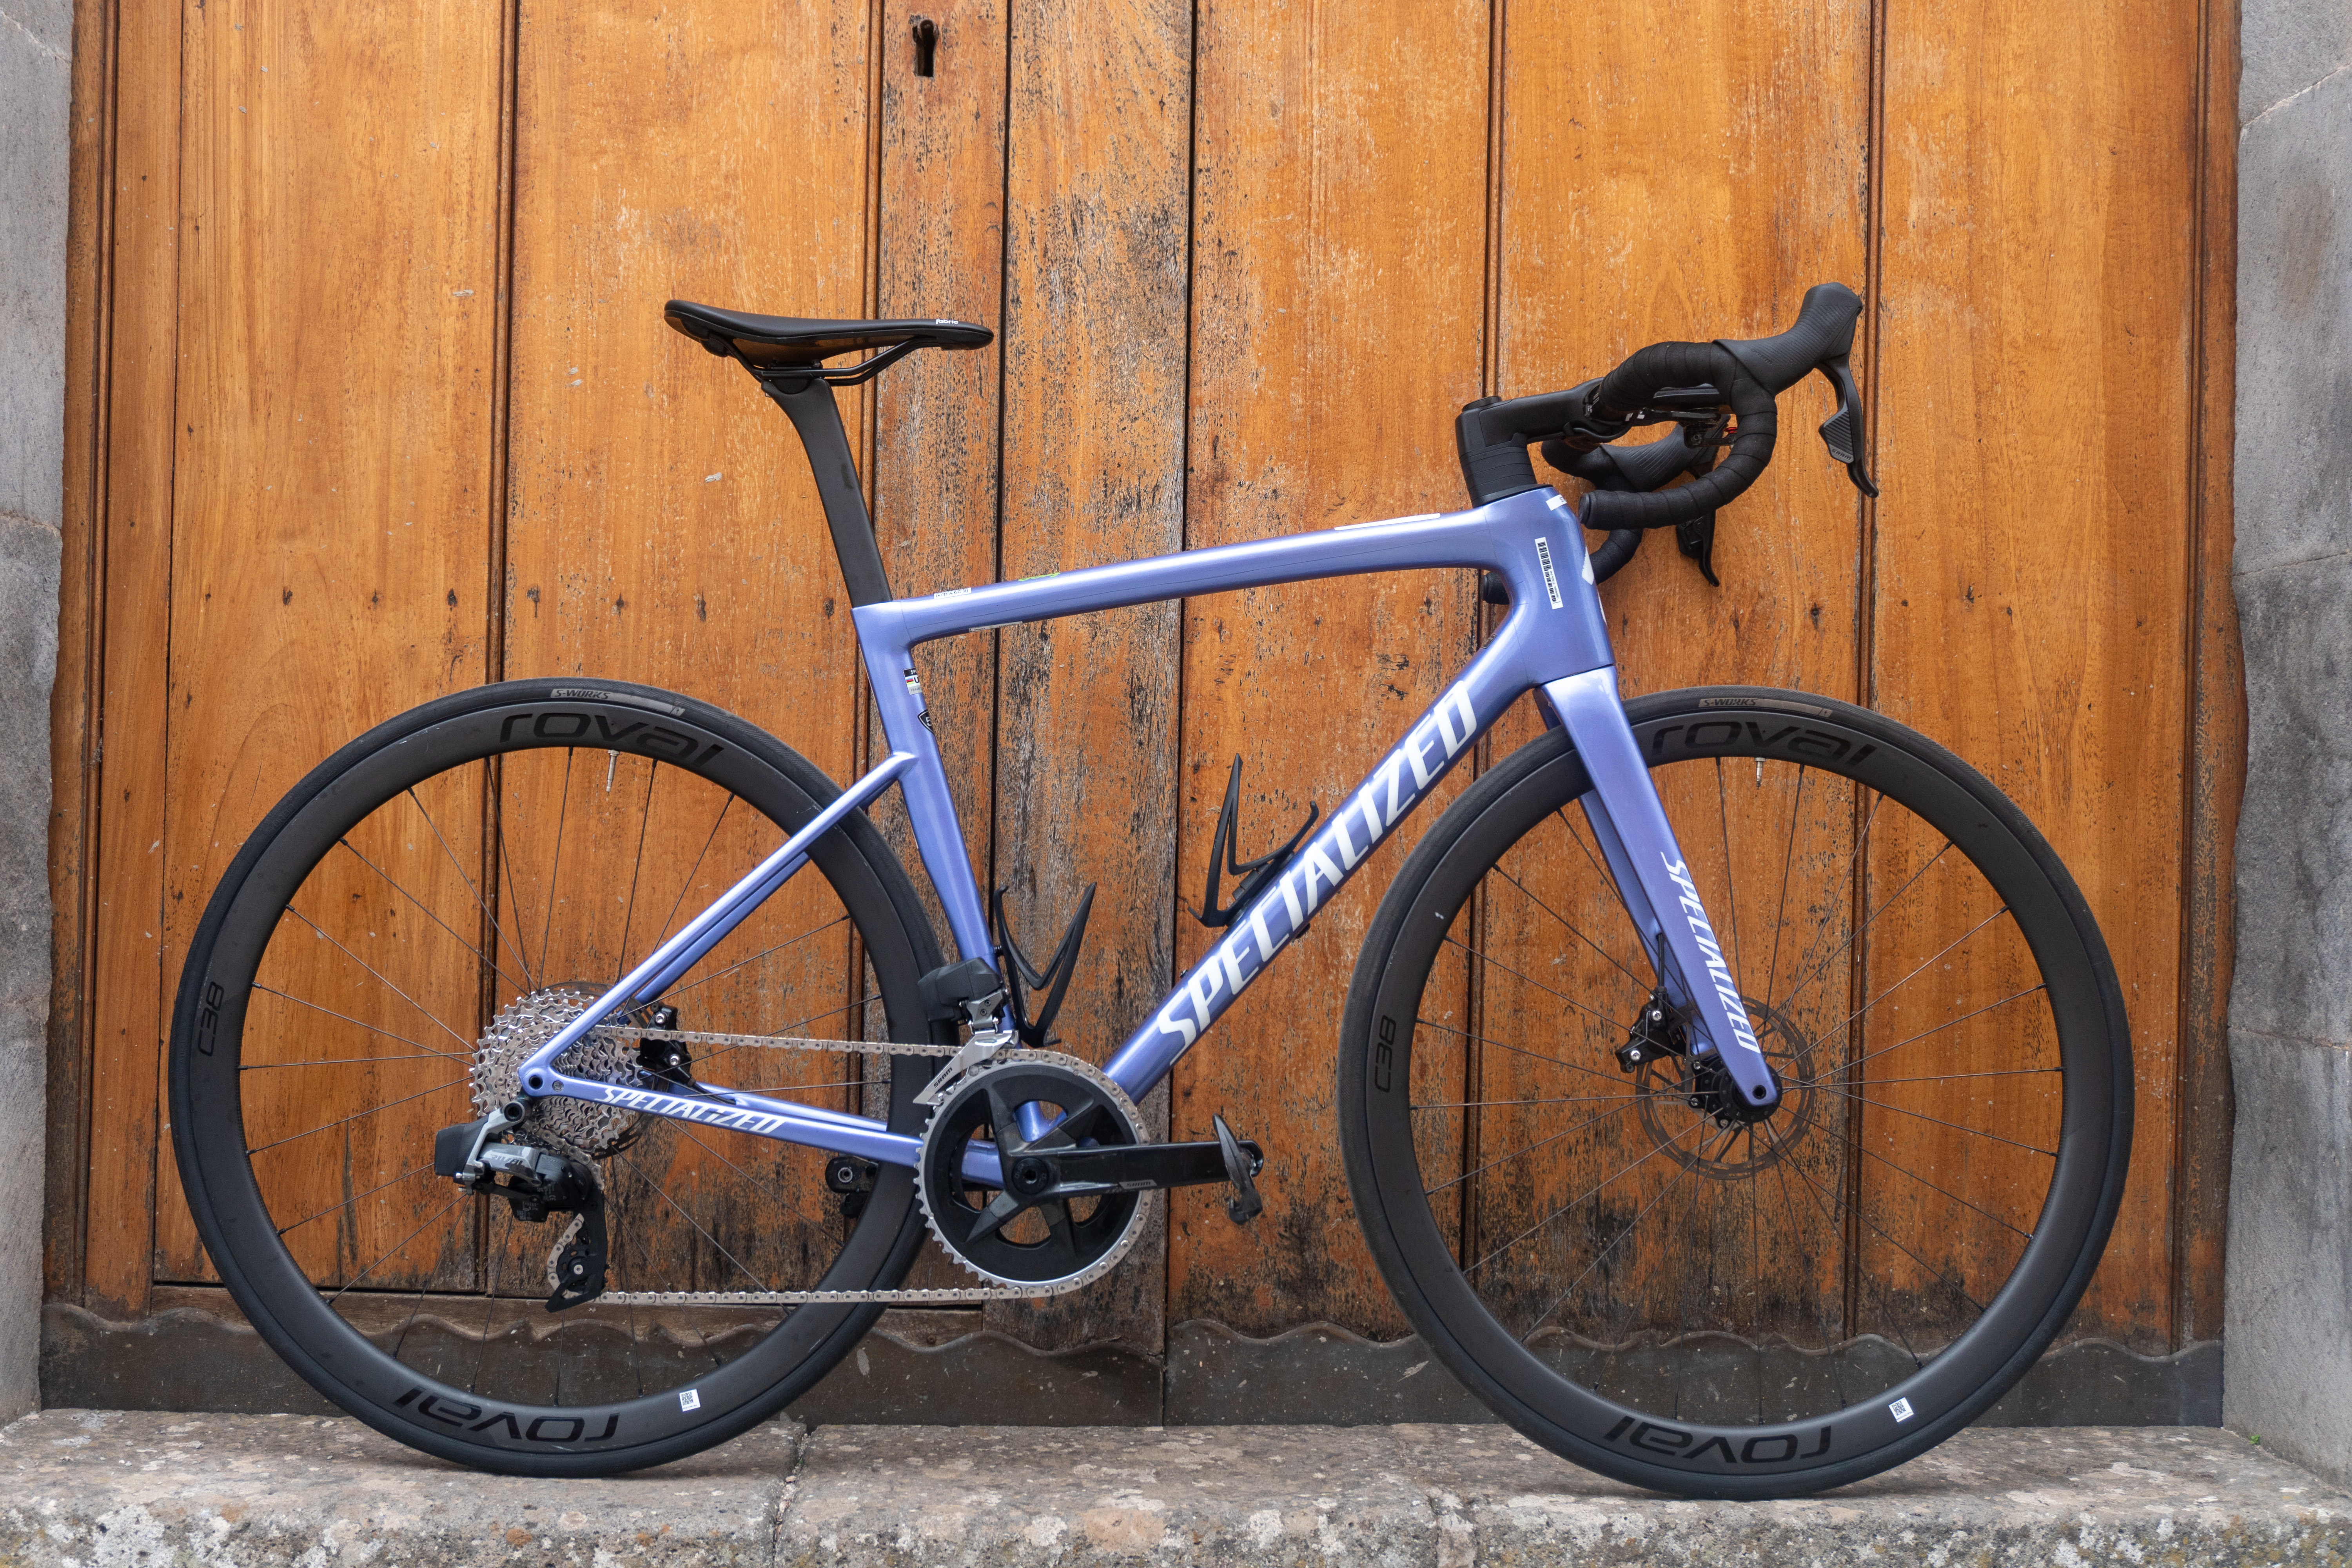
Specialized’s hotly anticipated Tarmac SL8 all-rounder race bike largely sticks with the winning ingredients of the Tarmac SL7 while increasing compliance, decreasing weight and improving aerodynamics.
Any fat that was on the already lightweight Tarmac SL7 has been trimmed, with the new bike claimed to weigh a feathery 685g in a size 56cm in its S-Works trim. That the second-tier frame on test here is claimed to weigh 780g in an equivalent size is particularly impressive, undercutting the S-Works Tarmac SL7 by 20g.
My initial impressions, based on a smidge under 200km’s of riding, is that Specialized has achieved its goal of subtly improving its race bike.
Specialized Tarmac SL8 Expert frame details
Oscar Huckle / The Cycling Meister
The Tarmac SL8 Expert is constructed from what Specialized calls its FACT 10r carbon fibre, two steps down from the FACT 12r reserved for the S-Works.
The brand says it has overhauled the bike’s ‘leading edges’, claiming the Tarmac SL8 is 16.6 seconds faster than the now-discontinued third-generation Venge at 45kmph. But the tube profiles are notably rounder and more svelte than the Tarmac SL7’s, with more than a little influence from the brand’s Aethos climbing bike.
These tube shapes are claimed to improve compliance, with Specialized claiming a 6% increase in comfort through the saddle over the SL7. The narrower seat tube also helps, and Specialized claims an improvement in aerodynamics too. The bottom bracket, head tube and fork are also said to have a 33% stiffness-to-weight ratio gain.
Oscar Huckle / The Cycling Meister
The head tube, dubbed the ‘Speed Sniffer’, is said to improve aerodynamics thanks to its pronounced leading edge that almost hangs over the fork.
All in, I like the Tarmac SL8’s elegant frame shape, reminiscent of classic climbing bikes of yesteryear. The only element disrupting this is that head tube though – while I’d be inclined to take Specialized’s word that it improves aerodynamics, it’s not the most aesthetically pleasing, especially with the two-piece cockpit that’s on this Expert model.
Oscar Huckle / The Cycling Meister
Tyre clearance is 32mm, which is on par with the latest Trek Madone but not quite as generous as the 34mm clearance found on the Cervélo S5. But 32mm is still plenty for a thoroughbred race bike.
Specialized says it wanted to preserve the geometry and handling characteristics of the Tarmac SL7 for the new bike but with the stack increased by 10mm to account for the new Roval Rapide cockpit found on the top-end models.
While that cockpit is said to save 4w, this Expert model eschews it with a separate bar and stem system.
44cm
49cm
52cm
54cm
56cm
58cm
61cm
Reach
366mm
375mm
380mm
384mm
395mm
402mm
408mm
Stack
501mm
514mm
527mm
544mm
565mm
591mm
612mm
Head tube angle
70.5º
71.75º
72.5º
73º
73.5º
73.5º
74º
Head tube length
99mm
109mm
120mm
137mm
157mm
184mm
204mm
Bottom bracket height
266mm
266mm
266mm
268mm
268mm
268mm
268mm
Bottom bracket drop
74mm
74mm
74mm
72mm
72mm
72mm
72mm
Top tube length, horizontal
496mm
509mm
531mm
541mm
563mm
577mm
595mm
Seat tube angle
75.5º
75.5º
74º
74º
73.5º
73.5º
73º
Seat tube length
433mm
445mm
456mm
473mm
494mm
515mm
545mm
Front centre
572mm
574mm
577mm
579mm
592mm
606mm
613mm
Chainstay length
410mm
410mm
410mm
410mm
410mm
410mm
410mm
Wheelbase
970mm
973mm
975mm
978mm
991mm
1,006mm
1,013mm
Crank length
165mm
165mm
170mm
172.5mm
172.5mm
175mm
175mm
Handlebar width
360mm
380mm
400mm
420mm
420mm
440mm
440mm
Stem length
70mm
80mm
90mm
100mm
100mm
110mm
110mm
Specialized Tarmac SL8 Expert build
Oscar Huckle / The Cycling Meister
The Expert is the third-tier in the Tarmac SL8 range, below the range-topping S-Works and Pro models. Note there are two Expert options – this SRAM Rival eTap AXS build for £5,500 / $6,499.99 / €6,500 or a Shimano Ultegra Di2 build for £6,000 / $6,999.99 / €7,000.
SRAM Rival eTap AXS is the third-tier electronic groupset in the brand’s range, sitting below Force and Red. Compared to Force, Rival components have a weight penalty (with the biggest differences to be found at the crankset) and the rear derailleur steps down to a spring clutch rather than the Orbit Fluid Damper.
Specialized specs a power meter crankset for the price with 48/35t chainrings, paired with a 10-36t cassette – sensible gear ratios for climbing but also for when you’re putting the hammer down.
You also get a set of Roval C38 carbon wheels. At £1,150, these undercut the in-house brand’s other offerings without, according to Specialized, sacrificing component quality or aerodynamics. The 38mm rim depth is paired with a 21mm internal rim width – par for the course, these days, but road-focussed and they’re specced with DT Swiss 370 hubs.
They’re shod with S-Works Turbo tyres in a 26mm width – very narrow considering the generous tyre clearance.
Oscar Huckle / The Cycling Meister
Moving to the cockpit, an aluminium Specialized Expert Shallow Drop handlebar is paired with a Tarmac stem. Although the two-piece cockpit looks a bit out of place with the Speed Sniffer head tube, there’s no denying the benefits of adjustment offered and being able to run whatever handlebar you’d like.
This build would typically be specced with a Specialized Power saddle (a favourite of my own) but my test bike came with a Fabric Line.
Specialized Tarmac SL8 Expert first ride impressions
Oscar Huckle / The Cycling Meister
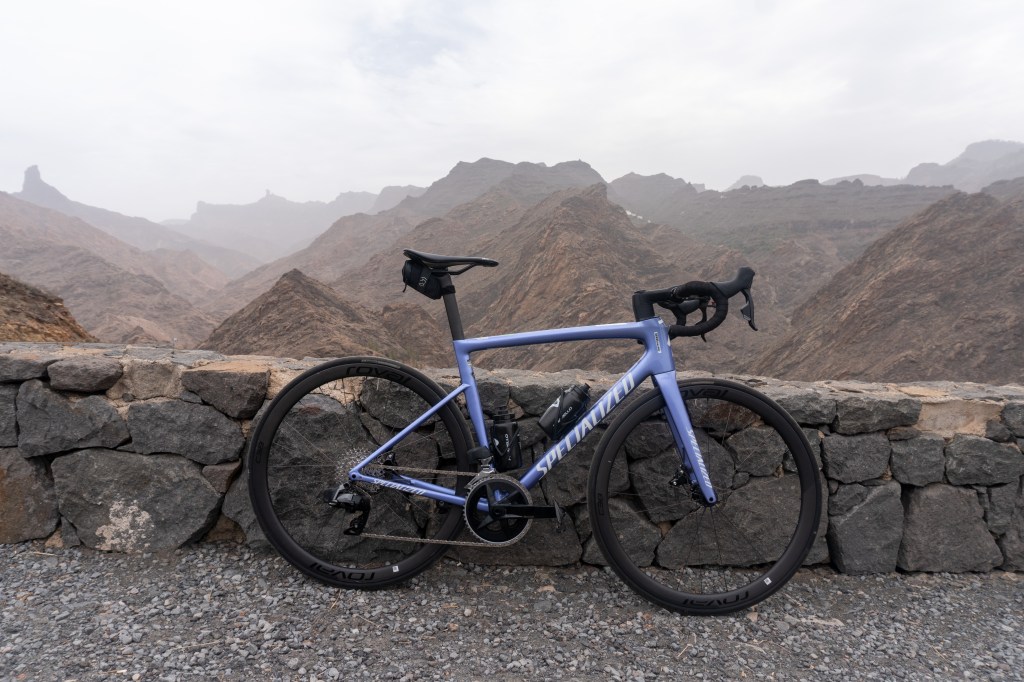
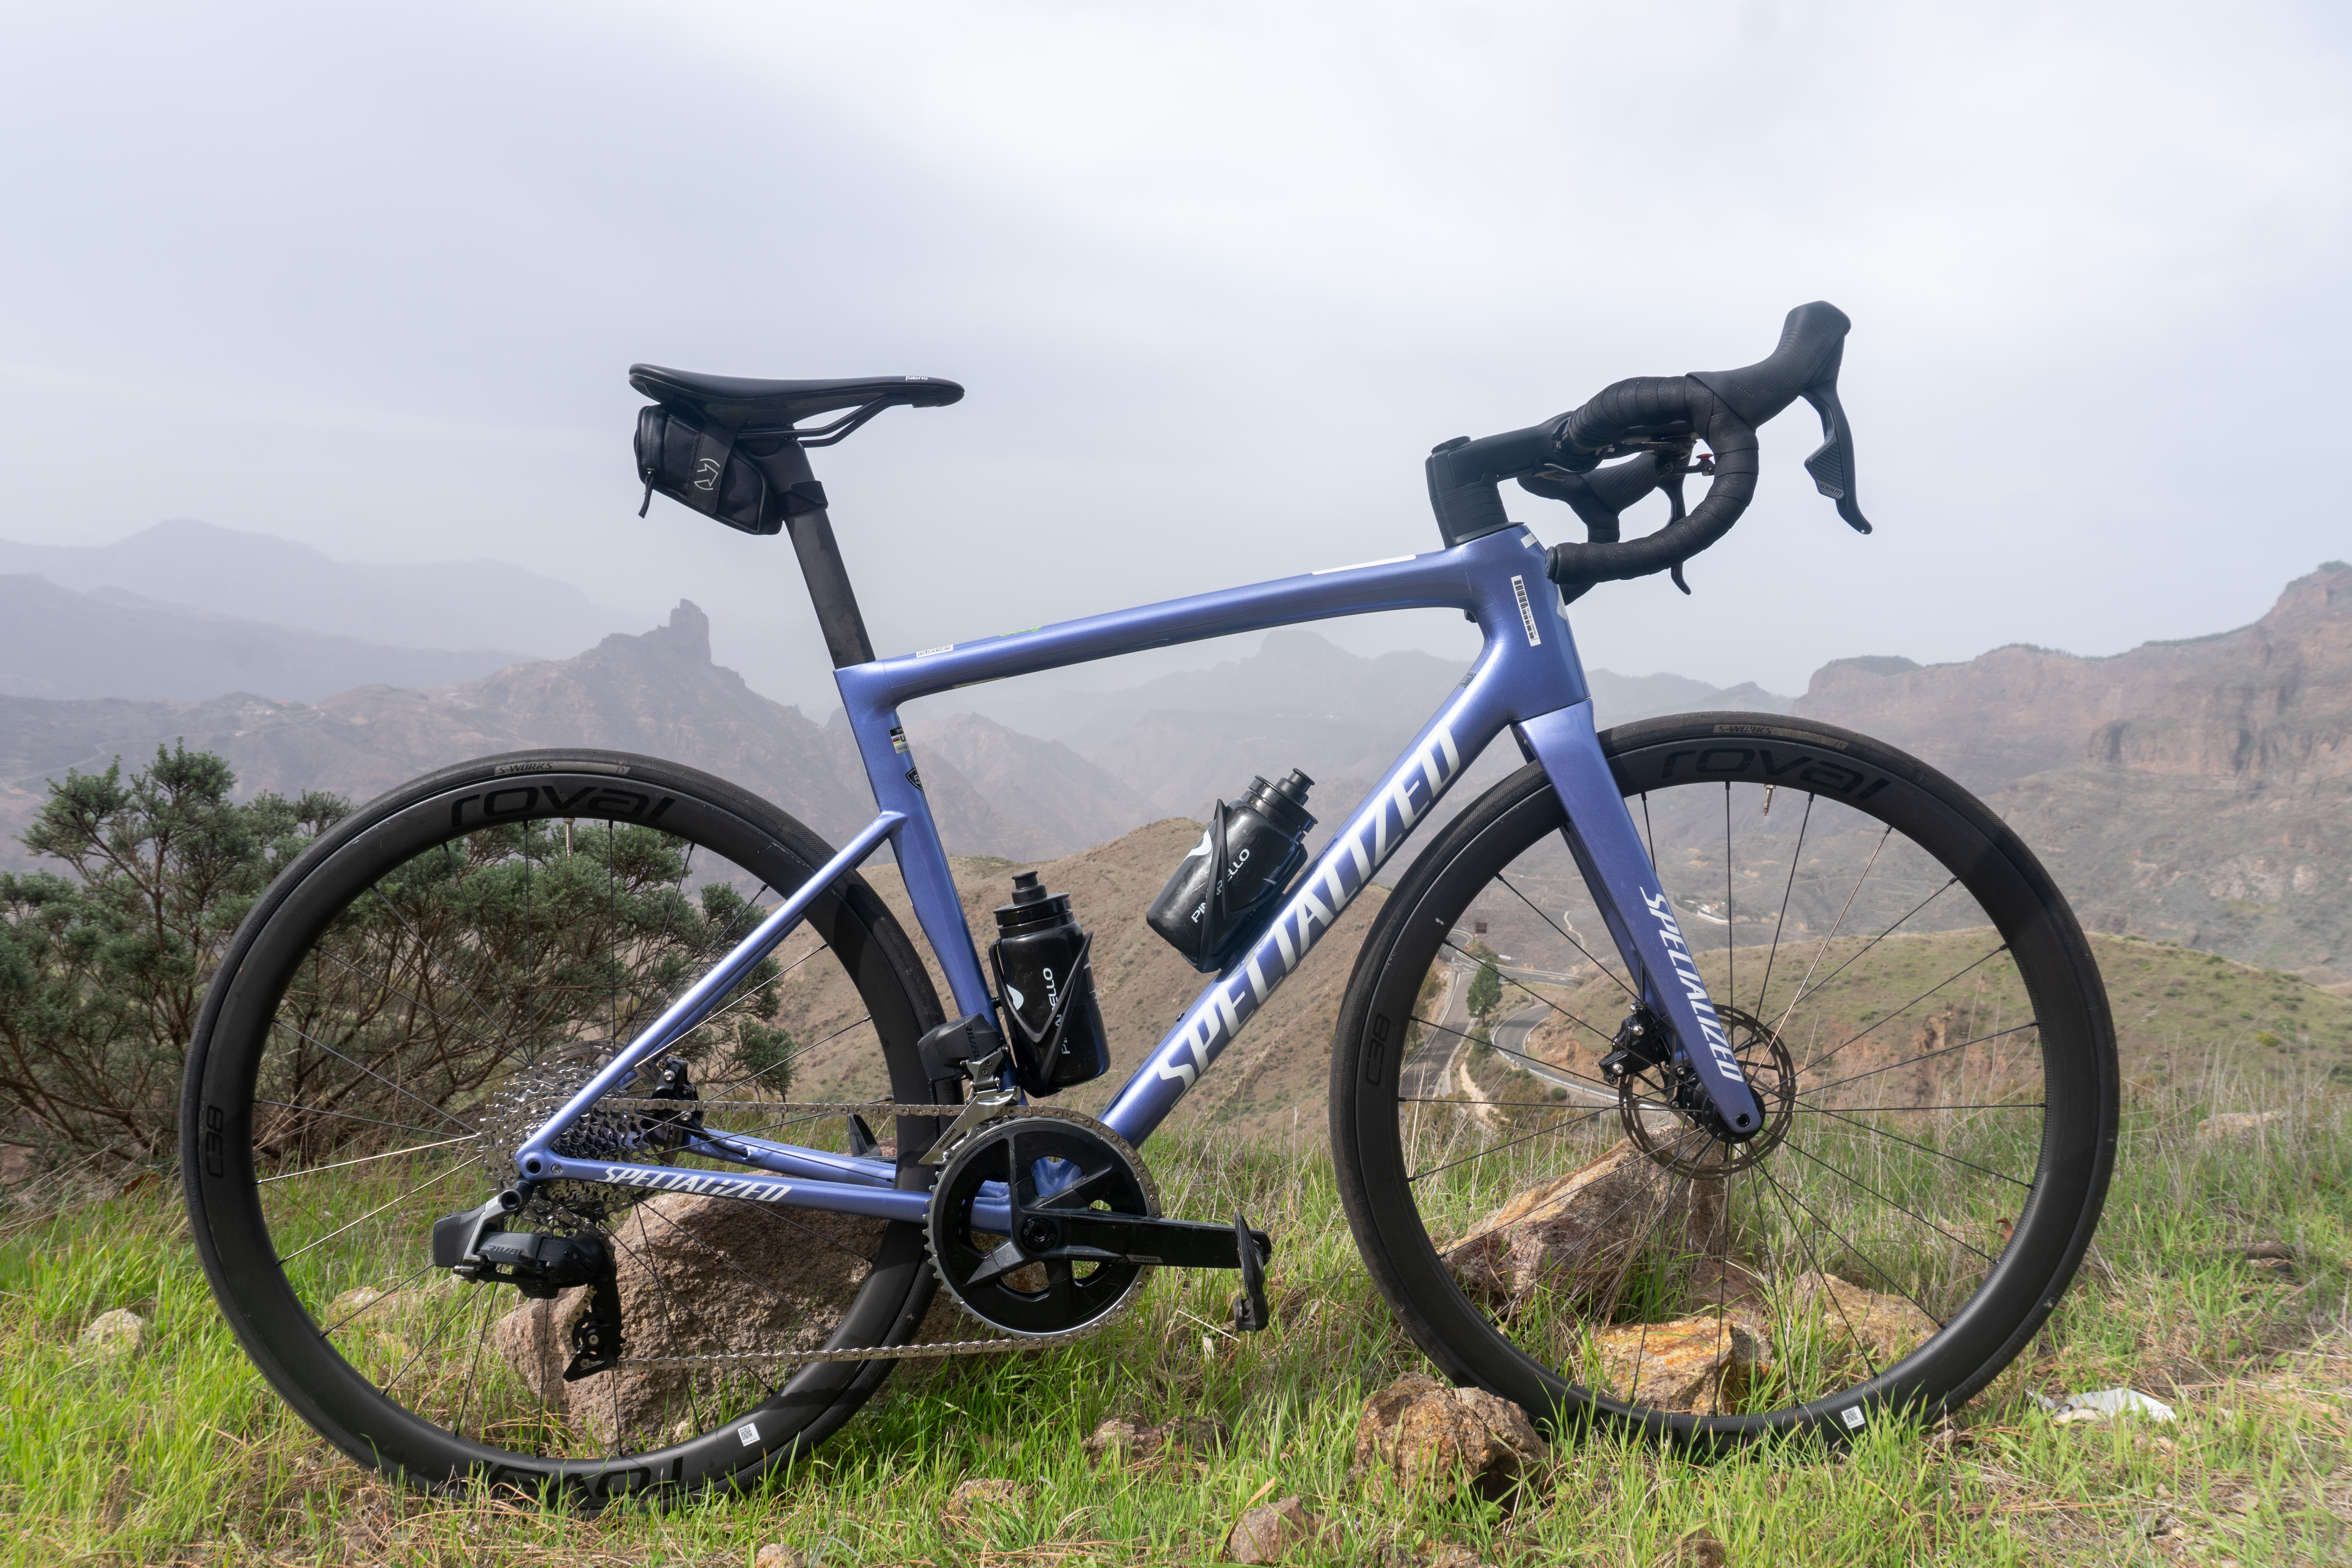
I rode the bike for two days in Gran Canaria encompassing just under 200km with a not-insubstantial 4,500m of climbing.
Both of my rides featured significant mountain climbs, and on the second day I rode up the feared Valley of the Tears (often touted as one of Europe’s hardest climbs), all the way up to the summit of the Pico de las Nievas at 2,000m, Gran Canaria’s tallest volcano.
From the off, the Tarmac SL8 felt like it was cut from the same cloth as its predecessors with a rapid ride quality with dainty handling. I particularly appreciated the exciting handling on Gran Canaria’s many hairpins, where the bike had a palpable poise.
Although this Expert build wears some heavy components (more on that later), the frameset’s low weight made itself instantly apparent, especially on the many prolonged climbs. The stiffness at the bottom bracket was also noticeable, giving the bike plenty of grunt when putting the power down – impressive given its rather minimalist appearance.
Oscar Huckle / The Cycling Meister
Tip the bike down the other side and the Tarmac SL8 has impeccable descending manners. The lively handling and aggressive position meant I was really able to lean in on corners and even at speeds up to 50mph / 80kmph, the Tarmac SL8 was unflinched.
It took me a while to get used to the 26mm tyres – these felt decidedly narrow and the spec choice is at odds with the generous 32mm clearance. While the S-Works Turbo tyres were fast-rolling and grippy, I’d swap them for 30 or 32mm rubber from the off – Continental’s Grand Prix 5000 S TRs are my current pick of the bunch.
But even with the narrow stock rubber, the Tarmac SL8 is more comfortable than I’d expect for a bike of this ilk, even on my longest nine hour ride with plenty of questionable road surfaces.
Although the spec list doesn’t set the world alight, it’s all functional fare. I’m not the biggest fan of SRAM’s Rival eTap AXS groupset – I don’t particularly get on with the blocky lever ergonomics, the front derailleur shifting isn’t on a par with Shimano and the increased weight is noticeable over Force AXS.
But there’s no denying its appeal to those that want electronic shifting at a budget and the brakes are a high point.
It’s also a positive that Specialized specs a power meter crankset to slightly sweeten the deal.
The Roval C38 wheels are a mixed bag – although the carbon rim isn’t as progressive as the higher models in the range in terms of external width (26.6mm compared to the 30mm and 30.7mm measurements of the Roval Rapide CL II and CLX II), the overall ride quality is very good.
I also like that Specialized have specced brass nipples, which are more resistant to corrosion – the higher-end Rapide wheelsets instead use aluminium nipples. While aluminium nipples are lighter, I’d rather take the weight penalty and know they won’t corrode at the first sign of salty water.
It’s a shame Specialized specs a bottom-rung DT Swiss 370 hub though, especially on a bike costing £5,500 / $6,499.99 / €6,500, but I suppose that’s the concession for the wheels to make their £999 / $1,099.99 / €1,200 price point.
While the 370 should prove a reliable option, I wish Specialized had specced a DT Swiss 350 hub instead and upped the price slightly.
The 350 hub steps up to a 36t ratchet (over the 370 Ratchet LN’s 16t), resulting in more points of engagement. But in my view, given the 350’s prolificity, a big advantage will also be in procuring spares.
Oscar Huckle / The Cycling Meister
The only other change I’d make to the bike would be the handlebar – I’d swap to a carbon option for more compliance. However, I’m glad Specialized specs a relatively cheap-and-cheerful stock handlebar because there’s an element of personal preference when it comes to upgrading.
I’m not sure the 4w claimed aerodynamic saving is enough to convince me to step up to the Roval Rapide one-piece cockpit but it’s a positive that you can upgrade to it if you’d like to.
It’s important to note if you upgrade to this cockpit, you’ll need an extra 10mm of steerer tube.
In terms of value, Specialized is never going to be the most competitive being as mainstream as you get. Sticking with the big brands, you can get a similarly specced Trek Madone SL 6 AXS for £4,125 / $5,999.99 / €3,999 or a Cannondale SuperSix Evo 3 (albeit with Shimano 105 Di2) for £4,000 / $4,200 / €3,999.
Although both of these options also use a second-tier frame, it’s important to note the Tarmac SL8’s 780g claimed frame weight significantly undercuts both on frame weight (1,054g for the Madone SL and 930g for the SuperSix Evo in a size 56cm).
In my view, that’s enough of a justification for the price increase.
Specialized Tarmac SL8 Expert initial verdict
Oscar Huckle / The Cycling Meister
The updates over the Tarmac SL7 may seem incremental but my initial rides suggest they have dramatically improved the Tarmac platform.
In fact, I think the Tarmac SL8 may well be the best race bike on the market at the moment – it just ticks all the boxes and has a fantastically balanced ride quality.
Further testing will reveal if that proves the case.
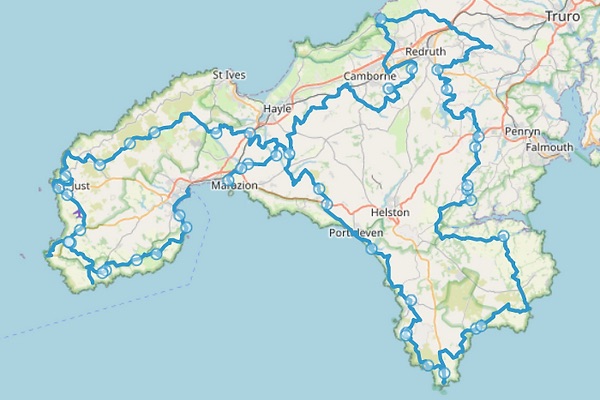
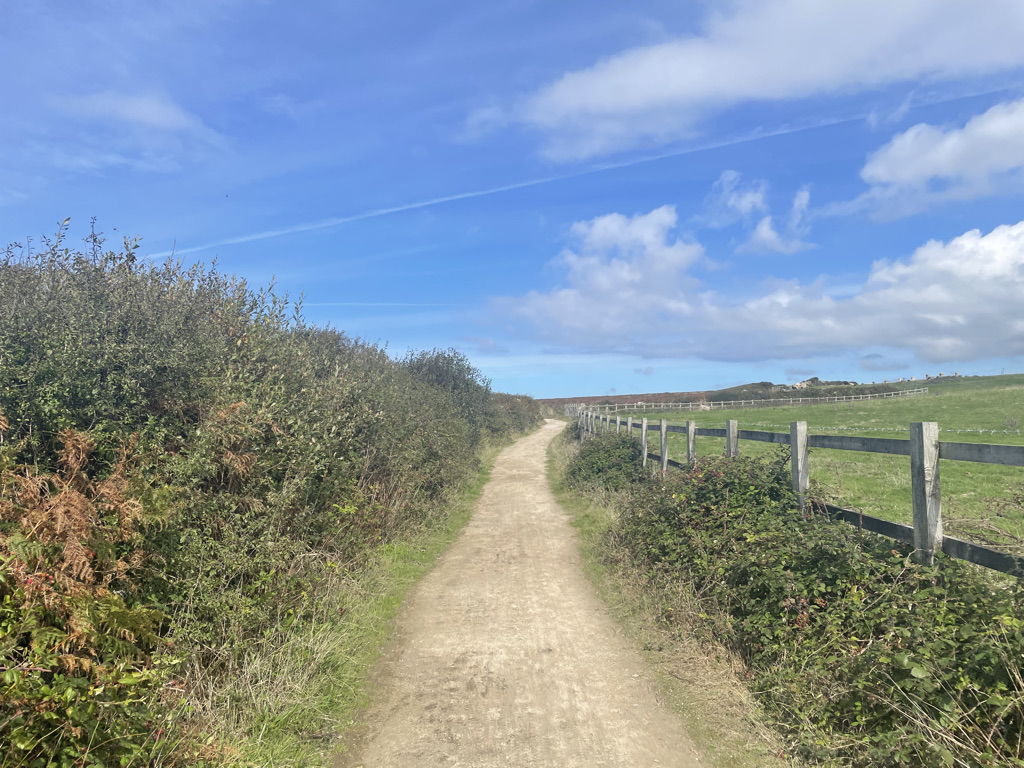
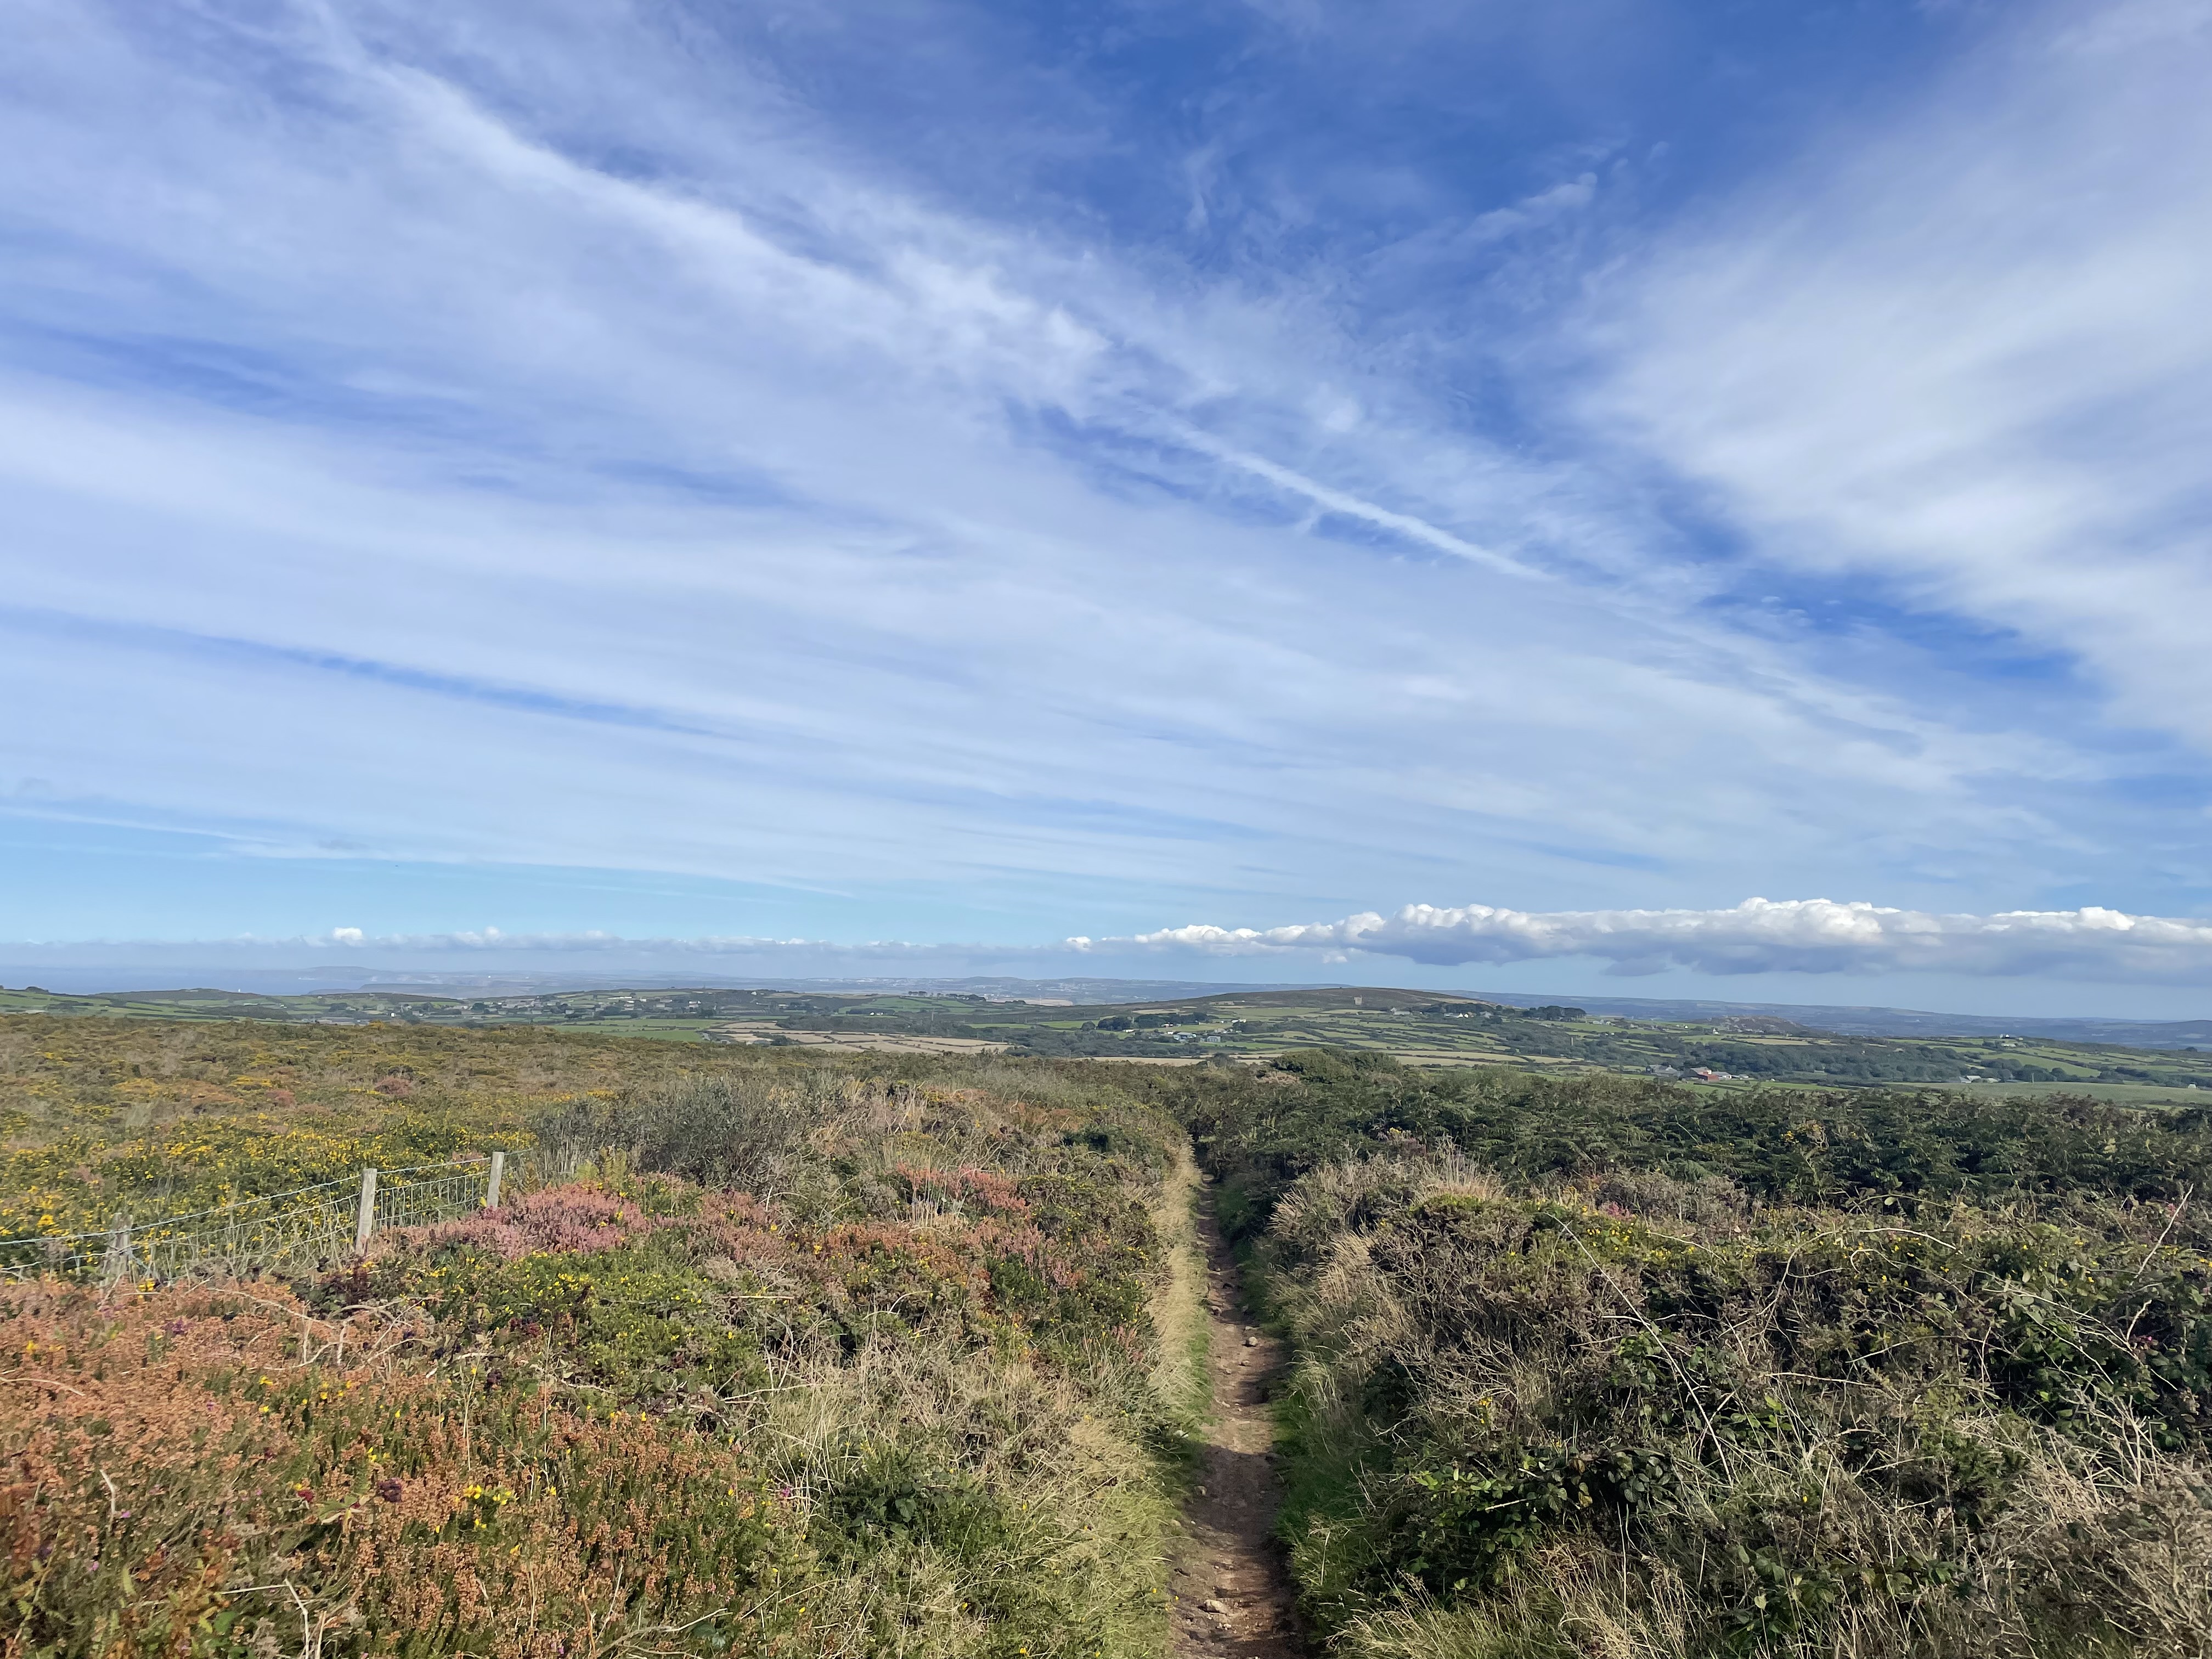
The West Kernow Way is an 236km off-road bikepacking route with 4,000m elevation, devised by Cycling UK and historian / cycling journalist Guy Kesteven, connecting many of Cornwall’s landmarks and trails.
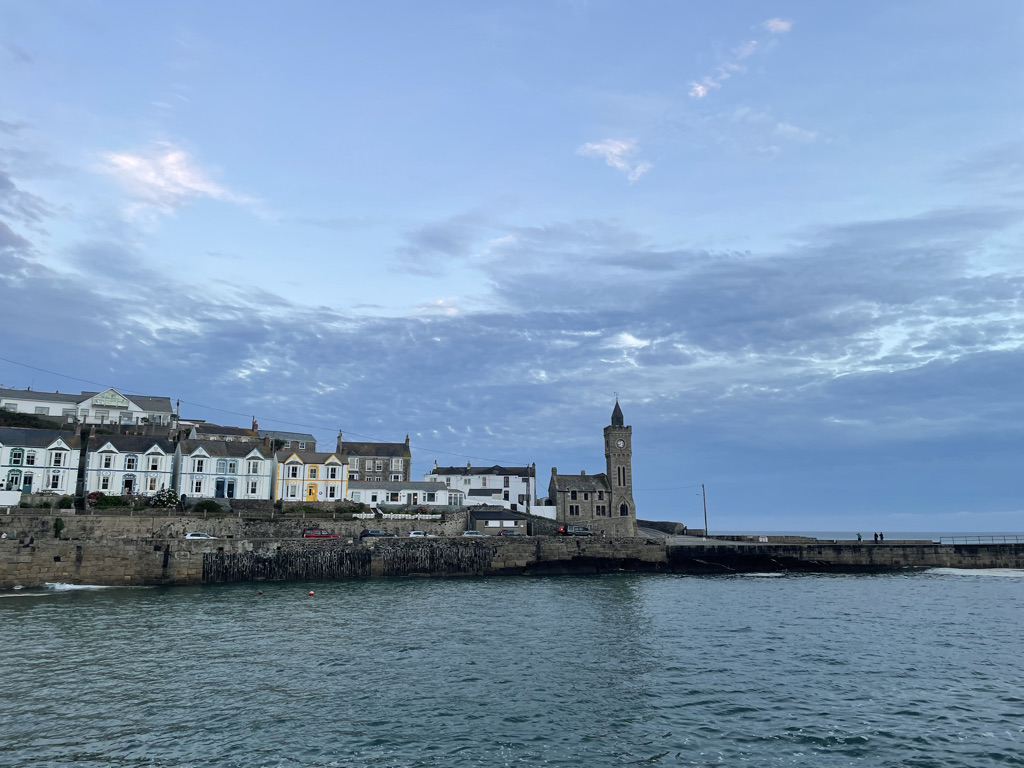
It officially starts in the town of Penzance and the route takes you on a figure-of-eight loop around the western peninsula of Cornwall. The route includes diversions to the Minack Theatre and Land’s End and The Lizard Point, with other points of interest including Cape Cornwall, The Loe and the mining trails around Redruth, before ending in Marazion in front of St Michael’s Mount.
Having completed the King Alfred’s Way last year, I caught the bikepacking bug hard. Cycling UK announced the route in Autumn 2021 and seeing as September worked well for last year’s trip, I aimed to complete this route at a similar time.
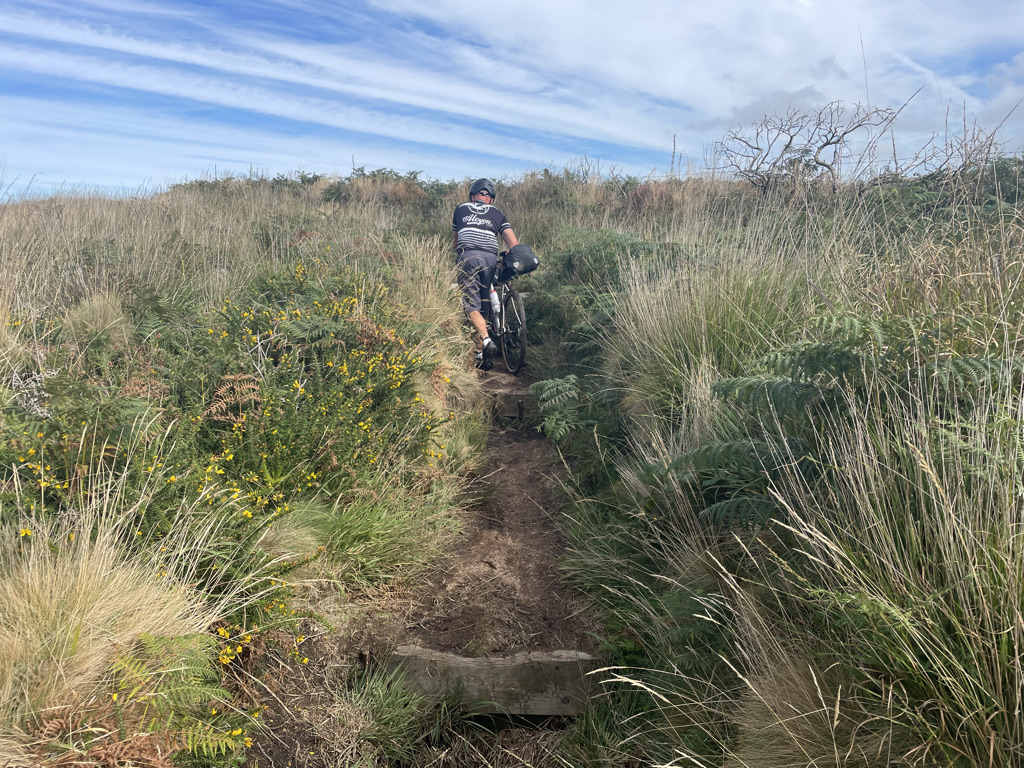
I was originally going to ride the West Kernow Way with my friends, Rob and Charlie, who I rode the King Alfred’s Way with last year. However, that dwindled down to just myself and Rob nearer the start.
Having learnt last year that 80 / 90 mile days are rather difficult to adhere to in the daylight, we decided to ride the route in three days so we could also enjoy the sights that Cornwall has to offer.
Day 1 would see us ride approximately 60 miles from Penzane to Porthleven, with stops to explore both The Minack Theatre and Land’s End.
Day 2 would be a shorter but equally hilly 45 mile day from Porthleven to Falmouth. Falmouth isn’t on the official route but B&B’s can be few and far between in Cornwall and that was where we happened to find one. This would mean an additional 5 mile downhill diversion from the village of Longdowns.
After a 5 mile ride back up to Longdowns, Day 3 was to be a 50 mile jaunt to the end of the route in Marazion.
The Bike
Oscar Huckle / The Cycling Meister
I once again used a gravel bike for this trip and Cycling UK recommends the route as suitable for both gravel and mountain bikes. My Niner RLT 9 RDO with a Campagnolo Ekar groupset made for an excellent companion on the King Alfred’s Way last year and I had planned to ride it again for this route.
However, I was commissioned to test and review a Berria Belador Allroad for BikeRadar. The Belador Allroad is the first gravel bike from the Spanish brand, with a significantly racier agenda compared to my Niner. It most notably features a pivot at the seatstay junction called the ‘Active Flex Concept’ that delivers 26mm of movement. The bike features a SRAM Rival eTap AXS XPLR electronic groupset, carbon Zipp 303S wheels and a fully integrated front end.
Although it’s a gravel race bike, Berria says it’s suitable for bikepacking, so what better way to test that claim than to take it bikepacking?
I’d ridden around 400km on the Berria prior to the West Kernow Way and had a good idea of how it handled. I was a little apprehensive as my initial impressions were that it wasn’t the most comfortable, nor particularly composed over seriously technical terrain.
Although I used bikepacking bags from Miss Grape last year, I was lucky enough to receive some Apidura Expedition bags. I used the Expedition Handlebar Pack in a 9-litre volume, 4.5-litre compact-fit Frame Pack and the Expedition Saddle Pack in 14-litres, which all performed close to faultlessly.
One mistake I made was forgetting my preferred Rapha Explore Powerweave shoes (I’d left them at my parents), meaning I had to ride in a pair of Fizik Vento Ferox’s, which I’d tested for BikeRadar and didn’t particularly get on with.
Oscar Huckle / The Cycling Meister
Rob also rode a gravel bike and his happened to be new, too. Earlier in the Summer, he had placed an order for a Reilly Gradient and it had arrived a couple of weeks prior to this trip. The Gradient features a titanium frame and offers a significantly more relaxed geometry over the Berria. The spec includes a SRAM Force XPLR eTap AXS electronic groupset with Miche wheels and Continental Terra Trail tyres.
Preparation
I’ve been on particularly good form this year, having moved to Bristol back in April for work. Although I’ve covered roughly the same distances as the last couple of years, what’s boosted my fitness are my 8km work commutes three times a week. It may not seem like a lot but it all adds up. The riding around Bristol is far more undulating than Berkshire too, where you can choose to ride a pan-flat route or head into the Chilterns or Surrey Hills which are typically shorter and steeper than the Cotswolds, Mendips or Wales.
My tactic for the King Alfred’s Way paid off last year and so I replicated it again this year. I don’t have a problem with riding these distances off-road but it’s a different story when you’re doing this consecutively over multiple days.
For training, I did some long rides over three or four days and started to taper down a couple of weeks prior to the event. I’d also been fortunate to ride a Canyon Endurace in Sardinia back in July, which helped with elevation training.
On the afternoon before our first day of riding, I met Rob at Bristol Temple Meads station and we embarked on the 200 mile journey down to Cornwall. Being a Friday evening, we inevitably got stuck in some pretty grim traffic on the M5 and I had to put the pedal to the metal of my tin can Ford KA to make the hostel we’d booked in Penzance before the check-in closed at 10pm.
We just about made it in time and after getting my bikepacking bags packed for the morning, I attempted to hit the hay. Hostels really aren’t my bag but this was the bargain of the trip at £30. Fortunately, the next two nights would be at B&Bs.
Luckily, the room that could sleep eight wasn’t at full capacity and we just had two others to share the room with. Still, it was pretty ferociously hot and opening the window didn’t really achieve anything so I didn’t have a particularly good night sleep.
Day 1
After a rather hearty breakfast at the hostel (although not as substantial as Rob’s cereal, followed by full English, then toast and pastries!), we got everything packed.
We thought we’d try our luck by seeing if we could leave the car at the hostel for the three days but that plan failed. Luckily, I’d been tipped that you can park at the Sainsbury’s in Penzance via the YourParkingSpace app for just over a tenner.
We made the short journey to Sainsbury’s, parked the car and got the bikes ready to go. Between us, we’d taken three pumps – I had a Silca Tattico mini-pump and a larger Lezyne digital mini track pump, whereas Rob had something in between size-wise. We decided that as we were both riding relatively new tyres and Rob had tubeless bacon strips, should the worst happen, that I’d carry the small Silca pump.
Robert O’Keefe / The Cycling Meister
Onto the bike and straightaway, a bus gave me some ‘encouragement’ as I turned out of the supermarket car park, clearly unhappy that his journey would be inconvenienced by 30 seconds. After about a kilometre, we arrived in the centre of Penzance which is the official start of the route. Rob and I made sure to take a photograph at the start overlooking the picturesque beach.
The route was reasonably flat through Penzance as it straddled the paved coastline and about 5km in just before reaching Mousehole, I noticed Rob only had one bottle on his bike, having left the other in the car. Rather than turn back and retrieve it, Rob decided that if we came across a bike shop, he’d buy one. Despite Rob only having one large bottle, we had roughly the same amount of water as the Berria’s bottle cage clearance with the Apidura frame pack was pretty wanting, so I had two small 500ml bottles.
Riding through the charming town of Mousehole, Rob briefly stopped at a bakery to see if he could buy a plastic bottle of water to carry but to no avail. The hill out of Mousehole was pretty disgusting, although at least it was paved. This was followed by an equally steep and twisty descent into Lamorna.
Oscar Huckle / The Cycling Meister
We’d reached our first off-road section of the day, which was a brief but picturesque climb through the trees up to a road. A reasonably undulating but steady 10km or so followed before we diverted to the Minack Theatre.
We were welcomed by the mesmerising views of Porthcurno beach, one of the top rated beaches in the UK. After a photo opportunity, we explored the spectacular open air theatre perched on the cliffs overlooking Porthcurno beach. After an explore and brief sit-down to watch part of a rehearsal, we had a quick coffee and then got back on the bikes as it was already midday and we’d ridden 20km.
Rob suggested the prospect of lunch at Land’s End but that was only going to be roughly 32km in to a 96km day, so we agreed we’d try and eat at around the half-way mark.
Oscar Huckle / The Cycling Meister
The route to Land’s End was virtually all on the road, bar one muddy trail where the Vittoria Terreno Dry tyres were called to the test on my Berria. It wouldn’t be unexpected to report that grip wasn’t ideal.
We reached the route diversion for Land’s End as we met the A30 and turned onto it. After a kilometre or so of road, the route takes you on The Cornish Way trail, a gravel track which was glorious, with arresting vistas of Sennen Cove – one of the highlights of the trip.
Oscar Huckle / The Cycling Meister
Now at the farthest point of the UK, a brief wander around Land’s End revealed the iconic signpost now required payment if you wanted a photo taken in front of it. There is a kiosk next to the sign where a photographer captures an image of you and can then send you hard copies or a downloadable file. We thought “Screw it,” and I took an image of the sign in between customers walking up to it and we then had a short stop for ice-cream.
We followed the magnificent Cornish Way back to the A30 and decided we’d try and get a solid couple of hours riding in to make up some of the distance before stopping for lunch.
Almost instantly after we set off, Rob’s rear tyre looked on the low side and we stopped to inflate it – this would go on to become a running theme of the trip. Rob was running Continental Terra Trail tyres and had set them up tubeless. Neither of us could find any problems with the tyre or the tubeless valve.
It was largely more of the same in terms of terrain – lumpy road until around 42km. A few minutes before the gravel arrived, I had remarked it was disappointing there had only been a stingy portion so far. I certainly got what I asked for.
Oscar Huckle / The Cycling Meister
We were faced with a viciously steep ascent on loose rock, where it could have been very easy to lose momentum if you picked the wrong line.
This was then followed by an equally loose descent that we had to carefully pick our way down. The surface mellowed for a kilometre or so and we had another fairly rocky climb followed by another technical descent where the SRAM brakes got called into action. Additional spice featured with two walkers walking up the opposite way and whenever you’re trying to negotiate a technical descent where the slightest wrong choice could go wrong, you don’t want to embarrass yourself!
Robert O’Keefe / The Cycling Meister
The descent featured stunning views of Cape Cornwall and once we reached the bottom, we had a brief explore and photo opportunity. We then reached a road climb that would lead us to the town of St Just where I passed a cyclist on a carbon framed road bike sans luggage, who wasn’t particularly impressed I’d gone past with bags galore and wide 700c x 38mm tyres!
It wasn’t long before we arrived on off-road terrain again as the route hugs the coastline before turning inland at Trewellard. The terrain here was ideal for a gravel bike – a relatively fine surface with some grass and meadowland thrown in.
Oscar Huckle / The Cycling Meister
This turned into some seriously technical singletrack with some interesting gate designs thrown in for good measure. The paths were very narrow with frequent galleys and sharp rocks that could rip your tyres if you rode at the wrong angle. Whilst this section was fun, it was very slow-going and would probably be more suited to a hardtail mountain bike.
At one point, Rob looked like he was going to stack it as he came in rather hot on a brief drop that had a sharp rock next to it which he tried to avoid. Shortly after, I experienced a slow-motion fall where I took the wrong angle on a path and only hurt my pride briefly. It took us a good hour to ride what was 12km or so but it just shows the contrast in terrain the West Kernow Way can offer – the first 40km on the road may be fairly easy going but then you can get quite literally bogged down in singletrack and make slow progress.
This extended singletrack section finished with a pretty epic but tricky descent that had some metal barriers every 100m or so for good measure! I was feeling both ready for some food and I was getting in quite a desperate state to refill my bottles once we hit the road. There wasn’t much around and it didn’t look like we were going to find civilisation until we’d reach the town of St Erth.
Oscar Huckle / The Cycling Meister
A little later than expected, I struck gold when I spotted a service station on the map slightly off the route once we reached the A30 crossing at Canonstown. We stocked up on water and I had an enormous Cornish pasty and full sugar Coke, while Rob had a sandwich and we shared some cherry glazed cakes.
Refuelled and refreshed, we rode back up the A30 to pick the route up again which was predominantly small, leaf-stricken roads for a couple of kilometres. We experienced a slight GPX route faux pas where our navigation wanted us to head through someone’s driveway and after a brief moment of research, we worked out there was a trail that circled the property to avoid this error.
Oscar Huckle / The Cycling Meister
The route continued to be a mixture of mud-stricken roads and even muddier trails, and service station stop wasn’t giving me a boost yet. One tough climb was particularly boggy and I’d somehow managed to get a stone in my shoe. I had to perform acrobatics to carefully take my shoe off, extract the stone and put it back on without my foot meeting sloppy mud.
The route continued to be annoyingly undulating and after a pleasant heather-infested section atop a hill, we reached a rather interesting gate with a sign indicating the trail was to become a footpath. Rob suggested turning back but I stubbornly wanted to continue the route and if it meant a brief walk for a footpath past a farmer’s property, so be it.
Oscar Huckle / The Cycling Meister
Once we’d walked through, we were greeted by the breathtaking view of Porthleven. The descent into the town was excellent and prolonged, before we then located our sleeping quarters for the night.
Porthleven is an ideal place to split the route as the second half of Day 1’s route was fairly difficult and consistently up-down. Performance-wise, I hadn’t had the best of days as I found the 30km or so a real trudge in places and the service station stop hadn’t really been of benefit, other than to hydrate. 60 miles may not seem a lot but in these conditions, it’s more than enough.
Rob and I had a beer at The Harbour Inn on the harbour to celebrate our efforts and then ate a disappointingly small and overpriced ‘large’ fish and chips at The Ship Inn – whilst the pub was rammed and had character, I’d recommend heading elsewhere if you’re after a meal.
Total distance: 96.7km
Total elevation: 1,603m
Day 2
After a rejuvenating eight hour’s sleep, Rob and I enjoyed a delicious breakfast at The Harbour Inn and set off just after 10am. Today was to be a shorter 45 miles to Longdowns, followed by five or so miles to our B&B in Falmouth but with equal elevation to yesterday. With 60 miles and 1,600m of climbing in the legs from yesterday, it’d be safe to say the legs didn’t feel particularly fresh. Rain was also forecast until around 1pm, although as we started to get the bikes ready for the day, there was some coastal mist. I decided it was best just to stick my waterproof on straightaway.
We headed out via Porthleven’s harbour and after a short 60m road climb, we were greeted by our first off-road section of the day. The route overlooks the coastline and after a relatively steep descent, you get a glimpse of The Loe.
Oscar Huckle / The Cycling Meister
The Loe is Cornwall’s largest freshwater lake, separated by the sea via a picturesque beach. After some picture-taking, we diverted off the route to have a further explore and Rob suggested the idea of skipping the beach to avoid unnecessarily ruining the bike’s drivetrains.
The route around The Loe was fabulous, the lake cutting an imposing presence – it’s a slice of heaven for walkers or cyclists who are lucky enough to live in this area. After cycling past the National Trust cafe and reaching the other side of the lake, we discovered the diversion would add more mileage than it was worth, so we decided to head back up again and cross the beach. At this point, it started to rain.
Oscar Huckle / The Cycling Meister
That’s just what we did and after trundling back up the climb to where we made our diversion, we descended down to the beach. The beach wasn’t rideable so we got off and walked and I took the opportunity to get my ‘money shot’ photo of the Berria for my BikeRadar review.
As we neared the other side of the beach, it really started to rain at this point and Rob donned his waterproof gear. An off-road climb led us to the road, which would take us to Mullion. The road was briefly interrupted by a short yet upsetting, sandy and rutted climb through a golf course.
Oscar Huckle / The Cycling Meister
The route took to the trails once again after we passed through the village, and it was more of the same rutted gravel with a beautiful heather-infested backdrop. There was one particularly rocky climb that was technically a footpath that necessitated walking and we then passed over a footbridge before being rewarded with spectacular views of Kynance Cove.
Oscar Huckle / The Cycling Meister
After a brief stint on the road, we found ourselves passing through Lizard’s village centre. We diverted off the road to check out the Lizard Point before heading back for a bite to eat.
The Lizard Point was another stunning attraction with its domineering lighthouse and the view of freight ships in the distance. By this point, the rain had also more or less stopped.
We rode back into the village and enjoyed a pasty and ice cream. With all the stopping and starting, it had taken us the best part of four hours to ride a little over 30km and with another 50km or so, we agreed to try and get a couple of hours in before stopping again. Looking at the prescribed route, potential places to stop looked few and far between so we thought if we happened to ride past a cafe or pub, we’d just stop then.
I found the next 25 miles or so to be a real slog and the route is virtually all road. It’s fairly flat-going until you reach the town of Coverack and I felt on decent form, taking a few long turns on the front to try and make up some of the distance.
Oscar Huckle / The Cycling Meister
The road descent into Coverack was particularly steep and technical and after a brief stop to check out the viewpoint, we started to make our way out of the town. We quickly saw an unpleasant sign warning of a steep uphill gradient and we winched our way up the unpleasant climb.
The gradients would prove to never be quite as steep as the climb out of Coverack as we began to traverse our way around the Helford River. Although it was all road-based, this section was quite tedious and up-down.
Oscar Huckle / The Cycling Meister
We pushed on until we reached Gweek, where we stopped for a coffee and cake. Rob also brought a Kernow cake, which looked the size of a brick, as an additional fuel reserve should we need it. Although the coffee wasn’t the best quality, a coffee and cake came in at £2.50 – bargain of the ride!
The climb out of Gweek was another unpleasantly steep one and after 25 miles or so of road, I thanked the Cycling UK gods for introducing a brief gravel track with a ford crossing before an excellent wooded section.
Oscar Huckle / The Cycling Meister
Our fun was briefly interrupted by an impassable bridge and Rob decided to circle back whereas I crossed the stream running underneath and surprise, surprise, managed to stick one of my shoes in the water.
After a muddy climb, we reached the village of Constantine where Rob stopped at a shop to buy some water and we then carried on towards Longdowns. I was quite ready to call it a day at this point and the last couple of climbs up to Longdowns were far from my best moments.
Oscar Huckle / The Cycling Meister
I looked at my Garmin once we had reached the end of today’s route and saw we were 180m up high. This was going to be fun in the morning…! The descent into Penryn was long and steep and after passing through an industrial park and the town centre, we arrived in Falmouth. Rob’s Hammerhead chucked another unpleasant climb at us, which we later discovered proved unnecessary.
We then started to look for the Jacob’s Ladder Inn, which would be our B&B for the night. A work colleague of mine who studied at Falmouth warned me the B&B had this name for a reason and the ‘ladder’ would be a long set of steps. He wasn’t wrong and when we saw the steps we’d have to scale, we decided to carry on riding up the road and take the long way around, up yet another climb, to reach our destination.
We reached the B&B and after a well-needed shower, it transpired the hotel had stopped serving food. After a quick WhatsApp message for food recommendations in Falmouth to my colleague, we headed to The Gurkha for excellent Nepalese cuisine that was far more substantial than last night’s disappointing fish and chips. We washed it down with a beer at the Beerwulf, a pub based in a book shop.
Day 2 was expectedly tough and the highlights were certainly the first 30km up to the Lizard Point. The 25 mile road drag was tedious though.
Although we rode around the Helford river, if it’s open and running and you can spare the cash, I’d recommend taking the ferry diversion Cycling UK suggests at Helford. You’re really not missing much riding around the river and your legs will thank you for it, although your wallet might complain a little. I was reading on a West Kernow Way Facebook group that the ferryman charges around £20 per passenger per crossing, which is rather a lot!
Total distance: 86.4km
Total elevation: 1,582m
Day 3
After a decent sleep but not as restorative as the night before, we got the bikes ready before breakfast and sat down to eat just after 8am. I didn’t feel 100% and felt as if I had the beginnings of a cold coming but this could equally have been the result of two full-on days.
We needed to finish the route and be back at Bristol Temple Meads station for before 8pm for Rob’s train. Taking into account how long the first two days had taken us and estimating a five hour journey back with stops, we had our work cut out! Rob suggested editing the route down but this isn’t in the spirit of bikepacking and I was confident we could get it done.
The ride up the hill to Longdowns made for a particularly depressing start, my legs refusing to spring into action. Once we hit the official route, after a handful of lanes, we hit the first extended off-road section of the day through grass and mud. My legs still refused to wake up, although Rob was on fine form.
Oscar Huckle / The Cycling Meister
However, this soon changed as unluckily for Rob, last night’s Nepalese came back to haunt him. I rolled on and finally started to find a bit of form. When Rob caught up, we passed a rather picturesque reservoir before hitting the lanes again, which remained undulating in true Cornish fashion.
This then turned into a heather-infested off-road trail and after a bit of a dicy 180-degree turn almost back on ourselves, we hit the Mining Trails. This is a 37.5 mile network of trails that span the towns of Redruth and Camborne and are also popular with walkers, horse riders and mountain bikers.
Oscar Huckle / The Cycling Meister
This was a real highlight of the day and I’d love to revisit this section to explore it in further detail.
The route predominantly sticks to these trails up to Portreath, with a few faster roads thrown in for added variety. Although only 40km in and feeling strong, Portreath seemed like the sensible place to stop for lunch.
We quickly found a bakery and we both had a steaming hot pasty each – this may have been the pasty of the trip for me and the beef was excellent quality.
Oscar Huckle / The Cycling Meister
The route out of Portreath was tranquil and after passing through a modern estate, we quickly hit the mining trails again. Annoyingly, my form seemed to have disappeared again and I was back to square one, really struggling in places. I can only think this was down to the sizeable lunch.
We passed the picturesque Carn Brea and the off-road sections started to become more rugged, yet still undulating as we left the Camborne area. I was really running on fumes and getting quite frustrated with myself. I’d eaten and drunk a fair amount and had kept topping myself up, so there should be no reason for this lack of performance.
This carried on for a couple of hours or so and I then miraculously found some form again. At one point heading through a village, we passed two other rides on hybrid bikes, embarking on the West Kernow Way. They would prove to be the only riders we would come across on the whole trip, compared to the many cyclists I came across every day on the King Alfred’s Way.
Oscar Huckle / The Cycling Meister
This part of the route generally felt more jurassic in landscape and I knew we couldn’t be too far away from the finish once the Angarrack railway viaduct came into sight.
We rode down a particularly hairy descent which I remember feeling relieved I didn’t have to climb on the way down and we crossed a footbridge over a river. The route advised us to head straight across but this wasn’t an option.
After a few minutes of finding our bearings, we followed the path in either direction but this would lead away from the route. This was another routing faux pas and we crossed back over the footbridge and up the bastard climb. Rob routed us on the road through St Erth, where a closed road looked like it may put pay to the day but the builders kindly let us through.
Ten or so kilometres added to the route, we found ourselves back on course and heading for the finish at Marazion. The last 5km felt noticeably flatter and we reached the end at Marazion, with the view of St Michael’s Mount in the distance.
Robert O’Keefe / The Cycling Meister
After some obligatory photography, we rode the couple of kilometres back to the Sainsbury’s car park in Penzance and made our journey homeward bound, Rob making it for his train in good time.
Day 3 was a noticeably flatter but perhaps the most varied route of the three days, with no annoying extended road sections to deal with. My performance was strange and I haven’t suffered on the bike as I did in places here in many a year. I’d love to head back and explore more of this beautiful area and the Mining Trails were easily the highlight of the day.
Total distance: 93.7km
Total elevation: 1,384m
West Kernow Way reflection
Oscar Huckle / The Cycling Meister
The West Kernow Way proved an excellent bikepacking trip and the route mostly delivers on its picturesque settings and landmarks. There’s certainly a lot more road than King Alfred’s Way though, which I didn’t expect, and this is why a gravel bike with wide clearances makes for the best option because it’ll be hard-going on a mountain bike. This is especially true of the numerous gates or obstacles to negotiate, where the extra weight of a mountain bike would be a hindrance.
The highlight of the trip was probably riding around The Loe on Day 2, despite it not being as large an attraction as other landmarks on the trip.
Choosing to ride the route in three days was the perfect decision, because bar the last day, we got to explore the surroundings at our own pace and truly appreciate the Cornish sights. You could do it in two days if you missed the various stops the route takes you on but you’d be in for an unpleasantly undulating mid-section.
Oscar Huckle / The Cycling Meister
Overall, I’d say I found the King Alfred’s Way a more challenging route. The hardest climb of the West Kernow Way is undoubtedly the rocky ascent on the first day at the beginning of the Cape Cornwall off-road section after Land’s End. There’s a good three or four climbs that are more challenging on the King Alfred’s Way but what saps your energy on this bikepacking route is the sheer undulation.
Penzance makes for a good start to the route as you’ll have the flattest day at the end, and there’s good amenities for picking up supplies and car parking.
I thoroughly enjoyed my time and I’m looking forward to planning my next adventure.
+ Uses the same frame technologies as the Endurace CF SLX + Far from an endurance slouch + Well-specced for the asking price
– Stock wheels hold the bike’s true potential back – Binary-feeling Shimano disc brakes
£2,699 / €2,799 / $3,699
Canyon’s Endurace is a staple of its genre. Launched back in 2016, this second-generation Endurace represented the German brand’s first disc-brake equipped endurance road bike.
The model is still going strong if not a little long in the tooth, and Canyon announced an updated Endurace in 2022. It supersedes this generation which features clearance for up to 700x35mm tyres and mounting points on the top tube. However, the second-generation CF SL 8.0 is what I am reviewing.
Rather than resorting to additional comfort measures such as Specialized’s FutureShock or Trek’s IsoSpeed, Canyon instead focus on introducing flex into the frame to deliver its all-day comfort. After all, the clue is in the Endurace’s name – rather than riding like a sofa, it needs to be able to be pushed too in a race scenario.
This is the CF SL variant. Sitting above this frameset is the top-flight SLX, which receives Canyon’s top-end carbon layup and will therefore be lighter and stiffer.
This CF SL 8.0 is equipped with a full Shimano Ultegra R8020 groupset and DT Swiss E 1800 wheels.
Oscar Huckle / The Cycling Meister
The bike has an unassuming appearance, cutting a neat aesthetic and eschewing frame features such as dropped seatstays, that many manufacturers are hell-bent on including. The seat tube is an interesting tube shape, with a slightly aerodynamic profile where the rear tyre meets it.
There’s even some colour on show on this particular sample – not all Canyon’s have to be black on black!
Canyon Endurace CF SL 8.0 Disc geometry
Oscar Huckle / The Cycling Meister
Canyon offers a broad range of sizes for the Endurace CF SL, starting from 3XS to XL. The brand doesn’t size conventionally so it’s worth paying close attention to the geometry chart before purchase.
I am 180cm and tested a medium – Canyon advises a 178 to 184cm height range for this size.
The head tube angles range from 70 to 73.25 degrees across the range, but seat tube angles are fixed at 73.5 degrees. This size medium has a 73 degree head tube angle with a 382mm reach and 578mm stack. It also features 415mm length chainstays.
This is on the racier end of the endurance bike spectrum. Compared to Trek’s latest Domane, that sees a 591mm stack and 377mm reach with 420mm chainstays. But the Endurace isn’t quite as race-oriented as Trek’s Emonda which features a 386mm reach, 541mm stack and 410mm chain stays.
Canyon Endurace CF SL 8.0 Disc performance
Oscar Huckle / The Cycling Meister
The Endurace CF SL 8.0 was tested over four days and just over 200 miles in south east Sardinia, including two 75 mile rides.
I found the Endurace to ride on the firmer side for an endurance bike – as the name suggests, it has a racing edge to it and you can certainly feel the Ultimate’s pedigree with its lightweight feel.
When the gradient points up, the Endurace is a steady climber but it doesn’t egg you on (a wheel upgrade would give this build a more urgent climbing feel but more on that later).
The Endurace is a steady and sure-footed descender, offering a planted but not overly exciting feel. It doesn’t encourage you to really rail it into corners or switchbacks like the Ultimate.
The Endurace offers a quiet ride and I couldn’t detect any cables rattling. There’s a cable tie system in place in between the two down tube bottle cage bolts which cinch the cables and hoses together during the build to prevent any unwanted rattles.
While it’s often an involved process to tie them all down (as you have to carefully hook the cable tie around the cables in a very small space), it’s an effective solution on this bike.
If you’re ever changing your outers, you’d be wise to use an internal cable routing kit to guide the new outer through the cable tie to prevent having to install a new one.
I couldn’t elicit any toe overlap on the size medium tested.
Groupset performance
Oscar Huckle / The Cycling Meister
The Endurace CF SL 8.0 is equipped with a Shimano Ultegra R8020 groupset, which I found to be disappointing. I have ridden the R8000 (mechanical with rim brake) and R8070 (hydraulic disc, electronic shifting) variants and while I’ve been impressed with the Di2 platform, the mechanical shifting and hydraulic brakes have some quirks.
The R8020 levers felt bulbous in the hand compared to the svelte R8000 and R8070 variants. The shifting was spot-on and light in feel due to the carbon construction of Ultegra’s levers. That said, despite the chain being lubed with Smoove and being well set-up, the drivetrain was quite noisy on the Endurace. This could be a chain line issue.
Canyon specs a 52/36 chainset and 11-32 cassette. Most endurance bikes rely on a compact 50/34 chainset but the 52t affords you a harder descending gear, which came in handy in the Sardinian mountains where I tested the bike. The 11-32 cassette offers a wide range and will suit most riders, although I find the jumps to be on the larger side, bearing in mind that R8020 is 11-speed.
My personal preference would be for an 11-30, which offers a slightly tighter gear ratio and smaller shifts between gears, but that said, I certainly got to make friends with the 32t cog on some of the climbs.
Oscar Huckle / The Cycling Meister
The braking felt binary and often induced rotor rub, which is a notable problem on this generation of Ultegra. Ultegra and its top-flight brother, Dura-Ace, use Freeza rotors, which Shimano says helps cool down the rotor quicker after prolonged braking.
While this may be the case, the rotors look more of a fashion piece with their futuristic aesthetic and I believe they use a slightly softer alloy, which is why they are more prone to rub.
I rode a Trek Emonda SL 5 earlier in the year which came furnished with a Shimano 105 R7020 groupset and although the brakes were binary, the RT70 rotor was pretty quiet, as it forgoes Freeza technology.
Wheels and tyres
Oscar Huckle / The Cycling Meister
The CF SL 8.0 runs on DT Swiss E1800 Spline wheels with a 23mm rim depth, 24mm external and 20mm internal rim width. The wheels spin on the brand’s 370 hubs, which use a 3-pawl system rather than the brand’s signature Ratchet EXP.
The wheels run well and are a reliable pick, but they’re heavy and would make for an ideal set of winter wheels. Upgrading the wheels would be my first recommendation to reduce the rotating weight and that would really unlock the Endurace’s potential.
Despite the weighty wheels, at least Canyon spec Continental Grand Prix GP5000’s out the box, which are my favourite road summer tyre. Extra kudos for speccing them in a 700x28mm width. Their grip is exemplary and they offer a fast and comfortable ride.
This particular sample came with a Vittoria Zafiro fitted on the rear, which offers opposite qualities to the GP5000 and is a cheap and heavy option that lacks grip. I’d recommend sticking with the GP5000’s.
Finishing kit
Canyon use DT Swiss’ ever-reliable RWS thru-axles with Canyon branding and they worked flawlessly. The levers have a removable handle, allowing you to either use the lever to remove and install the axle or you can remove the lever for a cleaner look and use a 6mm hex key.
The Canyon-branded Ergon VCLS seatpost is perhaps the greatest factor that delivers the Endurace’s comfort. You’ll want to take set-up into account with its flexing nature and you’ll want to consider the size you go for carefully so you can have enough exposed seatpost to really reap the benefit.
Oscar Huckle / The Cycling Meister
The seatpost clamp design is borrowed from the Ultimate – adjustments are made to a 4mm hex bolt that is positioned to the rear of the seatstay junction. Be sure to use a high-quality torque wrench and apply carbon fibre grip to the seatpost.
Oscar Huckle / The Cycling Meister
The Fizik Argo saddle was horrific and would be the first item to be swapped out if this was my bike. This was my first time riding an Argo and the shape looks particularly agreeable to me, as it is Fizik’s take on a short-nose saddle and I really get on with the Specialized Power. But alas, this saddle was just not for me.
The handlebar and stem were Canyon branded items, with the bars a 42cm width and the stem 100mm. I prefer a narrower 40cm bar as my arms feel a little splayed out on a 42cm, but this is personal preference and a 42cm is a safe option for a medium sized frame.
The Endurace uses Shimano’s BB86 press-fit bottom bracket standard, which is one of my preferred systems and it was creak-free on the Endurace.
Canyon Endurace CF SL 8.0 Disc bottom line
Oscar Huckle / The Cycling Meister
Canyon’s Endurace does what it says on the tin – it’s an endurance bike with a racier edge. For this reason, it’s not as comfortable as some of its competitors which offer armchair-like comfort. But it’s not aspiring to be at this level. This particular CF SL 8.0 build comes pretty sorted out of the box and with an upgrade in wheels, you would have yourself a pretty sweet ride.